How to Make a Halloween Candy Bag: Step-by-Step DIY Guide
Emily
Ready to get creative this halloween? You can learn how to make a halloween candy bag right at home. Grab some simple supplies and start crafting a bag that matches your style. This project works for any age. You can add your own decorations and make it as unique as you want. Your bag will hold up all night and look festive too. Let’s make this halloween extra fun with a homemade touch!
Key Takeaways
Collect things like fabric or paper to make a strong Halloween candy bag.
Pick your fabric carefully; cotton canvas lasts long for bags you can use again.
Use easy tools like scissors, glue, and markers to make your bag.
Cut your fabric or paper to the right size, about 12 inches wide and 14 inches tall.
Put your bag together by sewing or gluing, and make sure the seams are strong.
Add soft handles so you can carry your bag easily when trick-or-treating.
Make the handles and corners stronger so they do not tear.
Decorate your bag with paint, stickers, or felt shapes to make it special.
Materials for Halloween Treat Bags
Before you start making your halloween candy bag, you need to gather the right materials. You can choose from fabric or paper options, and you probably have many of these supplies at home. Picking the right materials helps your bag last through a night of trick-or-treating and look extra festive.
Fabric Options
If you want a reusable bag, fabric is a great choice. Cotton canvas works well because it’s strong and easy to sew. You can use lightweight or heavy canvas, depending on how much candy you plan to collect. Most bags need less than a yard of fabric, so you don’t have to buy much.
Here’s a quick look at some popular fabric types for halloween treat bags:
Bag Type
Fabric Type
Weight
Features
ECO TOTE BAG
100% lightweight cotton canvas
6 oz.
Size: 16″ tall x 15″ wide, 3″ gusseted
PREMIUM TOTE BAG
100% natural heavy cotton canvas
12.0 oz
Size: 15″ tall x 15″ wide, reinforced handles
DRAWSTRING BACKPACK
100% natural colored cotton canvas
N/A
Size: 14″ wide x 17″ tall, drawstring closure
Tip: Choose a heavier canvas if you want your bag to hold a lot of candy. Lighter fabric works for smaller bags or younger kids.
You can also use felt, which is easy to cut and doesn’t fray. Felt comes in lots of colors, so you can make your bag match any halloween costume.
Paper and No-Sew Options
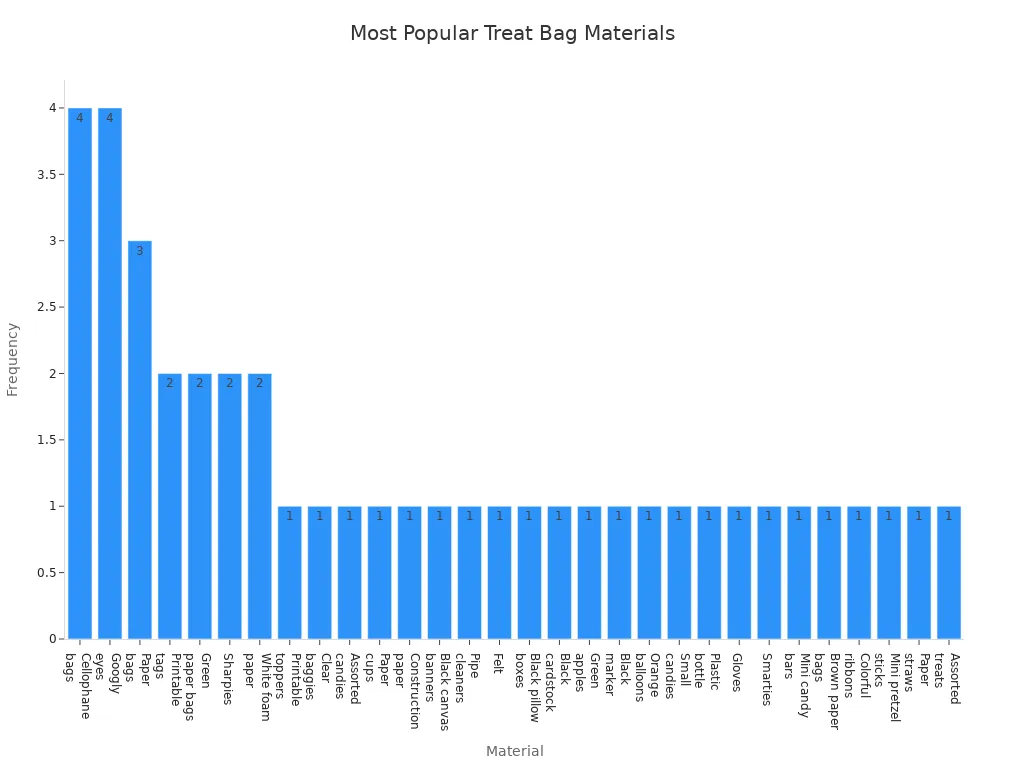
Paper bags and no-sew crafts are perfect if you want a quick project or plan to make bags with kids. Brown paper bags, colored paper, and cellophane bags are all popular choices. You can decorate them with markers, googly eyes, or stickers for a fun halloween look.
Check out some of the most popular materials for homemade treat bags:
Treat Bag Idea
Materials Used
Oogie Boogie Treat Bags
Green paper bags, Sharpies, white foam paper
Personalized Cellophane Bags
Cellophane bags, printable tags, ribbons
Black Cat Treat Holders
Black canvas banners, googly eyes, pipe cleaners, felt
Bat Boxes
Black pillow boxes, black cardstock, googly eyes
Easy Paper Bags
Brown paper bags, googly eyes
Pretzel Broomstick Treats
Mini pretzel sticks, cellophane bags, paper straws
Note: Most paper bags and cellophane bags are easy to find at craft stores. You can make a batch of halloween treat bags in no time.
Tools Needed
You don’t need fancy tools to make a halloween candy bag. For fabric bags, grab some scissors, a fabric pen or chalk, and sewing pins. If you want to sew, you’ll need a needle and thread or a sewing machine. For no-sew or paper bags, just use glue, tape, and markers.
Here’s a handy list to get you started:
Scissors (for fabric or paper)
Fabric pen or tailors chalk
Sewing pins or safety pins
Glue or double-sided tape (for no-sew bags)
Markers, Sharpies, or paint
Ruler or measuring tape
Tip: Use a rotary cutter and cutting mat for straight edges if you have them. These tools make your bag look neat and professional.
With these materials and tools, you’re ready to start your halloween treat bag project. Pick your favorite supplies and let your creativity shine!
How to Make a Halloween Candy Bag
Cutting and Preparing Materials
Ready to start your project? The first step in how to make a halloween candy bag is to cut and prepare your materials. Choose your favorite fabric or paper. Lay it flat on a table. Use a ruler or measuring tape to mark out the size you want. Most people like a bag that is about 12 inches wide and 14 inches tall. This size holds plenty of treats but is still easy to carry.
If you use fabric, grab your scissors and cut two rectangles the same size. For paper bags, you can use pre-made bags or cut colored paper into the shape you want. Felt works great for no-sew bags. It does not fray, so you can cut fun shapes like pumpkins or ghosts.
Tip: Draw your design with chalk or a fabric pen before you cut. This helps you get straight lines and the right size.
Now, gather your handles. You can use ribbon, rope, or even strips of fabric. Cut two pieces, each about 16 inches long. These will become your bag’s handles.
Assembling the Bag
Now it’s time to put your bag together. If you want to sew, place the two fabric rectangles together with the good sides facing in. Pin the edges to keep them lined up. Sew along the sides and bottom, leaving the top open. Turn the bag right side out. You now have the basic shape!
For a no-sew method, use fabric glue or double-sided tape. Stick the edges of your fabric or felt together, again leaving the top open. Press down firmly so the glue holds. If you use paper, fold the sides and bottom, then tape or glue them in place.
Making a halloween candy bag does not take long. You can finish the whole project in just a few minutes from start to finish. This means you can make several bags for friends or family without spending all day crafting.
Note: Always check that the seams or glued edges feel strong. You want your bag to hold up during trick-or-treat and keep all your treats safe.
Adding Handles
Handles make your bag easy to carry, especially when it starts to fill up with treats. Here’s how to make a halloween candy bag with sturdy handles:
For fabric bags, fold the top edge down about an inch and sew a hem. This makes the opening neat and strong.
Pin each end of your handle to the inside of the bag, about two inches from each side. Sew them in place with a few stitches back and forth.
For no-sew bags, use strong glue or tape to attach the handles. Press down and let them dry before you use the bag.
If you use paper bags, punch two holes near the top on each side. Thread ribbon or string through the holes and tie knots to keep them in place.
When you pick handles, look for straps that feel comfortable in your hand. Inspect straps and handles for strength and comfort. Check the material quality to make sure it can handle rain, rough handling, and the weight of your treats.
Tip: Reinforce the spots where you attach the handles. Add extra stitches or a bit more glue for extra strength.
You now know how to make a halloween candy bag from start to finish. These step-by-step instructions help you create a bag that is both fun and practical. Your bag will be ready for all the treats you collect on halloween night!
Reinforcing for Durability
You want your halloween candy bag to last all night, right? Nobody likes a ripped bag with treats spilling everywhere. Let’s make sure your bag can handle every trick-or-treat adventure. You can use a few simple tricks to make your bag extra strong, whether you sew or use glue.
Here’s a step-by-step way to reinforce your bag if you’re sewing:
Pin the entire top edge of your bag. Make sure the edges line up and the straps poke out just a bit.
Stitch along the top edge. Use a 1/4-inch seam allowance so you catch both strap ends in the stitching.
Pull the lining out of the main bag. Turn it right side out through a small opening at the bottom of the lining.
Stitch the lining opening shut. Stuff it back inside the main bag.
Press the top edge flat. Edgestitch around the top edge to finish and make the straps even stronger.
If you’re making a no-sew halloween bag, don’t worry! You can still make it tough. Use extra glue or double-sided tape along the seams. Press the edges together for a few seconds so the bond sets well. For paper bags, reinforce the handles by adding a strip of tape where the handles attach. You can also glue a second layer of paper inside the bag for extra support.
Tip: Always check the corners and handle spots. These areas get the most stress, so add a little extra stitching or glue there.
Want your halloween bag to last for more than one year? Store it flat in a dry place after the holiday. If you use fabric, you can even wash it and reuse it next halloween. A sturdy bag means more treats and less worry!
Halloween Trick or Treat Bag Sewing Guide
Cutting Fabric
You’re about to start your halloween trick or treat bag, so grab your fabric and let’s get cutting. For most bags, you want two pieces of fabric, each measuring about 15 inches by 14 inches. This size gives you plenty of room for treats but stays easy to carry. If you want your bag to stand up straight, use fusible fleece between the layers. Lay your fabric flat, measure carefully, and mark your lines with tailor’s chalk or a fabric pen. Cut along the lines with sharp scissors. If you want to add a design, like a pumpkin or ghost, now is the time. You can use machine embroidery or appliqué before you sew the pieces together. Some people like to use contrasting fabrics for the front and back. That makes your bag pop and look extra festive for halloween.
Tip: Double-check your measurements before you cut. A straight edge helps your bag look neat and professional.
Sewing Seams
Now you’re ready to sew the seams. Place the two pieces of fabric right sides together. Pin them along the edges so they don’t slip. Start by sewing the sides and bottom with a straight seam, using a 1/4-inch seam allowance. If you’re new to sewing, a patchwork foot helps you keep your lines straight. Press the seams with an iron to set them and open them up. If you want to add a lining, pin it to the outer fabric and sew around the edges, leaving a small hole at the bottom. After sewing, clip the corners so your halloween trick or treat bag turns out crisp. Turn the bag right side out through the hole. Use your hands to smooth the lining inside. Stitch the hole closed with an edgestitch foot. This easy sewing tutorial makes your bag sturdy and ready for treats.
Note: Ironing your seams makes the bag look finished and helps it hold its shape.
Attaching Handles
Handles make your halloween trick or treat bag easy to carry. Cut two strips of fabric, each about 16 inches long and 2 inches wide. Fold each strip in half lengthwise, then sew along the edge. Turn the strips right side out and press them flat. Pin the ends of each handle to the inside top edge of your bag, about two inches from each side. Sew them in place with several stitches back and forth. If you want a super simple option, use Velcro for the handles. Velcro is easy to sew and works great for beginners. You can also use ribbon or rope for a quick finish. Make sure the handles feel strong and comfortable in your hand. Your halloween treat bag is almost ready for trick-or-treating!
Tip: Reinforce the handle area with extra stitches or a small patch of fabric. This keeps your bag strong all night.
This tutorial gives you a simple way to make a halloween trick or treat bag. You can finish your project quickly and enjoy a custom bag for your halloween adventure.
Finishing Touches
You’ve sewn your Halloween bag and attached the handles. Now it’s time to make your bag look polished and ready for a night of trick-or-treating. The finishing touches can make your bag stand out and last longer.
Start by checking all the seams. Run your fingers along the edges to feel for any loose threads or spots that need extra stitching. If you see any, grab your needle and thread or sewing machine and reinforce those areas. This step keeps your bag strong, even when it’s full of candy.
Next, focus on the raw edges of your fabric. Raw edges can fray over time, especially if you use your bag year after year. You have several easy ways to stop fraying and give your bag a neat look. Here’s a quick guide to popular finishing techniques:
Technique
Description
Pinking Shears
Cuts the fabric edge with a zigzag pattern to reduce fraying.
Zigzag Stitch
A stitch along the raw edge that secures it and prevents unravelling.
Double-Fold Hem
Folds the raw edge under twice, completely enclosing it to prevent fraying.
Binding with Bias Tape
Wraps a strip of fabric around the raw edge, encasing it and adding style.
Overlock or Serger Finish
Uses a serger to trim and stitch the edge in one step for a strong finish.
Tip: If you don’t have a serger, try pinking shears or a zigzag stitch. Both work well and are easy for beginners.
After you finish the edges, press your bag with an iron. This step flattens the seams and gives your bag a crisp, professional look. Be careful with the heat setting, especially if you used felt or decorations that might melt.
Now comes the fun part—personalizing your bag! You can sew on felt shapes like pumpkins, bats, or ghosts. Use fabric paint or markers to add your name or a spooky message. Try gluing on googly eyes, buttons, or patches for extra flair. If you want your bag to shine at night, add reflective tape or glow-in-the-dark paint.
Here are a few ideas to make your bag unique:
Stitch on a ribbon border for a pop of color.
Attach a small bell or charm to the handle.
Use fabric scraps to create a patchwork design.
Remember: The best Halloween bags show off your creativity. Don’t worry about making it perfect. Have fun and make it your own!
Once you finish these steps, your Halloween trick or treat bag will look amazing and hold up all night. You’ll feel proud carrying a bag you made yourself!
Easy No-Sew and Paper Halloween Treat Bag
Looking for a fast and fun way to make Halloween treat bags? You don’t need a sewing machine or fancy tools. You can use paper, glue, and a few simple supplies to create awesome bags that everyone will love. These crafts work great for kids, families, or anyone who wants a quick project before trick-or-treat night.
Paper Bag Method
Paper bags make the perfect base for easy Halloween treat bags. You can grab brown lunch bags, colored paper bags, or even small gift bags. Decorate them with markers, stickers, or cut-out shapes. Try drawing pumpkins, bats, or spooky faces right on the bag. Want to get more creative? Check out these popular no-sew designs families love:
Sticky Spiderweb Halloween Treat Bag: Use Velcro and add plastic spiders for a creepy effect.
DIY Silhouette Halloween Treat Bags: Iron-on adhesive lets you add fun shapes like cats or witches.
Custom Stenciled Halloween Treat Bags: Use stencils and paint to make your own designs.
DIY Glow in the Dark Halloween Treat Bags: Paint with glow-in-the-dark colors for extra fun at night.
Halloween Treat Bags Made from Reusable Totes: Decorate old totes with Halloween stickers or fabric shapes.
Tip: Let kids help with decorating. They can use their imagination and make each bag unique.
Ghost and Glove Bags
Ghost and glove bags look spooky and cute at the same time. You can make them with just a few supplies. Here’s what you need:
Ghost Treat Bags Materials
Glove Treat Bags Materials
Scrap pieces of paper
Disposable gloves
Glue (non-toxic) or sewing machine
Twist ties
Copy paper or cardstock
Monster printable
Candy
To make a ghost bag, crumple some scrap paper into a ball and wrap it with a white napkin or tissue. Tie it at the neck with string or ribbon. Draw a ghost face with a marker. For glove bags, fill clear disposable gloves with candy. Use twist ties to close the top. Add a monster printable or draw faces on each finger for a silly touch.
Note: These bags are perfect for parties or classroom treats. Kids love making and sharing them!
Witch’s Broom Bags
Witch’s broom bags bring a magical twist to your Halloween. You can make them with brown paper lunch bags and a wooden dowel. Here’s how you do it:
Cut one brown lunch bag into strips, almost to the bottom. Cut a second bag halfway into strips.
Place the smaller bag inside the larger one. The strips from the bigger bag will look like broom bristles.
Slide a wooden dowel into the open end of the bags.
Fold the top edges of the bags over the dowel. Secure everything with a Halloween ribbon. Tie it tight so the broom holds together.
Adjust the ribbon and strips to make it look neat. Fill the broom with treats if you want.
Tip: Use orange or purple ribbon for a festive look. These bags make great party favors or decorations.
You can finish any of these bags in less than 30 minutes. They’re perfect for last-minute crafts or when you want to make a bunch for friends. Try different colors, faces, and decorations to match your Halloween style. Your homemade treat bags will stand out on trick-or-treat night!
Decorating Your Halloween Bag
You have your Halloween bag ready. Now it’s time to make it stand out! Decorating your bag is the best part. You can use paints, markers, felt, stickers, and even add your name. Let’s look at some easy and safe ways to make your bag festive and fun.
Paints and Markers
Paints and markers let you add bright colors and cool designs to your bag. You can draw pumpkins, bats, or even your favorite monster. If you want your bag to glow at night, try glow-in-the-dark paint. Kids love seeing their bags light up on Halloween!
Here are some safe and popular choices for decorating bags:
Permanent markers (great for bold lines)
Acrylic paint in lots of colors
Glow-in-the-dark paint for spooky effects
Fabric medium to help paint stick to cloth bags
If you want something even easier, try paint sticks or special markers made for kids. Some good options include:
Tip: Always let paint dry before you touch your bag. If you decorate with young kids, use washable markers or non-toxic paints. Cover your work area with newspaper to keep things clean.
Felt and Stickers
Felt and stickers make decorating simple and mess-free. You can cut felt into shapes like ghosts, cats, or candy corn. Glue them onto your bag for a soft, colorful look. Stickers are quick and easy. Just peel and press them on. You can find Halloween stickers at most craft stores.
Here’s a quick table of ideas:
Decoration Type
How to Use It
Safety Tip
Felt Shapes
Cut and glue onto bag
Use non-toxic glue
Stickers
Peel and stick
Avoid small stickers for toddlers
Googly Eyes
Glue for a silly face
Supervise gluing with young kids
Note: Always check that decorations are secure. Loose pieces can be a choking hazard for small children.
Personalization Ideas
Personalizing your Halloween bag makes it special. You can add your name, a spooky phrase, or even a pocket for extra treats. Try these fun ideas:
Embroider your name or “Trick-or-Treat” for a polished look.
Sew on fabric appliqué shapes like pumpkins, witches, or ghosts.
Add glow-in-the-dark threads or decals for nighttime fun and safety.
Attach a themed pocket for glow sticks or small toys.
You can mix and match these ideas. Use your favorite colors and shapes. Make your bag match your costume or your favorite Halloween character.
Remember: Always use safe, non-toxic materials. Let an adult help with scissors, hot glue, or sewing. Have fun and show off your creativity!
Now your Halloween bag is ready to shine. You’ll have the coolest, most unique bag on the block!
Tips for Sturdy and Festive Bags
Material Choices
You want your Halloween bag to last through a night of collecting treats. Picking the right materials makes a big difference. Some materials work better than others for holding lots of goodies and staying strong. Here are some top choices you can use:
Paper or fabric bags give you a classic look and feel.
Plastic treat bags are lightweight and easy to clean.
Burlap bags add a rustic touch and hold up well.
Fabric bags, like cotton or canvas, are sturdy and reusable.
Paper bags work for quick crafts and light treats.
You can also grab scissors, glue, and markers to decorate your bag. Halloween-themed decorations like googly eyes, spiders, or faux blood make your bag stand out. Try mixing materials for a unique style. If you want a bag that lasts for years, fabric or burlap is your best bet.
Tip: Choose thicker fabric or double-layer paper if you expect to carry heavy treats. This helps prevent rips and keeps your bag looking great all night.
Reinforcement Techniques
You want your bag to stay strong, even when it’s packed with treats. Reinforcing your bag is easy and helps avoid accidents. Here are some simple ways to make your bag tougher:
Add extra glue or tape along the seams for paper bags.
Sew a double row of stitches on the handles for fabric bags.
Use patches or extra fabric at stress points, like the corners and handle spots.
For plastic bags, tie knots at the handles to keep them from tearing.
Layer two pieces of paper or fabric for extra strength.
Check your bag before heading out. Tug gently on the handles and seams. If anything feels loose, add more glue or stitches. You want your bag to survive the whole night and keep your treats safe.
Reinforcement Method
Best For
How It Helps
Double Stitching
Fabric Bags
Prevents seam splitting
Extra Glue/Tape
Paper Bags
Stops edges from tearing
Patches
All Bag Types
Strengthens weak spots
Note: Reinforcing the handle area is super important. That’s where most bags break when loaded with treats.
Care and Reuse
You can use your Halloween bag year after year if you take care of it. Cleaning and storing your bag the right way keeps it fresh and ready for more treats next Halloween. Here’s how you can do it:
Empty the bag completely and sort through the treats.
Shake the bag to remove loose debris.
Mix warm water with a laundry sheet for a gentle cleaning solution.
Spot clean stains with a damp cloth or sponge.
Rinse the bag to get rid of soap residue.
Lay the bag flat on a towel and let it dry all the way.
Sprinkle baking soda inside if you want to deodorize.
Store your bag in a cool, dry place to prevent mold.
If you use a fabric bag, you can wash it by hand or in the machine. Paper bags need gentle cleaning and careful storage. Plastic bags wipe clean easily. When you reuse your bag, you help the environment and save money for more treats.
Tip: Label your bag with your name and the year. You’ll remember each Halloween and keep your bag from getting lost.
Conclusion
You can make your own Halloween candy bag and have a blast doing it. Try different materials and designs. Making bags at home gives you more than just a cool treat holder. You get to:
Manage candy by setting daily limits.
Enjoy fun family time while crafting.
Use leftover candy for snacks or decorations.
Homemade bags feel special. They show off your creativity. Want custom designs or need bags in bulk? We offer OEM/ODM services and wholesale options to help you celebrate Halloween your way!
FAQ
How long does it take to make a Halloween candy bag?
You can finish most bags in 30 minutes or less. If you add lots of decorations, you might need a little more time. Quick crafts are perfect for busy families!
Can I make a candy bag without sewing?
Yes! You can use glue, tape, or even staples. Try felt, paper, or pre-made bags. No-sew options work great for kids and beginners.
What is the best fabric for a sturdy treat bag?
Cotton canvas is a top pick. It holds a lot of candy and lasts for years. Felt is also easy to use and comes in many colors.
How do I keep my bag from ripping?
Reinforce the seams and handles. Add extra glue or stitches where the bag gets heavy. Double up the fabric or paper for more strength.
Are these bags safe for young children?
Yes, if you use non-toxic glue and decorations. Avoid small parts like buttons or beads for toddlers. Always supervise kids during crafting.
Can I wash and reuse my Halloween bag?
You can wash fabric bags by hand or in the machine. Let them dry flat. Paper bags are not washable, but you can reuse them if they stay clean.
What are some fun ways to decorate my bag?
Use glow-in-the-dark paint
Add felt shapes
Stick on googly eyes
Write your name with markers
Let your creativity shine!
Table of Contents
Looking for High-Quality Flexible Packaging Solutions?
We’ve Got You Covered!