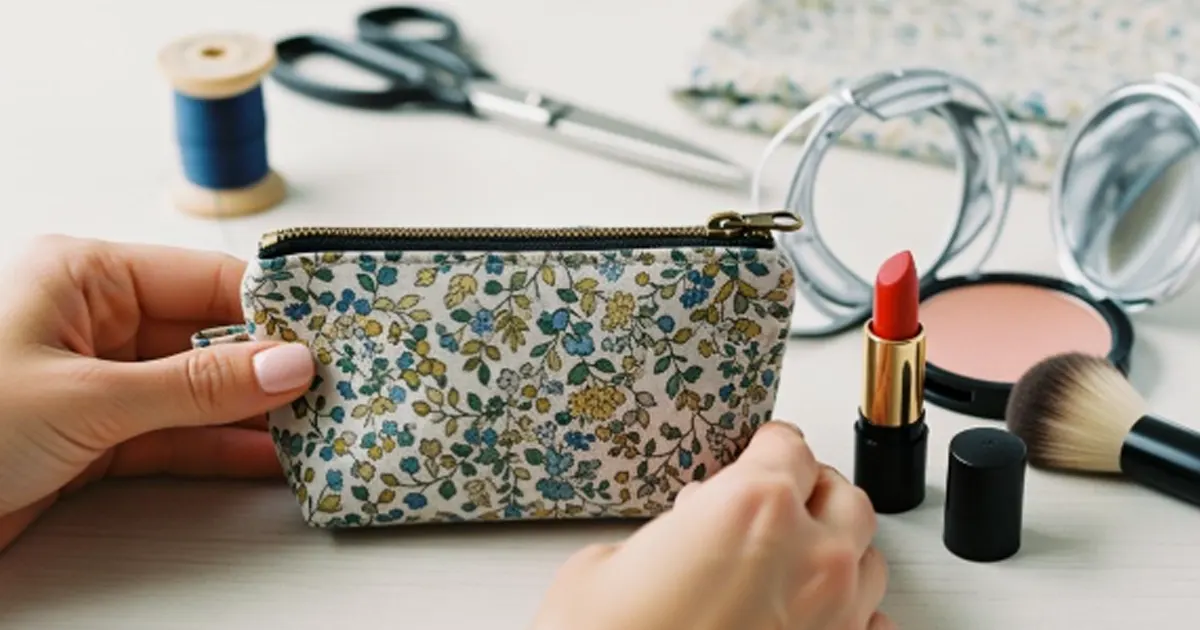
作り方について詳しく見ていきましょう 小さな化粧ポーチかわいい見た目で必需品を整理できる20分で作れるメイクアップバッグが欲しいなら、ここがぴったりです。初心者でも心配いりません。多くの初心者がこの20分で作れるメイクアップバッグを気に入っているのは、手早く楽しく作れて、新しいスキルを学ぶのに最適だからです。簡単な手順で小さなメイクアップバッグを作る方法をご紹介します。この20分で作れるメイクアップバッグは、ハンドバッグやバックパックにぴったり収まります。あなたのような初心者は、色、柄、さらにはファスナーチャームを使って、それぞれの20分で作れるメイクアップバッグをパーソナライズできます。実用的なミニポーチが欲しいですか?この小さなメイクアップバッグの作り方ガイドでは、毎日使える20分で作れるメイクアップバッグをご紹介します。完全なチュートリアルや初心者向けのソーイングプロジェクトを探しているなら、このソーイングチュートリアルは、初心者が自信を持って20分で作れるメイクアップバッグを完成させるのに役立ちます。
主要なポイント(要点)
- 20分で可愛いメイクポーチが作れます。簡単なので初心者にもおすすめです。
- バッグに合った生地を選びましょう。キルティングコットンは柔らかく、扱いやすいです。キャンバス地は丈夫で長持ちします。
- ナイロン製のコイルファスナーは縫いやすく、色も豊富なので初心者にもおすすめです。
- 布用はさみ、ピン、ミシンなどの道具を揃えましょう。これらの道具があれば、より速く、よりきれいに作業できます。
- ワッペンやチャーム、楽しいステッチなどで自分だけのスタイルを加えましょう。そうすることで、バッグが特別なものになり、あなたのセンスが伝わります。
- 生地を丁寧に採寸して裁断することで、すっきりとした仕上がりになります。こうすることで、バッグが美しくプロフェッショナルな印象になります。
- 角を箱型にすることで、バッグの形がしっかりします。こうすることで、バッグが自立し、中身をしっかり収納できます。
- バッグは優しくお手入れして、長く美しい状態を保つようにしましょう。適切な方法で保管すれば、長くお使いいただけます。
小さな化粧ポーチの作り方:材料と道具
生地と裏地の選択
ミニメイクポーチは、見た目も美しく、長く使えるものが理想です。そのためには、適切な生地を選ぶことが非常に重要です。キルティングコットンは、柔らかく、縫いやすく、色や柄も豊富なので、多くの人に選ばれています。丈夫なものがお好みなら、キャンバス地がおすすめです。フェイクスエードは手触りが柔らかく、バッグに高級感を添えてくれます。防水性を求めるなら、ナイロンやPUレザーが賢明な選択です。これらの生地は拭き取りやすく、日常使いにも耐えられます。
人気の生地とその利点を簡単に見ていきましょう。
| ファブリックタイプ | 特性と利点 | コスト範囲 |
|---|---|---|
| 600D PUコーティングナイロン | 耐水性があり、丈夫で、拭き取りも簡単です。 | 4ヤードあたり6~XNUMXドル |
| TPUラミネートキャンバス | 完全防水、柔らかく、耐久性がある | 6ヤードあたり10~XNUMXドル |
| シリコーン | 非常に丈夫で、非多孔性で、お手入れも簡単です。 | 8ヤードあたり15~XNUMXドル |
| ラミネートコットン | 柔らかくオーガニックな外観で、拭き取りやすくきれいです | 5ヤードあたり8~XNUMXドル |
| DWR加工ポリエステル | お手頃価格で撥水性 | 2ヤードあたり4~XNUMXドル |
裏地にはキルティングコットンが最適です。柔らかく、扱いやすいのが特徴です。裏地は表地と同じ色でも、対照的な色でも構いません。ミニ化粧ポーチの多くは、表地と裏地ともに約8×6インチまたは5 1/2×9 1/2インチの生地を使用しています。
適切なファスナーの選び方
バッグにぴったり合い、スムーズに開閉できるファスナーが必要です。ナイロンコイルファスナーは縫いやすく、色も豊富なので、初心者にも最適です。12~14インチ(約30~35cm)のファスナーなら、ポーチに合わせて長さを調整できます。金属製のファスナーはスタイリッシュですが、裁縫初心者には扱いが難しい場合があります。生地の色に合うファスナーを選ぶか、楽しいアクセントカラーを取り入れてみましょう。
ヒント:ファスナーの縫い方を学びたいなら、ナイロンから始めましょう。柔軟性があり、多少の失敗も許容してくれるからです。
必須の裁縫道具
このチュートリアルでは、特別な道具は必要ありません。ミニメイクポーチを作るのに必要なものは以下の通りです。
- 布用はさみまたはロータリーカッターで綺麗にカット
- 直線用のキルティング定規
- 部品を固定するためのピンまたはクリップ
- ファスナー押さえ付きのミシン(または、お好みであれば手縫いでも構いません)
- アイロンとプレス面を使って生地をパリッと保ちます
- 生地に合う万能糸
- 構造を強化するための接着芯地またはフリース
接着芯を使うと、バッグの形を保つことができます。プロのような仕上がりのポーチを縫いたいなら、接着芯を生地の裏側に接着しましょう。この工程でバッグが丈夫になり、型崩れを防ぎます。初心者の方でも、これらの道具と材料を使ってミニ化粧ポーチを縫う方法をご紹介します。
オプションの装飾
ちょっとした装飾を加えるだけで、ミニメイクポーチが特別なアイテムに早変わりします。こうしたちょっとした工夫で、バッグが際立ち、あなたの個性を表現できます。特別な技術は必要ありません。必要なのは、少しの創造力と基本的な材料だけです。
以下に、試してみる価値のある人気の装飾をいくつかご紹介します。
- アイロン接着パッチ自分のスタイルに合ったワッペンを選びましょう。バッグの前面または背面に貼り付けます。アイロンを使って貼り付けてください。ハート型、星型、かわいい動物型など、さまざまな形のワッペンが見つかります。
- 布用ペイントまたはマーカー自由にデザインを描いてみましょう。名前を書いたり、楽しい落書きを加えたりしても構いません。バッグを使う前に、絵の具が完全に乾くまで待ちましょう。
- 装飾的なステッチジグザグステッチやスカラップステッチを試してみてください。明るい色の糸を使うと良いでしょう。縁に沿って縫ったり、前面全体に縫ったりすると、クールな印象になります。
- チャームとジッパーの引き手ファスナーにチャームを付けてみましょう。気分に合ったチャームを選んでください。ビーズ、タッセル、小さなキーホルダーなど、お好みのチャームが使えます。
- ラベルとタグバッグの内側に布製のラベルを縫い付けましょう。名前や短いメッセージを書いてください。こうすることで、バッグがよりプロフェッショナルな印象になります。
ヒント:装飾を長持ちさせたいなら、接着剤ではなく縫い付けましょう。縫い付ければ、ワッペンやチャームがしっかりと固定され、毎日バッグを使っても安心です。
装飾は自由に組み合わせられます。布用絵の具とファスナーチャームを組み合わせてみたり、ワッペンと装飾ステッチを加えてみたり。可能性は無限大です。何が一番似合うかは、あなた次第です。
バッグに適した装飾を選ぶのに役立つ簡単な表を以下に示します。
| 飾り | 追加方法 | 以下のためにベスト |
|---|---|---|
| アイロン接着ワッペン | アイロンをかけるか、縫う | 手軽にスタイルアップ |
| 布用ペイント | 塗って乾かす | カスタムアートワーク |
| 装飾ステッチ | 色付きの糸で縫う | 楽しい枠線 |
| ジッパーチャーム | クリップで留めるか、縫い付ける | 簡単にパーソナライズ |
| ラベル/タグ | 内側または外側を縫う | プロフェッショナルなタッチ |
このチュートリアルを参考に、お好みの装飾を加えてみてください。もし失敗しても心配いりません。いつでも取り外したり、別のパッチや塗料で覆ったりできます。作るバッグはどれも世界に一つだけのオリジナルです。どれだけ個性を出すかはあなた次第です。
メイクポーチをリュックサックやハンドバッグとコーディネートしたいなら、似たような色やテーマを選びましょう。お揃いの装飾を施したセットを作るのもおすすめです。楽しんで、あなたの創造性を存分に発揮してください!
DIYミニボックス型メイクアップバッグ:裁断と準備
測定とマーキング
手作りのミニボックス型メイクアップバッグを、すっきりとプロっぽく仕上げたいですよね。まずは、生地のサイズを丁寧に測りましょう。定規を使って、表地と裏地の両方の寸法をマークします。一般的には7×9インチや8×6インチといったサイズが使われますが、必要に応じて調整できます。布用ペンやチョークを使って、はっきりとした線を引いてください。カットする前に、寸法をもう一度確認しましょう。失敗を避けるためにも、二度測って一度切るのがおすすめです。
ヒント:布をテーブルの上に平らに広げてください。こうすることで、縫い目が見やすくなり、布がずれるのを防ぐことができます。
表地、裏地、フリース生地の裁断
生地を裁断するのは、このDIYプロジェクトにおいて重要なステップです。すべてのピースが完璧に合うようにしたいですよね。正確な裁断を実現するためのヒントをいくつかご紹介します。
- 裏地と表地は同時に裁断しましょう。こうすることで、生地のサイズが均一になり、後々の作業時間を節約できます。
- 型紙用の重りやピンを使って生地を固定してください。こうすることで、裁断中に生地がずれるのを防ぐことができます。
- 必ず平らな場所で切ってください。こうすることで、生地が伸びたり滑ったりするのを防ぐことができます。
- 裁断する前に生地にアイロンをかけましょう。しわや折り目があると寸法が狂ってしまいます。
- 切り取った布地を重ねて、余分な端を切り落とします。こうすることで、バッグがすっきりと仕上がります。
接着芯地も用意する必要があります。これは、手作りのミニボックス型メイクアップバッグにしっかりとした構造を与えるためです。接着芯地は、外側の生地のサイズに合わせてカットしてください。丈夫なバッグを作りたい場合は、この工程を飛ばさないでください。
構造のための融合インターフェース
接着芯を貼ることで、バッグの強度が増し、形崩れしにくくなります。接着芯を貼る手順は以下のとおりです。
- 接着芯を、生地のサイズに合わせてカットしてください。
- ざらざらして光沢のある面を布地の裏側に当てます。
- アイロンの温度を、接着芯のパッケージに記載されている温度に設定してください。
- アイロンを数秒間押し付けます。持ち上げて次の場所に移動させます。アイロンを滑らせないでください。
- 生地が冷めるまで触らないでください。
注意:アイロンと接着芯の間には必ず当て布を挟んでください。こうすることで生地が保護され、アイロンも清潔に保たれます。
縫い始める前に、すべてのパーツの準備を済ませておきましょう。このステップを踏むことで、チュートリアルの残りの部分がより簡単になります。素敵なDIYバッグを作りたいなら、採寸、裁断、接着に時間をかけてください。異なる生地を選んだり、フリースを追加してよりしっかりとした作りにしたりすることで、バッグを自分好みにカスタマイズできます。DIYプロジェクトはどれも、学び、スキルを向上させるチャンスを与えてくれます。
化粧ポーチの作り方:ファスナーの取り付け方
ジッパーの取り付け
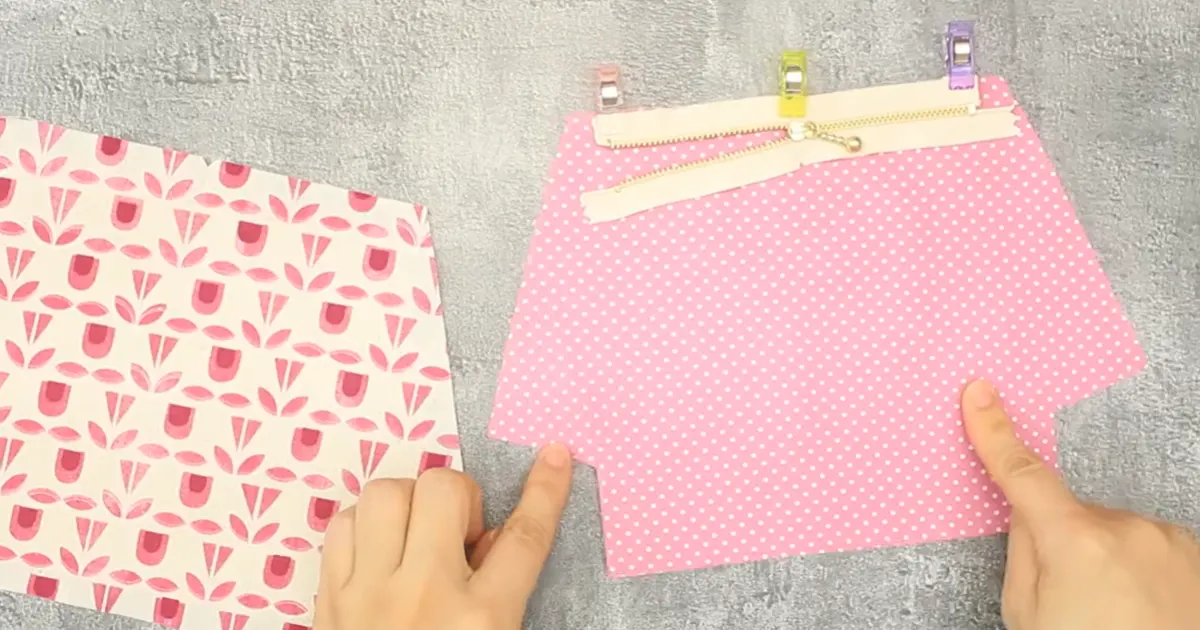
ミニメイクポーチのファスナー部分の製作に取り掛かりましょう。この工程でポーチがプロ仕様に見え、中身も安全に保管できます。表地を表側を上にして置きます。ファスナーをファスナーの引き手が下向きになるように上に置きます。上端が揃っていることを確認してください。次に、裏地を表側を下にしてファスナーの上に置きます。上端がすべて揃っていることを確認してください。縫製中にずれないように、すべてをピンやクリップで留めておきます。
ヒント:ファスナーの歯が裏地の方を向いていることを必ず確認してください。こうすることで、後でバッグをひっくり返したときにファスナーが正しい位置に留まります。
きれいに仕上げたい場合は、ファスナーの両端に約1.9cm(3/4インチ)ほど縫い残しておきましょう。この隙間があることで、縫製ミスを防ぎ、後で角を箱型に仕上げやすくなります。
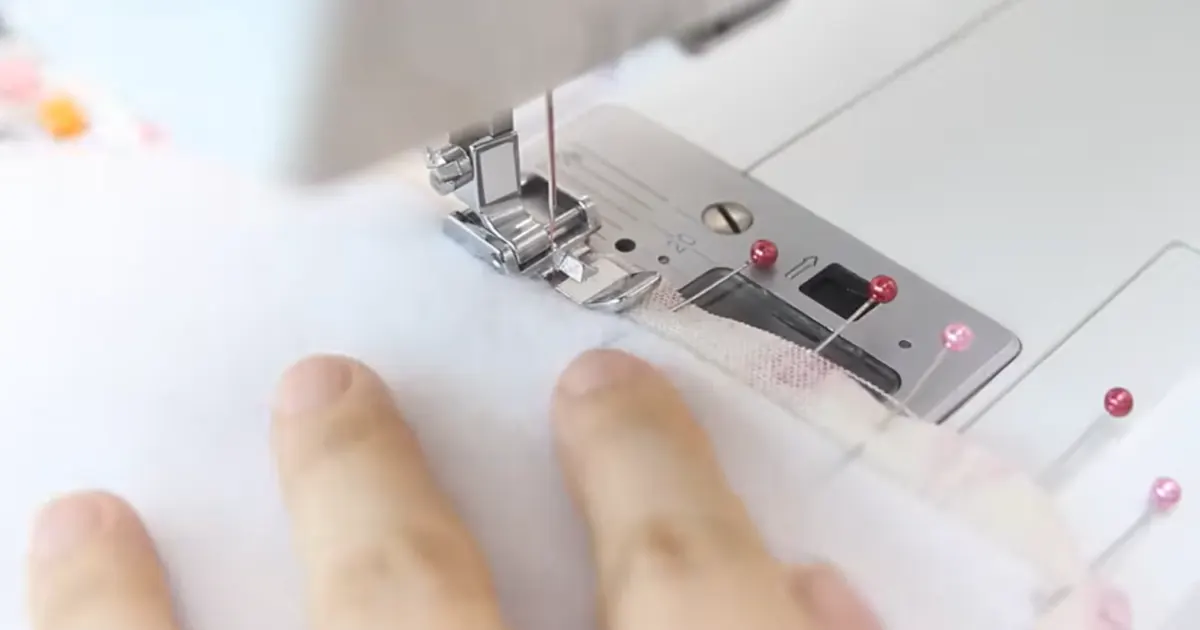
ファスナーを布地に縫い付ける
これで自信を持って化粧ポーチを縫えます。ミシンにファスナー押さえを取り付けてください。ピンで留めた端に沿って、1/4インチの縫い代をつけて縫います。ファスナーの引き手まで縫い進む前に、縫い目を止めます。引き手を邪魔にならないように移動させてから、縫い終わりまで縫い進めてください。このコツで、縫い目がぐらつくのを防ぐことができます。
よくある間違いとその回避方法をご紹介します。
- ファスナーが上端すべてと揃うようにしてください。
- すっきりとした仕上がりにするには、縫い代を1/4インチにしてください。
- ファスナー止めを縫い付けないように、両端に3/4インチの隙間を残してください。
- 縫い合わせる前に、ファスナーテープを裏地側に折り込んでください。
- ファスナーを別々に縫い込んで、端を縫い合わせることで、隙間が開いたままになる。
縫い目をまっすぐに仕上げたい場合は、ファスナーサンドイッチ方式を試してみてください。表地、ファスナー、裏地を重ねてピンで留め、縫い合わせます。当て布を使ってファスナーから離れた方向に縫い目をプレスします。こうすることで、縫い目が平らになり、トップステッチの準備が整います。
ファスナーに裏地を取り付ける
ファスナーの取り付けはほぼ完了です。生地とファスナーを開いて、表側が外側になるようにします。2枚目の裏地を用意し、ファスナーの反対側でも同じ手順を繰り返します。裏地を表側を下にして置き、その上にファスナーを置き、表側を上にして表地を重ねます。各層をピンまたはクリップで留めます。
ピンで留める前に、しわを伸ばしてください。端と角を揃えてください。ポケットやラベルを付けたい場合は、縫う前に付けてください。ファスナー押さえを使って、最初の側の縫い代に合わせて端を縫います。
裏地を表側を上にして置き、その上にファスナーを置き、次に裏地を付けた表地を表側を下にして置きます。上部をピンで留めて縫い合わせます。
縫製後、ファスナーから生地を離すようにアイロンをかけます。ファスナーの両側に、端から約1/8インチから1/4インチの位置にステッチを入れます。この工程でバッグがすっきりとした印象になり、裏地がファスナーに挟まるのを防ぎます。
このチュートリアルに従えば、毎回きれいなファスナーが作れます。時間をかけて、位置合わせを確認し、縫い目をしっかりプレスしてください。ミニメイクポーチは見た目も美しく、使い勝手も抜群です。
化粧ポーチの縫製チュートリアル:組み立て手順
メイクポーチの縫製チュートリアルもほぼ完成です。この工程でポーチを組み立て、箱型でプロっぽい仕上がりになります。各ステップを順を追って説明していくので、自信を持って完成させられるでしょう。
側面と底の縫製
ファスナーを取り付け、生地の準備も完了しました。次に、側面と底を縫い合わせます。この工程で、ミニ化粧ポーチの本体が完成します。
- バッグのパーツを中表にして重ねてください。裏地同士、表地同士がきちんと合うようにしてください。
- 側面と底辺をピンやクリップで留めます。こうすることで、すべてがきちんと揃い、ずれを防ぎます。
- 側面と底を1/4インチの縫い代で縫い合わせます。後でバッグをひっくり返すために、裏地に小さな隙間(約2インチ)を残しておきます。
- 強度を高めるために、各縫い目の始めと終わりに返し縫いをします。
- 縫い目を平らにアイロンで伸ばしてください。こうすることで、バッグがパリッと美しく仕上がります。
ヒント:生地を裁断する前に、芯地を生地に縫い付けてください。こうすることで、裁断精度が保たれ、縫製が楽になります。
プロのような仕上がりの化粧ポーチを縫いたいなら、縫い終わったら必ず縫い目をアイロンで押さえましょう。この簡単な一手間が大きな違いを生みます。
ボックスコーナーの作成
角を箱型に仕上げることで、化粧ポーチに構造が生まれ、自立しやすくなります。完璧な角を作るには、以下の手順に従ってください。
- バッグを横向きにして、角を平らにして、側面の縫い目と底の縫い目が揃うようにしてください。
- 角から1~1.5インチ内側を測り、角を通る直線を引きます。
- 印をつけた線に沿って縫います。これで四角い形ができます。
- 余分な布地を切り落としますが、縫い目に近すぎないように注意してください。
- 4つの角すべてについて同じ手順を繰り返してください。
- 必要に応じて、より安全性を高めるために返し縫いをしてください。
注:縫い目を切り、角を四角くしてください。こうすることでバッグの開口部が広くなり、平らに置けるようになります。
角を箱型に折り終えたら、布を表に返し、角を押し出します。鈍い道具か指を使って、角をシャープに仕上げてください。
回転とプレス
バッグを表に返す準備ができました。このステップで、完成したメイクアップバッグの縫製チュートリアル作品がお披露目されます。
- 裏地の隙間から手を伸ばし、バッグをそっと表に引き出してください。
- 角、特に箱型の角をしっかりと押し出して、シャープな形に仕上げましょう。
- 裏地の隙間の切りっぱなしの端を内側に折り込み、小さなすくい縫い、またはミシンで縫い閉じます。
- 角をアイロンで軽く押さえると、さらに鋭くなります。
- ファスナーと縁に沿ってステッチを入れましょう。これにより耐久性が向上し、バッグにすっきりとしたプロフェッショナルな仕上がりになります。
バッグを市販品のように見せたい場合は、ピンで留めた後、側面をアイロンで平らにし、ファスナーと縁に沿ってステッチを入れてください。
整理整頓をもっとしたいなら、仕切りやポケットを追加できます。仕切りやポケットが内蔵されたミニメイクアップバッグを探してみましょう。中には取り外し可能な仕切りが付いているものもあり、レイアウトをカスタマイズできます。ポケットを追加したい場合は、バッグを組み立てる前に、小さな長方形の布を裏地に縫い付けてください。
追加できるオプション機能の簡単な一覧表を以下に示します。
| 機能 | 商品説明 |
|---|---|
| 内蔵仕切り | アイテムを分けて保管します |
| 裏地ポケット | 小さな必需品を収納できます |
| 取り外し可能なセクション | レイアウトをカスタマイズします |
このメイクアップバッグの縫製チュートリアルでは、主要な手順をすべて完了しました。きれいな縫い目、角ばったボックス状の縁、そして洗練された仕上がりのメイクアップバッグの縫い方を学びました。各手順は時間をかけて丁寧に行いましょう。縫い目と角はしっかりとアイロンをかけてください。さらに機能性を高めたい場合は、ポケットや仕切りを追加してみましょう。これで、ミニメイクアップバッグは毎日使える状態になりました!
コスメポーチ:仕上げとカスタマイズ
トップステッチとディテール
化粧ポーチの縫製は完了しましたが、ちょっとした工夫でさらに素敵な仕上がりになります。ファスナーと縁にステッチを入れると、バッグがすっきりとしたプロフェッショナルな印象になります。さらに個性を出したいなら、楽しい色の糸を使ってみましょう。バッグを自分好みにカスタマイズしたい場合は、装飾ステッチ、ワッペン、刺繍などがおすすめです。縁取りを縫い付けたり、ワッペンを付けたり、イニシャルを生地に直接刺繍したりすることもできます。
化粧ポーチを自分好みにカスタマイズする人気の方法を簡単にまとめた表を以下に示します。
| 方法 | 詳細説明 |
|---|---|
| 縫い付け | あなたの個性を反映した、手縫いのデザイン。 |
| パッチを適用 | 個性的なルックスを演出するユニークなワッペン。 |
| 刺繍 | 個性的なタッチを加えるための、パーソナライズされた刺繍。 |
これらの方法は自由に組み合わせることができます。例えば、前面にワッペンを付けて、側面に刺繍を入れるのも良いでしょう。あなたのバッグですから、あなたが決めることができます!
個人的なタッチを追加する
化粧ポーチを個性的にしたいですか?ファスナーに名前入りのラベルやチャームを付けてみましょう。アイロン接着ワッペンを使ったり、タグを縫い付けたり、小さなキーホルダーを付けたりできます。刺繍なら、形や文字、お気に入りの動物などを刺繍できます。もし失敗してしまっても大丈夫。別のワッペンで隠したり、上から縫い直したりできます。
以下に、簡単なアイデアをまとめた表を示します。
| 方法 | 詳細説明 |
|---|---|
| パッチ | 個性的なワッペンでバッグをカスタマイズしよう。 |
| 刺繍 | バッグにオリジナルの刺繍を施しましょう。 |
ヒント:バッグを長持ちさせたいなら、装飾品は接着剤ではなく縫い付けましょう。縫い付ければ、毎日使ってもすべてがしっかりと固定されます。
最終品質チェック
化粧ポーチを使い始める前に、よくあるミスがないか確認しましょう。糸のほつれ、縫い目の不均一、縫い目の抜けなどがないかチェックしてください。問題が見つかったら、すぐに直しましょう。ファスナーがスムーズに開閉するか、角がシャープになっているかも確認してください。最後にポーチにアイロンをかけて、きれいに仕上げましょう。
バッグを良い状態に保つには、以下のケア方法に従ってください。
- 摩耗を防ぐため、粗い表面や汚れた表面は避けてください。
- 色あせを防ぐため、日光を避けてください。
- 形を保つため、立てて保管するか、軽く詰め物をして保管してください。
- 耐久性を高めるために、布地保護スプレーを使用してください。
- バッグが濡れた場合は、余分な水分を拭き取ってください。
- 柔らかい布で拭き、部分的な汚れは中性洗剤と水で拭き取ってください。
- 涼しく乾燥した場所に保管し、保護のためにダストバッグを使用してください。
注:バッグのお手入れをしっかりすれば、見た目も美しく、長持ちします。このチュートリアルとヒントに従えば、化粧ポーチは常に清潔で、どんな冒険にもすぐに使える状態を保つことができます。
初心者向けDIYメイクアップバッグの作り方
一般的な問題のトラブルシューティング
初めて簡単な手作りメイクポーチを作る際、いくつか問題に遭遇するかもしれません。でも心配しないでください!誰でも失敗はするもので、ほとんどの問題は簡単なコツで解決できます。よくある問題とその解決方法をご紹介します。
- 型紙の準備を省略しないでください。作業を始める前に必ず説明書を読んでください。そうすることで、次に何をすべきかが分かります。
- 間違った生地選び:初めてバッグを作るなら、綿かキャンバスを選びましょう。これらの生地は縫いやすく、形崩れしにくいのが特徴です。
- 針のサイズを間違えないでください。厚手の生地には90/14または100/16の針を使用してください。こうすることで、縫い目が丈夫になります。
- 縫い代を無視する:縫い代をマークして、それに沿って縫いましょう。こうすることで、バッグが歪んで見えるのを防ぐことができます。
- 切断作業を急いでいる場合:ロータリーカッターとマットを使用すると、きれいでまっすぐな切断が可能です。
- アイロンがけや仕上げの細かい作業を省略する場合:縫い目をアイロンで押さえ、ステッチをかけることで、洗練された仕上がりになります。
以下に、その他の課題と解決策をまとめた表を示します。
| 課題 | 解決策 |
|---|---|
| ファスナーの縫い目が縮んでいる | 縫い目をほどき、再度アイロンをかけ、ゆっくりと縫います。 |
| ファスナーがスムーズに閉まらない | 歯に布が挟まっていないか確認し、余分な布を切り取る。 |
| ファスナーの取り付けが不均一 | 縫い代を一定に保ち、足の位置を正しくしてください。 |
| かさばるファスナーの端 | 余分なファスナーテープを切り取り、きちんと折りたたむ |
| コーナーはうまくいかない | 縫い目線に近いところで切り込みを入れ、ポイントターナーを優しく使用します。 |
| 最終縫製前にファスナーを開けないこと | ファスナーは常に少し開けておいてください |
| 縫い代が不均一なため、端が歪む | 寸法をきちんと測り、縫い目を平らにプレスする |
| 寸法を再確認せずに生地を裁断する | 切る前に正確に測ってください |
ヒント:もし間違いを犯したら、一度立ち止まって作業内容を確認しましょう。ペースを落として手順を二重チェックすることで、ほとんどの問題は解決できます。
簡単なカスタマイズアイデア
簡単なDIYメイクアップバッグも、ちょっとした工夫で特別なものに変身させることができます。生地や色を変えてみたり、楽しいディテールを加えてみたりしましょう。バッグを個性的にするのに高度なスキルは必要ありません。いくつかアイデアをご紹介します。
- 外側には明るい色の綿素材を、内側には柄物の裏地を使用してください。
- ファスナーの引き手やチャームを付けると、さらに華やかになります。
- 前面にワッペンやラベルを縫い付ける。
- 縁に装飾的なステッチを入れてみてください。
- 布で小さなタブを作り、側面に取り付けます。
手順に沿って作業を進めたい場合は、まず表地の裏側に接着芯を貼り付けます。表地と裏地にファスナーを縫い付けます。側面と底を縫い合わせてバッグを組み立て、返し口を残しておきます。最後に、上部をステッチで仕上げます。
色やデザインをいろいろ試してみましょう。作るバッグはどれも個性的なものになります。化粧ポーチをリュックサックやハンドバッグとコーディネートすることもできますよ。
お手入れ
手作りのメイクポーチを長く使いたいですよね。いくつかの簡単な手順に従えば、清潔で新鮮な状態を保つのは簡単です。
- 柔らかく、糸くずの出ない布を使って、ほこりや指紋を拭き取ってください。
- 研磨剤入りの洗剤は避けてください。中性洗剤を薄めた水で洗ってください。
- 洗剤を使う前に、必ず目立たない場所で試してください。
- それぞれのバッグが休めるように、ローテーションさせてください。
- バッグの形を保つために、中にティッシュペーパーを入れて保管してください。
- 保管時には、汚れを防ぐためにダストバッグを使用してください。
- バッグを扱う前に、手を清潔にしてください。
注:バッグのお手入れをしっかりすれば、長く美しい状態を保つことができます。これらのヒントを参考にすれば、簡単に作れる手作りメイクアップバッグは、どんな冒険にもすぐに使える状態を維持できるでしょう。
最初は完璧にできないかもしれません。でも大丈夫!練習すれば上達します。新しい生地、デザイン、テクニックに挑戦してみましょう。バッグを作るたびに、何か新しい発見があります。楽しみながら、その過程を満喫してください。
結論
このチュートリアルを参考に、自分好みの小さな化粧ポーチを作ってみませんか?このプロジェクトでは、ファスナーの付け方や裏地の作り方など、様々なスキルを学ぶことができます。パーツを一つずつ組み立てていくうちに、自信がつき、どれだけ上達したか実感できるでしょう。作るポーチはどれも個性豊か。ぜひ楽しんで、完成したポーチを友達に見せてあげてください。
もっとアイデアが欲しい場合は、他の裁縫チュートリアルをご覧ください。様々な種類のバッグや新しいデザインが見つかるでしょう。弊社では、OEMおよびODMサービスでブランド向けの化粧ポーチも製造しています。多くのブランドから、以下のような特別なバッグの製作依頼を受けています。
| メイクアップバッグの種類 | 詳細説明 |
|---|---|
| スリムな長方形のメイクポーチ | 日用品や景品を入れるのに最適です。 |
| 旅行用メイクアップバッグ&キット | 旅行ブランド向けに、複数の収納スペースと防水裏地を備えています。 |
| 吊り下げ式トイレタリーバッグ | アウトドア用品店や旅行用品店向けの折りたたみ式デザイン。 |
| PUレザー&構造化ケース | 高級化粧品ブランド向けの上質なパッド入りケース。 |
| 透明PVC&TPU製メイクアップバッグ | TSAキットやeコマースブランド向けの透明バッグ。 |
| キルティング&パファータイプのメイクアップバッグ | Z世代向けブランドに人気のトレンドシェイプ。 |
| コットン&キャンバス製コスメティックバッグ | 環境に配慮したブランドのためのエコフレンドリーな選択肢。 |
| ブランドコスメポーチセット | 小売店向けギフトや定期購入ボックス用のコーディネートセット。 |
選ぶことができます OEMまたはODMサービス 必要なものに応じて:
- ロゴを追加したり、色を選んだり、ハードウェアを選択したりできます。
- OEMを利用すれば、プライベートブランドのバッグを製造でき、デザインから大量注文までサポートを受けられます。
- ODMは、多少の変更は可能な既製バッグを提供します。
自分だけのバッグを作ってみて、どれだけクリエイティブになれるか試してみましょう!
FAQ
ミニ化粧ポーチを作るのにどれくらい時間がかかりますか?
ミニメイクポーチは20分から30分程度で完成します。裁縫初心者の方は、もう少し時間がかかるかもしれません。焦らず、ゆっくりと作業を楽しんでください!
このバッグは手縫いでもいいでしょうか?
はい、このバッグは手縫いで作れます。丈夫な縫い目にするには、細かくしっかりとしたステッチをしてください。ミシンを使えばもっと早くできますが、初心者には手縫いがおすすめです。
初心者に最適な生地は何ですか?
綿生地は初心者にとって最も扱いやすい素材です。柔らかく、裁断しやすく、滑りにくいのが特徴です。より丈夫なバッグを作りたい場合は、キャンバス生地を試してみるのも良いでしょう。
波打ったファスナーを直すにはどうすればいいですか?
ファスナーが波打っている場合は、アイロンで平らにしてください。ゆっくりと縫い、ピンやクリップを使ってしっかりと固定しましょう。練習を重ねることで、より良い仕上がりになります。
使い終わったメイクポーチは洗えますか?
ほとんどの化粧ポーチは洗濯可能です。冷水と中性洗剤を使用してください。型崩れを防ぐため、自然乾燥させてください。必ずご使用前に生地の洗濯表示をご確認ください。
布をどのサイズに切ったらいいでしょうか?
小さめのポーチを作る場合は、表地と裏地をそれぞれ約7×9インチの大きさに2枚ずつ裁断します。必要に応じてサイズを調整してください。
バッグをカスタマイズするためのアイデアをもっと見つけるにはどうすればいいですか?
クラフトブログ、YouTube、Pinterestなどでインスピレーションを探してみましょう。ワッペンやチャーム、刺繍などを加えてみてください。このチュートリアルは、始めるための素晴らしいベースとなるでしょう!