
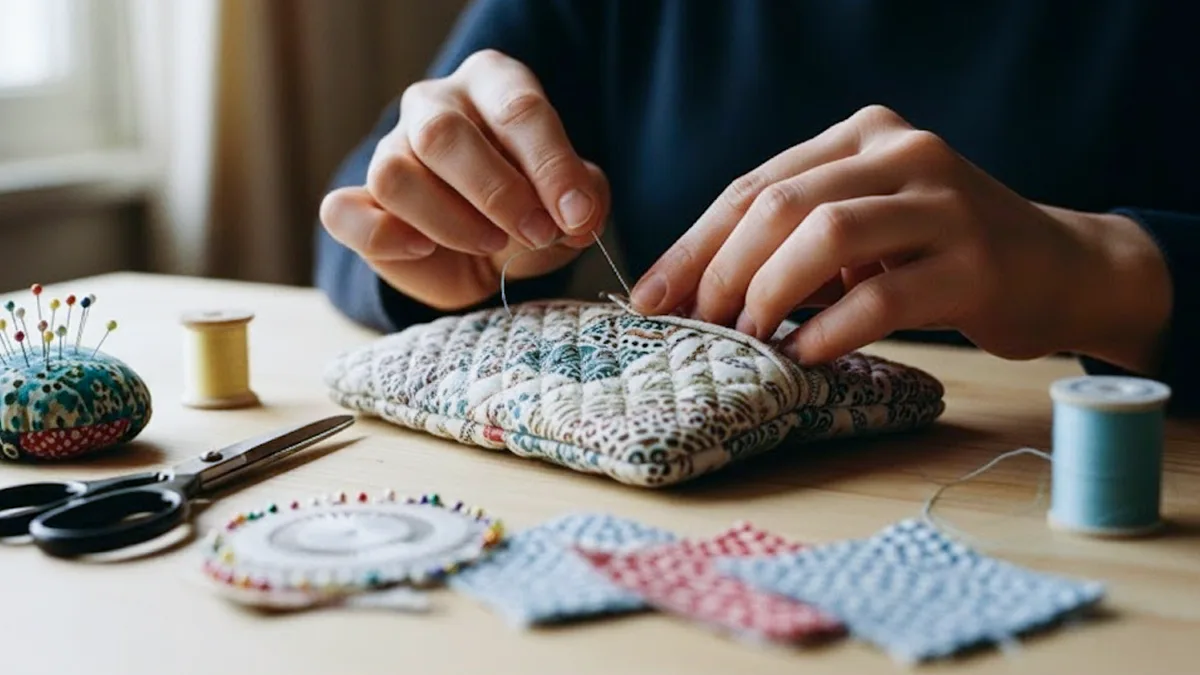
Ready to start a fun project? Making your own quilted makeup bag lets you choose your favorite fabrics. You can make something special that is just for you. You will enjoy making it and feel proud when you use it. Picking handmade instead of store-bought helps the Earth, too:
- Eco-friendly fabrics like organic cotton or recycled materials break down easily.
- You avoid the bad plastics found in most bags from stores.
- Choosing sustainable crafting helps keep the world clean and green.
If you get stuck, a video tutorial can show you each step. This tutorial will teach you how to make a quilted makeup bag from beginning to end!
Key Takeaways
- Making a quilted makeup bag lets you pick fabrics you like.
- You can make something special and different.
- Using eco-friendly materials helps cut down on plastic waste.
- This also helps keep the environment clean.
- Gather all your materials and tools before you start. This will help your sewing go smoothly.
- Measure and cut your fabric with care to avoid errors. Careful cutting helps your bag look neat.
- Layer your fabric and batting the right way. This makes your bag soft and strong.
- Boxing the corners gives your bag a nice, 3D look.
- Adding a zipper the right way is very important. Use a zipper foot to get the best results.
- Add decorations to your bag to make it your own.
Materials & Tools
Before you start sewing your quilted makeup bag, you need to gather the right materials and tools. Picking the best fabric and supplies makes your project easier and helps your bag last longer. Let’s break down what you need.
Fabric, Lining & Batting
You want your makeup bag to look great and stay strong. The right fabric gives your bag style and structure. You also need a good lining to protect against spills. Batting adds softness and shape. Here’s a quick guide to help you choose:
| Type | Material Options | Characteristics |
|---|---|---|
| Outer Fabric | Nylon 600D, Polyester 300D–420D, PU leatherette | Durable, provides structure and protection |
| Lining | PU-coated polyester, PVC-free waterproof film, recycled nylon | Easy to clean, protects against spills and stains |
| Batting | Polyester batting, open-cell foam, PE sheet | Offers softness, structure, and durability |
You can mix and match fabric types to get the look you want. Try a bold print for the outside and a bright color for the lining. Batting goes between the outer fabric and lining to make your bag feel soft but sturdy.
Tip: Always pre-wash your fabric before sewing. This helps prevent shrinking later.
Notions & Zipper
Notions are the extra items you need for sewing your bag. The zipper is the most important one. It keeps your makeup safe inside. You also need thread that matches your fabric and holds everything together. Here’s a look at common thread types for quilted makeup bags:
| Thread Type | Best For | Strengths | Weaknesses |
|---|---|---|---|
| Glide | Quilted bag panels, decorative stitching | Smooth, lint-free finish; great for details | Not strong enough for heavy-duty seams |
| Tex 45 | Cosmetic bags, wallets, small pouches | Lightweight durability; clean finish | Not for heavy projects |
| Tex 70 | Larger bags needing more durability | Stronger; good for thick fabric | May be too bulky for delicate fabric |
Pick a zipper that matches your fabric in color and length. A nylon coil zipper works well for most makeup bags. You can also use a metal zipper for a stylish touch. Make sure your zipper glides smoothly and feels sturdy.
Essential Sewing Tools
You need a few basic tools to cut and sew your fabric. Here’s a handy checklist:
- Rotary cutter or sharp scissors for cutting fabric
- Quilting ruler for straight lines
- Cutting mat to protect your table
- Sewing machine (or needle for hand sewing)
- Pins or clips to hold fabric layers
- Seam ripper for fixing mistakes
Safety matters when you use sharp tools. Always keep your rotary cutter blade closed when not in use. Cut away from your body and use a cutting mat. Keep blades sharp so they don’t slip. Store cutters out of reach of kids.
Other safety tips:
- Wear cut-resistant gloves if you’re new to rotary cutters.
- Use safety rulers to protect your fingers.
- Try quilting ruler handles for a better grip.
With these materials and tools, you’re ready to start sewing your quilted makeup bag. Take your time picking fabric and notions you love. The right supplies make sewing more fun and help your bag turn out just right.
Cut Fabric & Batting
Measure & Mark Pieces
You want your quilted makeup bag to look neat and fit together well. Start by laying your fabric flat on a clean surface. Smooth out any wrinkles with your hands or a warm iron. Use a quilting ruler to measure the size of each piece you need. Most makeup bags use two rectangles for the outside, two for the lining, and two pieces of batting. Write down your measurements before you start cutting.
Grab a fabric marker or chalk. Mark the lines where you will cut. Make sure your lines are straight and easy to see. Always measure twice before you cut. This helps you avoid mistakes and wasted fabric. If you want a boxy bag, add a small square at each bottom corner. You will cut these out later to help shape the bag.
Tip: Take your time when measuring and marking. Rushing can lead to uneven pieces and a bag that does not fit together.
Cutting Tips for Accuracy
Cutting fabric and batting the right way makes sewing much easier. Place your fabric on a cutting mat. Use a rotary cutter for straight, clean edges. If you use scissors, keep them sharp and cut slowly along your marked lines. Hold the fabric steady with your hand or use fabric clips.
Many beginners make the same mistakes when cutting fabric and batting. Here are some things to watch out for:
- Skipping the pre-wash. If you forget to prewash your fabric, it might shrink or pucker after you sew your bag.
- Not squaring the fabric. If your fabric is not square, your pieces will not line up.
- Ignoring the grain. Always cut along the grain of the fabric. This keeps your bag strong and helps it hold its shape.
- Rushing measurements. Slow down and double-check your numbers before you cut.
Note: Skipping interfacing can make your bag floppy. If you want more shape, add interfacing between the fabric and batting.
You can stack your fabric and batting to cut several pieces at once. Just make sure everything lines up before you cut. Always cut away from your body and keep your fingers clear of the blade. If you are new to rotary cutters, wear cut-resistant gloves for safety.
When you finish cutting, lay out all your fabric pieces. Check that each one matches your measurements. If something looks off, trim it now. This step saves you trouble later when you start sewing.
Cutting fabric and batting with care gives you a strong start. You will feel proud when your quilted makeup bag comes together perfectly.
Quilt Fabric Pieces
Layering for Quilting
You want your quilted makeup bag to feel soft and sturdy. Start by laying your outer fabric piece face down on a flat surface. Place the batting on top of the fabric. Smooth out any wrinkles with your hands. Next, add the lining fabric on top, right side up. Make sure all the layers line up at the edges.
To keep the layers from shifting, you can use a few different methods:
- Tape the backing fabric to your table to keep it smooth.
- Center the batting on the backing and smooth it out.
- Pin or baste the layers together to secure them.
Some people like to use spray basting because it is fast and holds the layers well. Others prefer pin basting, which is slower but reusable and better for the environment. You can also use clamps to hold the sides of the layers while you work. Always press the quilt top and backing before basting. This helps you get a smooth surface and a neat quilted effect.
Mark & Sew Quilt Lines
Now you get to add the quilted look! Use a ruler and fabric marker to draw straight lines across your fabric sandwich. You can make diagonal lines, straight lines, or even a grid. Try to keep the lines evenly spaced for a neat finish.
When you start sewing, use a walking foot if you have one. This special foot helps in several ways:
- Prevents fabric layers from shifting
- Reduces puckering
- Ensures smooth, professional-looking stitches
Sew along the lines you marked. Go slowly and keep your stitches straight. If you want a classic quilted effect, sew lines about one inch apart. Remove pins as you sew so your needle does not hit them. When you finish, trim any loose threads.
Press for Clean Seams
After you finish quilting, press your fabric pieces with a warm iron. This step makes a big difference in how your bag looks. Pressing flattens the seams and helps your pieces stay the right size.
A flat seam is an essential technique in quilting, second only to an accurate 1/4″ seam allowance. We can’t underestimate the importance of a flat seam as it has the capability to improve every stage of quilting thereafter. For example, a block that’s been pressed flat can be trimmed easily and accurately. Any “bouncy” seams – that is, seams that are rounded – can skew our measurements and therefore, our accuracy.
Let your quilted panels cool before moving them. This helps the fabric hold its shape. If you see any puckers, press again with a little steam. Now your quilted makeup bag panels are ready for the next step in sewing!
How to Make a Quilted Makeup Bag: Step-by-Step
Ready to see your project come together? This is the part where you turn your quilted panels into a real boxy makeup bag. Follow this step-by-step sewing pattern and you’ll have a sturdy, stylish bag in no time. Let’s break it down so you can enjoy every part of the process.
Assemble Exterior Panels
Start by laying out your quilted fabric panels. You should have two rectangles for the outside and two for the lining. If you want a classic boxy makeup bag, make sure your pieces match the sewing pattern you measured and cut earlier. Place the two exterior fabric panels right sides together. Pin or clip the edges to keep them lined up.
Sew along the sides and bottom using a 1/4″ seam allowance. This keeps your seams strong and your bag looking neat. Don’t sew the top edge yet. If you’re following a tutorial, you might see the tip to open the zipper before you sew the panels together. This makes it easier to turn the bag right side out later.
Tip: Use Wonder Clips instead of pins if your fabric is thick or slippery. Clips hold everything in place without poking holes.
After sewing, press the seams flat. This step helps your bag keep its shape and makes the next steps easier. If you want extra strength, sew over the seams a second time. Double stitching helps prevent splits, especially if you plan to carry heavier items in your makeup bag.
Box Corners for Shape
Now it’s time to give your bag that perfect 3D look. Boxing the corners is what turns your flat panels into a roomy, boxy makeup bag. Here’s how to do it:
- Cut a small square from each bottom corner of your sewn exterior and lining panels. The size of the square depends on how deep you want your bag. A 1.5″ square works well for most sewing patterns.
- Pinch each cut-out corner so the side seam lines up with the bottom seam. This will open up the corner and create a triangle shape.
- Use a ruler to mark your stitch line straight across the raw edge. This helps you sew an even, boxy corner.
- Sew across the marked line. For extra durability, double-stitch this seam.
- Trim any excess fabric from the corners to reduce bulk.
Note: Press your seams open or to one side before boxing the corners. This makes the corners crisp and helps your boxy makeup bag stand up on its own.
If you want a really professional finish, use bias tape to cover the raw edges inside the corners. This keeps the inside neat and stops the fabric from fraying. Many sewing patterns suggest this step for a polished look.
Attach Lining
The lining is what makes your quilted makeup bag easy to clean and helps it last longer. Pick a lining fabric that matches your style and is easy to wipe down. Waterproof options like vinyl or coated nylon work great for makeup bags.
Here’s how to attach the lining:
- Place the lining panels right sides together, just like you did with the exterior fabric. Sew the sides and bottom, leaving a small gap at the bottom. You’ll use this gap to turn the bag right side out later.
- Box the corners of the lining the same way you did for the exterior. This keeps the shape consistent and gives your bag a true boxy makeup bag look.
- With the exterior bag still inside out, slip the lining inside so the right sides are facing each other. Line up the top edges and pin or clip them together.
- Sew around the top edge with a 1/4″ seam allowance. Go slowly to keep your stitches even, especially around the zipper area.
- Turn the bag right side out through the gap in the lining. Push out the corners for a crisp, boxy shape.
- Sew up the gap in the lining by hand or with your machine. Tuck the lining inside the bag and smooth it out.
Pro Tip: Use bias tape or fabric binding over any raw edges inside the bag. This protects against fraying and gives your makeup bag a professional finish.
If you want to reinforce the zipper area, use a heavier thread or add a few extra stitches near the zipper stops. This helps your zipper last longer, even with daily use.
You’ve just finished the main steps for how to make a quilted makeup bag! With this sewing pattern, you can create a sturdy, boxy makeup bag that looks great and holds up over time. Try different fabric combinations and lining materials to make each bag unique. If you follow this tutorial, you’ll find sewing the bag gets easier every time.
Add the Zipper
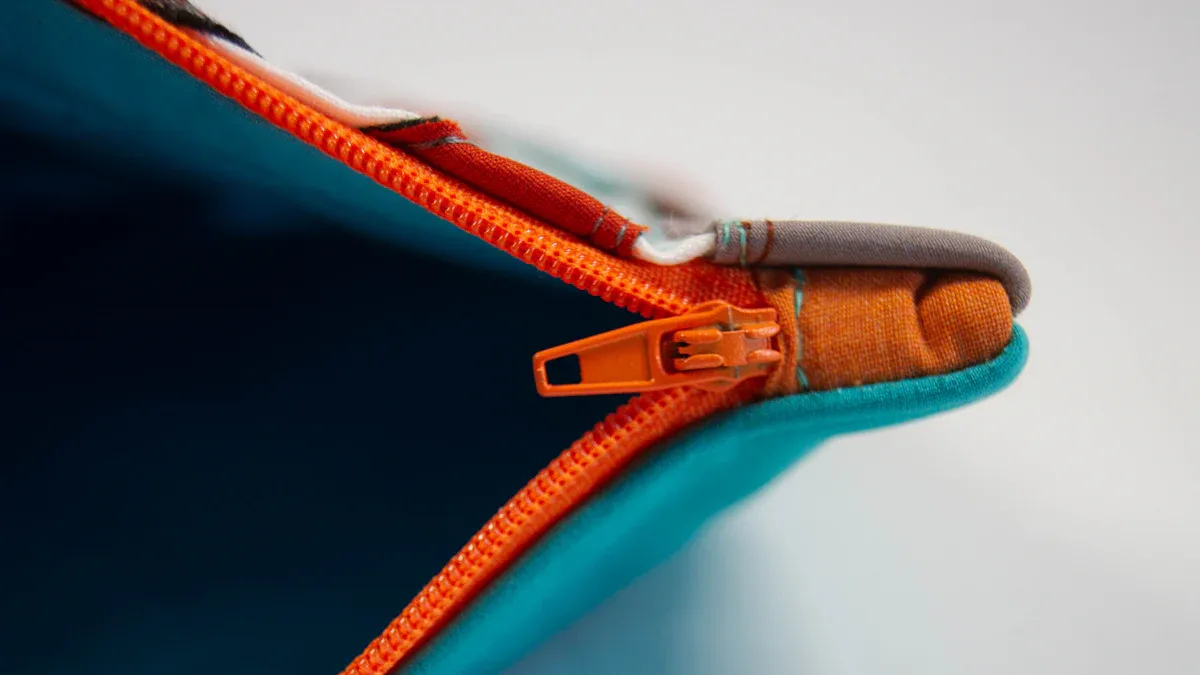
Adding a zipper is the step that brings your quilted makeup bag together. You want your zipper to glide smoothly and look neat. The right zipper makes your bag easy to use and helps it last longer. Nylon coil zippers work best for quilted makeup bags. They bend easily and forgive small mistakes, which is great if you are new to sewing. Metal zippers look fancy and feel strong, but you need to handle them with care so you do not break your needle or damage the zipper during installation.
Sandwich Zipper Between Layers
Lay your quilted exterior panel right side up. Place the zipper face down along the top edge. Line up the edge of the zipper tape with the edge of your fabric. Next, put your lining panel right side down on top of the zipper. Now you have a zipper sandwich: exterior, zipper, then lining. Pin or clip the layers together to keep them from shifting.
Tip: Use a zipper foot on your sewing machine. This foot lets you sew close to the zipper teeth for a neat finish.
Sew along the edge with a straight stitch. Go slow and keep your seam straight. When you finish, flip the fabric so the right sides face out. Press the fabric away from the zipper. Topstitch close to the zipper edge. This keeps the fabric from getting caught in the zipper teeth and gives your bag a crisp look.
Repeat these steps for the other side of the zipper. You will end up with the zipper running neatly between your exterior and lining panels.
Sew & Finish Zipper Ends
Now you need to finish the zipper ends. Fold the ends of the zipper tape toward the lining. Pin them in place. This step keeps the zipper ends hidden and stops them from poking out of your bag.
Sew across each end of the zipper to secure it. Backstitch for extra strength. Trim any extra zipper tape if needed. Make sure the zipper pull is inside the bag before you sew the ends shut.
Zipper problems can happen, but you can avoid most of them by following a few simple tips:
- Stuck zipper: Fabric or threads can get caught in the zipper teeth. Gently pull the fabric free and use a little zipper lubricant.
- Zipper sliding down: If the slider wears out, replace it to keep your bag secure.
- Teeth not meshing: Misaligned sliders or damaged teeth cause this. Realign or replace the zipper for smooth use.
- Choose the right zipper for your bag’s design.
- Test the zipper for quality before sewing it in.
- Regularly check the zipper for wear and tear.
Adding a zipper can feel tricky, but with patience and practice, you will get a clean, professional result. Your quilted makeup bag will open and close smoothly every time.
Finishing Touches
Use Bias Tape on Edges
You want your quilted makeup bag to look neat inside and out. Bias tape helps you cover raw seams and gives your bag a polished finish. Cut a strip of bias tape long enough to go around the inside seams. Open the tape and line up the edge with the seam. Pin it in place. Sew along the fold, then fold the tape over the seam and sew again. This hides the raw edges and keeps them from fraying.
Many beginners forget to use bias tape or sew it too close to the edge. If your tape slips, use more pins or clips. Take your time and sew slowly. You can use a matching color or pick a bright shade for a fun pop inside your bag.
Tip: If you see bunching near the zipper, check that your bias tape is flat and not pulling. Smooth it out before sewing.
Personalize with Embellishments
Now you can make your quilted makeup bag truly yours. Add a charm or tassel to the zipper pull for extra style. Sew on a fabric label or use iron-on patches. Try embroidery or fabric paint for a custom design. You can even use decorative stitches along the zipper seam.
Here are some ideas to inspire you:
- Attach a ribbon or bead to the zipper pull.
- Add a small pocket inside for tiny items.
- Use a patterned bias tape for a unique look.
- Sew on buttons or appliqué shapes.
If you want to change the look later, pick embellishments that you can remove or swap out. Always test your decorations before sewing them on. Make sure they do not block the zipper or make it hard to open and close.
Final Press & Quality Check
Give your bag a final press with a warm iron. This step smooths out wrinkles and helps your bag hold its shape. Check all seams, especially near the zipper. Make sure the zipper opens and closes without catching. Look for loose threads and trim them.
Common mistakes include sewing the zipper in backward or catching the lining in the zipper teeth. If your zipper sticks, gently pull it back and forth. Sometimes a little wax or soap helps it glide better. If you see puckers near the zipper, press the area again and check your stitching.
Note: Always test the zipper several times before using your bag. A smooth zipper means your bag is ready for daily use.
Take a moment to admire your work. You made a quilted makeup bag that is both beautiful and useful!
Conclusion
You did it! Take a moment to admire your finished makeup bag. You can try new fabrics, sizes, or add fun details next time. If you want to keep your bag looking fresh, check out these care tips:
| Do | Don’t |
|---|---|
| Use pH-neutral detergents for delicates | Use bleach or harsh cleaners |
| Test cleaners on a hidden spot | Iron damp fabric directly |
| Store with tissue paper inside | Fold or compress while damp |
| Vacuum gently for dust | Machine-wash unless labeled safe |
| Line dry flat | Rub stains hard |
Want more ideas? Watch a video for inspiration, or share your own video with friends. If you get stuck, a video can help you fix mistakes. Try making a video of your process to see your progress. You can even use a video to show off your bag. If you love your bag, record a video review!
Practice makes perfect, so keep sewing and enjoy every step. If your business needs custom quilted makeup bags, initi can help. As a professional bag manufacturer, we produce boxy, flat, and travel-size quilted makeup bags in any color, material, or style you need. Contact initi for custom OEM/ODM solutions designed for your brand.
FAQ
How do I wash my quilted makeup bag?
You can hand wash your bag with mild soap and cold water. Let it air dry flat. Avoid bleach and harsh scrubbing. If your bag has a waterproof lining, just wipe it clean with a damp cloth.
What if I don’t have a sewing machine?
No worries! You can sew your makeup bag by hand. Use small, tight stitches for strength. It might take longer, but you’ll still get a great result.
Can I use scraps or leftover fabric?
Absolutely! Using fabric scraps makes your bag unique and eco-friendly. Mix and match colors or patterns for a fun look. Just make sure your pieces are big enough for your pattern.
My corners look bulky. How can I fix this?
Try trimming the seam allowance at the corners before turning your bag right side out. This helps the corners lay flat and look crisp. Use a point turner or a chopstick to push out the corners gently.
What size zipper should I use?
Pick a zipper that matches the width of your bag. For most makeup bags, a 9- to 12-inch zipper works well. You can trim a longer zipper if needed.
How do I keep my bag from looking floppy?
Add interfacing or use thicker batting for more structure. Quilting your fabric also helps the bag hold its shape. If you want a stiffer bag, try foam stabilizer.
Can I make my bag waterproof?
Yes! Choose a waterproof lining like PUL or coated nylon. You can also spray your finished bag with a fabric protector. This keeps spills from soaking in.


