Ready to learn how to make a phone bag? You do not need to feel nervous if you are just starting out. You can choose sewing or crochet. Both ways are simple and fun. Grab your favorite fabric or yarn. Gather your tools. You will soon create a stylish and useful bag for your phone!
Key Takeaways
- Pick the best materials for your phone bag. Quilting cotton is easy for beginners. Canvas and faux leather are strong choices.
- Collect basic tools like scissors, measuring tape, and needles. You do not need special equipment to sew or crochet.
- Follow simple steps to cut and get your fabric ready. Careful measuring helps your phone fit just right in the bag.
- Try different ways to add pockets. More compartments keep your things neat and easy to find.
- Choose closures that match your style. Zippers, buttons, and magnetic snaps all help keep your bag closed in different ways.
- Make your phone bag special with decorations. Put your name or cool patches on it to show your style.
- Practice basic sewing and crochet skills. Knowing simple stitches will make you better and more confident.
- Take care of your handmade bag the right way. Wash it by hand and let it air dry to keep it nice and last longer.
Gather Materials & Tools
Before you start making your phone bag, you need to gather the right materials and tools. You can sew your bag or crochet it. Both methods work well, and you can find a free sewing pattern for almost any style you like. Let’s break down what you need for each approach.
Fabric & Interfacing
If you want to sew your phone bag, you have many fabric choices. Some of the most popular options include:
- Quilting cotton (100% cotton works best for beginners)
- Canvas
- Faux suede
- Faux leather or vinyl
- Home decor fabric
- Cork
You can pick a fabric that matches your style or use scraps from other projects. Many people start with quilting cotton because it’s easy to sew and comes in lots of colors and prints. You can often find a free sewing pattern that recommends using 100% cotton.
To give your bag structure and protect your phone, you need interfacing. Interfacing adds strength and helps your bag keep its shape. Here’s a quick look at some common types:
| Interfacing Type | Characteristics | Applications | Pros | Cons |
|---|---|---|---|---|
| Pellon SF101 Shape-Flex | Lightweight stability, retains drape | Best for quilting cotton | Easy to apply, keeps fabric feel | Not sturdy enough for shape |
| Pellon 987F Fusible Fleece | Soft, lofty, adds cushion | Soft-structured bags | Adds padding, easy to use | Less rigid, less durable |
| Pellon 525 Decovil Light | Flexible, tear-resistant, pro look | Structured bags, wallets | Maintains shape, easy to sew | Pricier, may be stiff |
| Pellon 523 Decovil Light Sew-In | Non-fusible, consistent support | Heat-sensitive fabrics | Retains shape, good support | Takes more time to apply |
| Pellon FF78F1 Flex Foam | Substantial padding, firm | Bags needing structure | Strong, lightweight | Hard to sew through layers |
Tip: If you use a free sewing pattern, check the recommended interfacing. This helps you get the best results for your bag.
Sewing & Crochet Tools
You don’t need fancy tools to make a phone bag. Here’s a list of essentials for both sewing and crochet projects:
- Sharp pair of scissors or yarn snips
- Stitch markers
- Measuring tape
- Sewing and yarn needles
- Pins
- Pencil or pen
If you sew, you’ll also want a sewing machine, but you can sew by hand if you prefer. For crochet, grab your favorite yarn and a crochet hook that matches your pattern.
Optional Add-ons
Want to make your phone bag extra special? Try adding these features:
- Magnetic snaps, zippers, or buttons for closures
- Decorative trims, lace, or patches
- Adjustable straps or wristlets
- Extra pockets for cards or cash
- Keychain rings or clips
You can personalize your bag with embroidery, iron-on patches, or even a fun lining. Many free sewing patterns include ideas for add-ons, so you can get creative and make your bag one-of-a-kind.
How to Make a Phone Bag: Step-by-Step
Ready to start your project? This section will walk you through how to make a phone bag from start to finish. You will find clear steps, helpful tips, and even a super-fast method if you want to finish quickly. Let’s get started!
Cut & Prepare Fabric
Marking & Measuring
First, you need to measure your phone. Lay your phone on a piece of paper. Draw around it, leaving about 1 inch extra on all sides. This extra space gives your phone room to slide in and out. Use a ruler to make straight lines. Mark the outline on your fabric with a pencil or fabric marker.
Tip: Double-check your measurements before you cut. It’s easier to fix a mistake now than later!
Cutting Tips
Cut your fabric pieces using sharp scissors. You will need two pieces for the outside and two for the lining. If you want a padded bag, cut two pieces of interfacing or fusible fleece. Try to keep your cuts straight and even. This helps your bag look neat when you sew it together.
Assemble & Sew
Pinning Pieces
Lay your outer fabric pieces right sides together. Do the same for the lining. If you use interfacing or fleece, place it on the wrong side of the outer fabric. Pin the edges to keep everything in place. Pins help your pieces stay lined up while you sew.
Sewing Seams
Sew around the sides and bottom of your outer fabric, leaving the top open. Repeat this for the lining, but leave a small gap at the bottom. You will use this gap to turn your bag right side out later. Use a straight stitch on your sewing machine or sew by hand with small, even stitches.
Here are some common sewing techniques you can use to make your bag look great:
- Use fusible fleece for added structure.
- Try stiffer materials like vinyl or leather for the outside.
- Canvas or stiff cotton works well if you don’t have interfacing.
- Understitch the lining to keep it from rolling out.
- Box the corners for a flat bottom.
- Add a short wristlet strap for easy carrying.
Note: The average time to sew a basic phone bag is about 2 hours. If you want a quick project, check out the next section!
| Project | Time Required |
|---|---|
| Mobile Phone Pouch | 2 hours |
Quick 10-Minute Method
Short on time? You can still learn how to make a phone bag in just ten minutes! Here’s a simple way:
- Cut a long strip of fabric, about twice the length of your phone plus 2 inches.
- Fold the strip in half, right sides together.
- Sew the sides, leaving the top open.
- Turn the bag right side out.
- Fold the top edge down and sew a simple hem.
- Add a ribbon or cord for a strap.
This method skips the lining and extra pockets, but you still get a cute and useful bag. It’s perfect for beginners or when you need a last-minute gift.
You now know how to make a phone bag using both detailed and quick methods. Try both and see which one you like best. You can always add more features as you get comfortable with sewing.
Add Compartments & Pockets
Adding compartments and pockets to your phone bag makes it much more useful. You can keep your phone safe, store small items, and stay organized. Let’s look at how you can design, attach, and reinforce pockets for your bag.
Multi-Pocket Design
You might wonder why you need more than one pocket in your phone bag. Multiple compartments give you lots of benefits:
- Organized storage helps you keep your phone, cards, and keys separate. You won’t have to dig around for what you need.
- Easy access means you can grab your items quickly. No more searching at the bottom of your bag.
- Versatility lets you use your bag for different occasions. You can carry snacks, travel documents, or even small electronics.
- Weight distribution spreads out the load. Your bag feels lighter and more comfortable to carry.
- Stylish designs let you show off your personality. You can choose colors and patterns that match your style.
You can use a multi-pocket design for travel, work, school, or outdoor activities. For example, you can keep your passport and headphones in separate pockets when you travel. You can also store snacks and keys for daily use or organize gear for hiking.
Attach Pockets
Now, let’s talk about how to add pockets to your phone bag. You have a few options:
- Patch pockets: Cut a small rectangle of fabric. Fold the edges under and sew it onto the outside or inside of your bag.
- Zippered pockets: Sew a zipper into a pocket piece. Attach it to the lining or outside for extra security.
- Slip pockets: Use a simple piece of fabric. Sew the sides and bottom, leaving the top open for easy access.
Tip: Place pockets where you need them most. Try adding a pocket on the front for quick access or inside for privacy.
You can mix and match pocket styles. If you want a card slot, sew a few narrow pockets side by side. For coins, use a zippered pocket. You can even add a clear pouch for your ID.
Reinforce for Durability
You want your pockets to last. Reinforcing them makes your bag strong and keeps your items safe. Here are some ways to make your pockets more durable:
| Feature | Benefit |
|---|---|
| Tarpaulin reinforced side material | Gives your bag extra strength. It stands up to tough use and keeps your pockets from tearing. |
| Water-resistant clear pouch | Protects your phone from rain, snow, dirt, and dust. Your bag stays clean and dry. |
| Heavy-duty zipper | Keeps your pocket closed tight. It stops water and dirt from getting inside. |
You can use sturdy fabrics like canvas or vinyl for pockets. Try double-stitching the edges for extra strength. If you add a zipper, choose a heavy-duty one for better protection.
Note: Reinforced pockets help your bag last longer, even if you use it every day or take it outdoors.
With these tips, you can create a phone bag that’s organized, stylish, and tough. Try different pocket styles and materials to find what works best for you!
Add Closures & Straps
Adding closures and straps to your phone bag makes it both secure and easy to carry. You have lots of choices, and you can pick what works best for your style and needs. Let’s look at some simple ways to finish your bag and make it ready for everyday use.
Zippers, Buttons, or Snaps
You want your phone to stay safe inside your bag. Closures help with that. You can choose from zippers, buttons, or snaps. Each one has its own look and level of difficulty.
- Zippers give your bag a modern feel. They keep everything inside, even if you drop your bag. You can sew a zipper by hand or with a sewing machine. Some people find zippers a little tricky at first, but you get better with practice.
- Buttons add a classic touch. You can sew a button and make a loop with fabric or elastic. This method works well for fabric bags and gives you a chance to use a fun, colorful button.
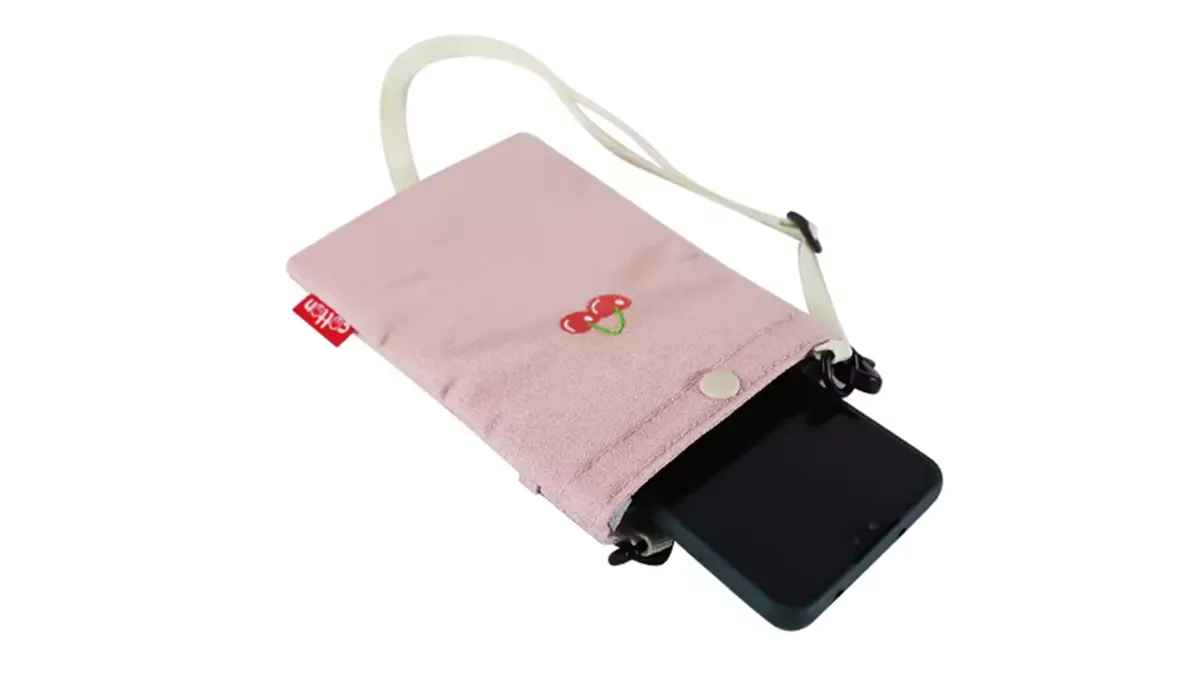
- Magnetic snaps are very popular for phone bags. They look neat and close with a satisfying click.
Though it may not look like a beginner project, it is pretty easy to install a magnetic snap to a bag. Actually, I find it even quicker to install a magnetic snap than sewing buttons. For beginners in the bag-making world, magnetic snaps will quickly become their go-to bag closure method.
You can try different closures on different bags. If you want a fast finish, go with a magnetic snap. If you like sewing, try a button or a zipper.
Make a Crossbody Strap
A crossbody strap lets you wear your phone bag across your chest. This keeps your hands free and your phone close. You can make a strap from fabric, ribbon, webbing, or even a crochet chain.
Here’s a simple way to make a fabric strap:
- Cut a strip of fabric about 2 inches wide and as long as you want your strap.
- Fold the strip in half lengthwise, right sides together.
- Sew along the long edge.
- Turn the strap right side out.
- Press it flat with an iron.
- Topstitch along both edges for a finished look.
You can also use a ready-made strap or a thick piece of ribbon. If you want to adjust the length, add a slider buckle. For a crochet bag, just make a long chain and single crochet back along it.
Attach Strap Securely
You want your strap to stay put, even if you use your bag every day. There are several ways to attach a strap so it feels strong and lasts a long time.
- Using a phone case with eyelets or an adapter gives you a secure spot to clip your strap.
- You can add a universal adapter to your existing case for a sturdy hold.
- Self-adhesive patches with loops stick to almost any phone, but they might leave a mark.
- Universal adapter inserts slide between your phone and case. They use tough TPU material and last a long time.
If you sew your strap to the bag, stitch back and forth a few times to make it extra strong. You can also use metal rings or clips for a removable strap. Always check your strap before you head out. A strong strap means you can trust your bag to hold your phone safely.
Now your phone bag is almost ready! You’ve added closures and a strap, so you can carry your phone in style and comfort.
How to Make a Cell Phone Bag: Crochet Method
Crocheting a cell phone bag is a fun and relaxing project. You do not need to be an expert to get started. If you want to learn how to make a cell phone bag with yarn, you are in the right place. This method is perfect for beginners and lets you create a soft, sturdy bag that fits your style.
Choose Yarn & Hook
Picking the right yarn makes a big difference. Cotton yarn works best for a cell phone bag. It does not stretch much, so your bag keeps its shape. Cotton also shows off your stitches and feels strong in your hand. If you want a shiny finish, try mercerized cotton. It looks bright and lasts a long time. Linen yarn is another good choice. It feels soft after washing and holds color well. You can also use recycled or organic cotton, linen, or hemp if you want something eco-friendly.
When you choose a crochet hook, start with a size that matches your yarn. Most beginners like a hook between size E and J (US), or 3.5mm to 7mm. If you use worsted weight yarn, a size H-8 (5mm) hook works great. This size feels comfortable and helps you keep even stitches.
Tip: Try a few different hooks to see which one feels best in your hand. A smooth hook makes crocheting easier and more fun.
Basic Crochet Stitches
You do not need to know many stitches to make a cell phone bag. Most patterns use simple stitches that you can learn quickly. Here are some of the most common stitches you will use:
| Pattern Name | Common Stitches Used |
|---|---|
| Angela Phone Pouch | Herringbone Half Double Crochet, Chaining, Slip Stitches |
| Crochet Phone Cozy | Double Crochet, Single Crochet, Half Double Crochet |
The single crochet stitch makes a tight, sturdy fabric. The half double crochet gives your bag a little more stretch and texture. You can also use slip stitches to join pieces or add a neat edge. If you want to try something new, look for free online patterns that use different stitches or fun textures.
Note: Practice your stitches on a small swatch before you start your bag. This helps you get comfortable and check your gauge.
Assemble Crochet Bag
Now you are ready to put your cell phone bag together. Here is a simple way to do it:
- Make a chain that is as wide as your phone, plus a little extra for seam allowance.
- Work single crochet or half double crochet rows until the piece is twice as long as your phone.
- Fold the piece in half. The fold will be the bottom of your bag.
- Use slip stitches or single crochet to join the sides. Leave the top open.
- Add a strap by chaining a long length and attaching it to both sides of the bag. You can also crochet a separate strap and sew it on.
- If you want a flap, crochet a few more rows on one side before you join the sides. Add a button or snap for closure.
You can finish your bag with a border or add a pocket for cards. Try different yarn colors or add beads for a personal touch. If you want more ideas, search for free crochet patterns online. Many designers share step-by-step guides for how to make a cell phone bag in all shapes and sizes.
Making a cell phone bag with crochet is a great way to show off your creativity. You can match your bag to your outfits or make gifts for friends. Once you learn how to make a cell phone bag, you will want to try new patterns and styles. Have fun and enjoy your new handmade accessory!
Finish & Personalize
Trim & Turn
You are almost done! Now, it is time to give your phone bag a clean look. Start by trimming any extra threads or uneven edges. Use sharp scissors for this step. If you see bulky corners, snip a little fabric off the tips. This helps your bag turn out smooth and flat.
Next, turn your bag right side out. Push out the corners with a blunt tool, like a chopstick or the eraser end of a pencil. You want those corners to look crisp. Check the inside of your bag. Make sure the lining sits flat and the seams look neat. If you added pockets, tuck in any loose edges. This step makes your bag look tidy and ready for the final touches.
Final Press & Adjust
Now, grab your iron. Press your bag gently. This step smooths out wrinkles and gives your bag a polished finish. Focus on the seams and edges. A good press helps everything lay flat and look professional.
You can also add top-stitching along the edges. This simple sewing trick does two things. It holds the layers together and gives your bag a finished look. Try top-stitching around the opening, the strap, or even the pocket flaps. You will notice how much neater your bag looks.
Here are a few ways to make your bag look like it came from a store:
- Top-stitching on handles and seams for a polished look
- Careful fabric prep so the inside looks as nice as the outside
- Finishing edges with neat stitches to hide raw fabric
Take a moment to check your bag. Adjust the strap if it feels twisted. Make sure the closure works well. Your bag should feel sturdy and look neat.
Add Personal Touches
Now comes the fun part—making your phone bag truly yours! You can add decorations or details that show off your style. Many people love to personalize their bags. Here are some popular ways:
| Personalization Method | Description |
|---|---|
| Names, Initials, or Text | Add your name, initials, or a favorite word with fabric paint, embroidery, or iron-on letters. |
| Image Upload | Print a favorite photo on fabric or use a patch with a cool image. |
| Cool Design Options | Sew on patches, use fun trims, or pick a bold fabric pattern for a unique look. |
You can sew on a button in your favorite color. Try adding a patch or a piece of lace. Use fabric markers to draw a design. If you want, add a keychain ring or a charm to the strap. Your phone bag can match your mood, your outfit, or even your favorite hobby.
Tip: Personal touches make your bag special. They also make great gifts for friends and family!
Take a step back and admire your work. You made a phone bag that is both useful and one-of-a-kind. Enjoy carrying it every day!
Troubleshooting & Tips
Common Mistakes
You might run into a few bumps when making your phone bag. Don’t worry! Everyone makes mistakes, especially when learning something new. Here are some common problems and how you can fix them:
- Uneven seams: Sometimes your stitches don’t line up. Try pinning your fabric before sewing. Go slow and check your work as you sew.
- Bag too small: Your phone doesn’t fit? Double-check your measurements before you cut. Always add extra space for seams.
- Crochet bag stretches out: Cotton yarn works best. If your bag feels too loose, use a smaller hook or tighter stitches.
- Strap comes loose: Make sure you sew or attach the strap several times. Test it by pulling gently before you use the bag.
- Pockets don’t line up: Mark pocket spots with a pencil or pins before sewing. Check both sides to keep them even.
Tip: If you make a mistake, you can always take out stitches and try again. Practice makes perfect!
Customization Ideas
You can make your phone bag stand out with a few creative touches. Here are some fun ideas to try:
- Add a bright zipper or a colorful button for a pop of color.
- Sew on patches, beads, or small charms that show off your hobbies.
- Use fabric paint or markers to draw your favorite design.
- Try a patterned lining for a surprise inside.
- Crochet a flower or shape and sew it on the front.
- Mix and match fabrics for a patchwork look.
| Customization | How to Do It | Level |
|---|---|---|
| Embroidery | Stitch your initials or art | Easy |
| Iron-on Patch | Press with a hot iron | Beginner |
| Beads | Sew beads along the edge | Moderate |
| Fabric Paint | Draw or stencil a design | Easy |
Personal touches make your bag special. You can even make matching bags for friends or family!
Care Instructions
You want your phone bag to last a long time. Taking care of it is easy if you follow these steps:
- Fabric bags: Wash by hand in cool water with mild soap. Let it air dry. If you use a washing machine, put the bag in a mesh laundry bag.
- Crochet bags: Wash gently by hand. Lay flat to dry so the bag keeps its shape.
- Stains: Spot clean with a damp cloth. Don’t use bleach.
- Closures and straps: Check them often. Tighten or sew again if they feel loose.
- Storage: Keep your bag in a dry place. Avoid leaving it in direct sunlight for a long time.
A little care goes a long way. Your handmade bag will stay bright and strong for many adventures!
Conclusion
Making your own cell phone bag is fun and useful. You can choose the style you like best. You can sew or crochet your bag. There are free patterns for a padded clutch or a small crossbody cell phone bag. If you want to see how your bag compares to store-bought ones, look at this table:
| Feature | Knit Phone Bag | Leather Case |
|---|---|---|
| Drop Protection | Limited | High |
| Scratch Resistance | Low | Medium-High |
| Water Resistance | Poor | Moderate |
| Heat Tolerance | Low | Medium |
| Aesthetic Longevity | Short | Long |
Experiment with new designs and refine your creations as you go. If you’re looking for more ideas, there are plenty of cell phone bag designs online. Need custom cell phone bags or large quantities? As a trusted bag manufacturer, we can help you create the perfect bags tailored to your needs.
FAQ
How do I choose the right fabric for my phone bag?
Pick 100% cotton if you’re a beginner. It’s easy to sew and comes in many colors. Canvas or faux leather works if you want a sturdy bag. Always check your pattern for fabric suggestions.
Can I make a phone bag without a sewing machine?
Yes, you can sew by hand! Use a strong needle and small, even stitches. It takes more time, but you’ll still get a great result. Hand-sewing works best for simple designs.
What size should I cut my fabric?
Measure your phone. Add about 1 inch on all sides for seam allowance and wiggle room. Double-check before you cut. This helps your phone fit easily inside the bag.
How do I wash my handmade phone bag?
Hand wash your bag in cool water with mild soap. Air dry it flat. For crochet bags, reshape while damp. Avoid bleach or harsh cleaners to keep your bag looking new.
Can I add a pocket for cards or cash?
Absolutely! Sew a small rectangle of fabric inside or outside your bag. You can also crochet a pocket and attach it. Pockets help you organize cards, cash, or keys.
What’s the easiest closure for beginners?
Try a magnetic snap. It’s quick to install and keeps your bag closed. You can also use Velcro or a button with a loop. Pick what feels easiest for you.
Where can I find free patterns for phone bags?
You can search online for free sewing or crochet patterns. Many craft blogs and YouTube channels share step-by-step guides. Look for patterns that match your skill level and style.