If you want a laundry bag that fits your life instead of the other way around, you are in the right place. In this guide we will build three practical versions step by step: a classic drawstring sack, a mesh delicates bag with a zipper, and a hands free backpack style laundry bag. You will learn how to pick fabric, calculate sizes, cut clean pieces, sew strong seams, add hardware, brand your bag, and care for it so it lasts.

We will keep the tone friendly and the steps clear. You will see exact dimensions, pattern math you can trust, and pro tips that remove guesswork. Ready Let us start.
Laundry bag styles and when to use each
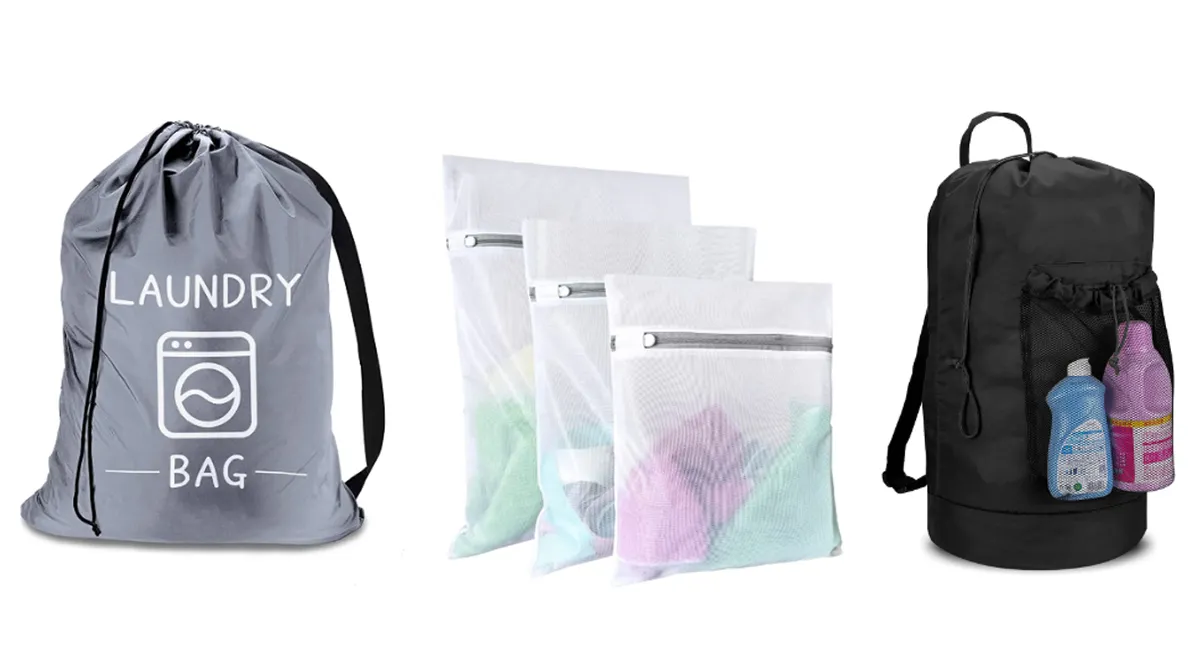
Classic drawstring sack
This is the do it all bag. Cut one big panel, sew one side seam, then fold a top channel for the cord. Box the corners or add a round base for extra space. It holds about a week of laundry and still fits in a locker. Choose canvas for a sturdy feel or 210D oxford for light carry. Add grommets, a cord lock, and a small name window.
Mesh delicates bag with zipper
Great for anything that tangles or snags. Two mesh panels and a nylon coil zipper are all you need. French seams keep edges neat so socks do not escape. The see through body makes sorting easy, and the whole bag goes into the washer. Pick fine mesh for lingerie and wider mesh for socks. Add a hang loop and a soft name tag to keep sets together.
Backpack laundry bag
Choose this when you climb stairs or walk far. Two shoulder straps spread the load and keep your hands free. A reinforced base and bar tacks at strap points make it tough. Add a drawcord channel at the top for quick open and close. Use 420D oxford for light carry or canvas for more structure. Add a chest strap and a front pocket if you want.
Materials and tools
Fabric options
| Fabric | Typical weight | Best for | Pros | Cons | Care |
|---|---|---|---|---|---|
| Cotton canvas | 8 to 12 oz 270 to 400 gsm | Drawstring, backpack | Strong, breathable, easy to print | Can shrink, dries slower | Cold wash, air dry, prewash before cutting |
| Polyester oxford 210D | about 110 gsm | Drawstring, backpack | Light, water resistant, fast dry | Less breathable | Gentle cycle, low heat |
| Polyester oxford 420D | about 210 gsm | Heavy duty drawstring, backpack | Very durable, holds shape | Heavier | Gentle cycle, low heat |
| Nylon ripstop 70D | about 70 gsm | Light drawstring sack | Very light, packs small | Less abrasion resistance | Gentle cycle, hang dry |
| RPET mesh 1 to 2 mm | about 120 to 180 gsm | Delicates bag | Drains and dries fast, see through | Needs zipper finish | Gentle cycle, laundry bag |
| PUL or TPU coated nylon | 150 to 200 gsm | Waterproof liner | Blocks moisture and odors | Less breathable, needs careful stitching | Wipe clean, gentle wash |
Hardware and notions
- Drawcord: 6 to 8 mm for canvas, 4 to 6 mm for oxford
- Cord lock sized to cord
- Eyelets or grommets 8 to 12 mm if you want cord exit holes
- Webbing for straps: 25 to 38 mm
- Zipper for mesh bag: 30 to 50 cm nylon coil
- Thread: all purpose polyester for home machines or bonded nylon for heavy duty
- Labels, ID window vinyl, foam or plastic base insert if desired
Tools
- Sewing machine with size 90 14 or 100 16 needle for canvas, 80 12 for mesh and oxford
- Overlocker serger or zigzag stitch for edge finishing
- Grommet setter and anvil if using metal grommets
- Fabric scissors or rotary cutter, ruler, chalk, clips or pins
- Lighter to seal synthetic cord ends, hammer for grommets, hole punch
Size planning and pattern math
You do not need fancy software. A few simple formulas cover almost every laundry bag.
Choose a target capacity
- Small delicates: 35 to 45 liters
- Medium single person: 60 to 75 liters
- Large family: 90 to 120 liters
Convert capacity to dimensions
Cylinder style drawstring sack
Use liters L, height h in centimeters, diameter d in centimeters.
Volume formula:
L × 1000 = π × (d 2)^2 × h
Solve for diameter:
d = 2 × √(L × 1000 ÷ (π × h))
Quick picks that work well in real life:
| Size | Height h | Diameter d | Circumference for cut width |
|---|---|---|---|
| Small 40 L | 70 cm | 27 cm | 85 cm |
| Medium 70 L | 70 cm | 36 cm | 113 cm |
| Large 110 L | 80 cm | 42 cm | 132 cm |
Add seam allowance and casing allowance as shown later.
Boxed corner style tote shape
Volume in liters L ≈ (W × D × H) ÷ 1000, dimensions in cm.
If you want a square base, set W = D = S. Then S ≈ √(L × 1000 ÷ H).
Examples:
| Size | Height H | Base S x S | Volume |
|---|---|---|---|
| Medium | 65 cm | 33 x 33 cm | ~70 L |
| Large | 75 cm | 38 x 38 cm | ~110 L |
Seam allowances and tolerances
- General seam allowance: 1 to 1.5 cm
- Casing height: 3.5 to 5 cm finished for 6 to 8 mm cords
- Prewash cotton and press flat before cutting to control shrink
Cutting and prep
- Prewash and press cotton canvas. This prevents surprise shrink later.
- Mark grainline along the length of woven fabrics, keep long seams on grain for strength.
- Label pieces as you cut: body panel, casing strip, base circle or boxed corners, straps and patches.
Build 1 — Classic drawstring sack beginner friendly
We will make a medium 70 L version in 10 oz canvas.
You can scale using the size table.
Pieces and cut list
- Body rectangle: width = circumference 113 cm plus 3 cm seam allowance = 116 cm. Height = bag height 70 cm plus 6 cm casing allowance plus 2 cm top turn under = 78 cm. Cut 1.
- Optional round base: diameter equals d 36 cm plus 2 cm seam allowance = 38 cm. Cut 1 if you prefer a round base.
- Casing strip if you want a separate piece: 116 × 10 cm. Many people simply fold the top of the body to make the channel.
- Cord: 170 to 190 cm for an average sack
- Two grommets optional
Step by step
- Finish the short edges
Run the two short edges through an overlock, or use a zigzag if that is what you have. This stops fraying after washes. Test on a scrap to set stitch length around 2.8 to 3.2 so the edge is neat, not wavy. - Sew the side seam
Fold the rectangle right sides together. Sew the 78 cm side with a 1.5 cm seam allowance, backstitch at both ends, then press the seam flat. Want extra strength Use a French seam to trap the raw edge. - Bottom A boxed corners
Lay the tube flat. Mark 8 cm squares at both bottom corners and cut them away. Pinch each corner so the side seam meets the bottom fold, then sew across with a 1.5 cm seam. Press and, for heavy loads, topstitch that seam for added strength. - Bottom B round base
Quarter mark the tube and the circle. Match the marks, pin or clip, and sew around with a 1.5 cm seam, easing the fabric as you go. Snip tiny notches in the seam allowance to relax it, then press for a smooth curve. - Make the top casing
Press 1 cm to the wrong side, then fold down 5 cm and press again. Stitch close to the inner fold to form the channel, leaving a 3 cm gap at the side seam for threading. If the fabric is thick, add a second row of stitching for stability. - Add grommets optional
Prefer cord exits at the front Mark two holes about 3 cm below the top and 4 cm from the side seam. Fuse or stitch a small patch inside for reinforcement, punch the holes, and set the grommets. Practice on a scrap first for clean edges. - Thread the cord
Attach a safety pin or bodkin to the cord and feed it through the channel all the way around. Exit at the gap or grommet, add a cord lock, then tie firm stopper knots. Lightly heat seal synthetic cord ends so they do not unravel. - Reinforce stress points
Add short, dense bar tacks at the top of the side seam, near grommets, and at each boxed corner seam. These little stitches take the load when the bag is full. Give each area a gentle pull test to be sure it is secure.
Time and cost guide example
Numbers vary by region. This gives a planning feel.
| Component | Qty | Unit estimate | Subtotal |
|---|---|---|---|
| 10 oz canvas | 0.9 m | 6 to 10 USD m | 5.4 to 9.0 |
| Cord 8 mm | 1.8 m | 0.4 USD m | 0.7 |
| Cord lock | 1 | 0.3 to 0.6 | 0.3 to 0.6 |
| Grommets | 2 | 0.1 each | 0.2 |
| Thread small share | — | 0.2 | 0.2 |
| Estimated materials | 6.8 to 10.7 USD |
| Operation | Beginner time | Experienced time |
|---|---|---|
| Cut and mark | 15 min | 7 min |
| Sew side and bottom | 15 min | 8 min |
| Make casing | 10 min | 6 min |
| Grommets and cord | 10 min | 5 min |
| Total | 50 min | 26 min |
Build 2 — Mesh delicates bag with zipper
We will make a simple 35 × 45 cm bag that fits a standard laundry load of socks and underwear.
Pieces and cut list
- Front mesh: 35 × 45 cm
- Back mesh: 35 × 45 cm
- Nylon coil zipper: 35 to 40 cm
- Optional binding tape for side seams if you do not have an overlocker
Step by step
- Insert the zipper between the two mesh panels at the top edge. Place zipper face down on the right side of the front mesh, stitch, flip and topstitch. Repeat for the back panel.
- Close the sides and bottom with a narrow French seam: sew wrong sides together at 0.5 cm, trim if needed, turn right sides together, press gently, and sew again at 1 cm. This traps the raw mesh edges and stops fraying.
- Bind zipper ends if the zipper does not reach both side edges. Fold small tabs to cover the ends neatly.
- Add a care label to one side seam.
- Optional hang loop: a 10 cm strip of webbing folded and inserted at one side seam near the zipper.
Tips for mesh
- Use a size 80 12 needle and a shorter stitch length around 2.0 to avoid skipped stitches.
- If the zipper waves, reduce presser foot pressure or stabilize the mesh edge with a narrow strip of lightweight woven fabric.
Build 3 — Backpack laundry bag
We will make a 90 to 110 L version that carries like a drawstring backpack.
Pieces and cut list for a 110 L bag in 420D oxford
- Body rectangle: width = circumference 132 cm plus 3 cm seam allowance = 135 cm. Height = bag height 80 cm plus 6 cm channel plus 2 cm turn under = 88 cm. Cut 1.
- Base patch inside: 35 × 35 cm extra layer for wear resistance
- Two strap webbing pieces: 90 to 110 cm each, 25 to 38 mm wide
- Two strap patches: 8 × 8 cm squares of the main fabric or leatherette
- Cord: 200 cm with a cord lock or two grommets
Step by step
- Make strap patches: fold raw edges under, topstitch the squares to the outside of the body panel about 12 to 15 cm up from the bottom, spaced one third in from each side.
- Attach webbing straps: secure the lower ends at the patches with a box X stitch. Leave the top ends free for now.
- Sew side seam of the body rectangle, right sides together, 1.5 cm seam. Finish the edge.
- Reinforce base: place the base patch inside, centered, and stitch around its perimeter with two rows.
- Close the bottom with boxed corners or a round base as in Build 1. For backpack comfort, boxed corners about 10 cm give a flat base.
- Create top channel: fold 1 cm under, then 5 cm down, stitch around leaving two small openings at the back between the strap points.
- Feed the cord through the channel.
- Anchor strap tops: run each strap up to the top edge and stitch into the seam allowance under the channel, then add a bar tack through the channel seam for extra security.
- Finish: thread the cord lock, heat seal webbing and cord ends, then add a small chest clip if you like.
Fit tip
- Strap length around 95 cm suits most adults. For taller users, 105 to 110 cm works better.
Reinforcements, finishing, and safety
- Edge finishes: overlock, zigzag, or bind with 20 to 25 mm cotton tape.
- Bar tacks: place them where straps meet the body, near grommets, and at the top of side seams.
- Safety for kids: limit free cord length. Use a breakaway buckle if the bag is for children.
- Metal hardware: smooth any sharp edges on grommets with a deburring tool.
Custom features and add ons
- ID window: a 9 × 12 cm clear vinyl pocket stitched near the top holds a name card or room number.
- Front zipper pocket: 20 × 25 cm panel for detergent pods or coins.
- Base support: a removable insert cut from thin foam or corrugated plastic adds structure. Round the corners and slide it into a small internal sleeve.
- Branding:
- Screen print on cotton and poly blends for bold logos
- Heat transfer film on polyester oxford
- Sublimation on white polyester only
- Embroidery patches on strap patches or pocket panels
Care and maintenance
| Material | Wash | Dry | Notes |
|---|---|---|---|
| Cotton canvas | Cold wash, mild soap | Air dry flat or hang | Expect minor shrink after first wash if not prewashed |
| Polyester oxford | Gentle cycle | Low heat or hang | Avoid very high heat at the iron |
| Nylon ripstop | Gentle cycle | Hang dry | Heat can glaze nylon |
| Mesh delicates | Use a laundry bag to protect | Air dry | Close zipper before wash |
| PUL or TPU liner | Wipe clean or gentle cycle | Hang dry | Avoid hot dryer to protect coating |
Odor control
- Do not store damp clothes in a sealed bag for long.
- Add mesh vents or use breathable fabrics.
- Wash the bag regularly with similar colors.
Troubleshooting
| Problem | Likely cause | Quick fix |
|---|---|---|
| Puckering seams on canvas | Tension too high, needle too small | Reduce top tension, use size 100 16 needle, lengthen stitch to 3.0 |
| Skipped stitches on mesh | Needle too blunt or wrong type | Fresh size 80 12 needle, reduce foot pressure |
| Wavy zipper on mesh | Stretch while sewing, no stabilizer | Use narrow woven stabilizer tape, shorten stitch, topstitch |
| Fraying edges | No finish or too small seam | Overlock or zigzag, increase seam allowance to 1.5 cm |
| Grommet pulls out | Fabric too thin, no reinforcement | Add a backing patch, interface, or switch to a buttonhole style cord exit |
| Cord disappears into channel | No cord stop or knot | Add a cord lock or tie large knots at ends |
| Boxed corners misaligned | Inaccurate corner cuts | Mark with a square ruler, cut both corners together after folding |
No sew options quick DIY
- Hem tape casing: fold the top twice, fuse with hem tape, then punch holes for a cord.
- Riveted straps: attach webbing with rivets and washers rather than stitching.
- Pre made grommets: hammer in two grommets near the top and thread a cord.
Sustainable choices
- Choose organic cotton or RPET mesh.
- Cut pieces with an efficient marker layout to reduce waste.
- Turn offcuts into cord tabs, labels, or patch reinforcements.
- Offer repair friendly designs with replaceable cords and straps.
Packaging and gifting ideas
- Fold the bag into a neat bundle and wrap a kraft paper belly band with a short care guide.
- Add a QR code linking to your digital instructions.
- For sets, include color coded cords to tell sizes apart.
For schools, small brands, or teams scaling production
QC checklist
- Straight seams, consistent stitch length, seam allowance within 2 mm, bar tacks present, thread tails trimmed, grommets secure, cords sealed.
Basic compliance for bulk orders
- Colorfastness wash test, seam strength pull test, needle detection for factory lines, fiber content and care labels per region rules.
Working with a factory
- Share target size and capacity, fabric choice and color, logo method, packaging, and any test standards. Typical MOQ for printed bags starts from a few hundred units. Samples help you lock the details before mass production.
Photos and diagrams to include
- Cutting layout sketches for each build.
- Step photos for boxed corners and zipper insertion.
- Close ups of bar tacks, grommets, casing entry, and strap patches.
- Alt text ideas:
- Cutting a 116 by 78 cm canvas rectangle on a table
- Sewing a 5 cm channel at the top edge of a laundry bag
- Close up of a bar tack securing a webbing strap
- Mesh delicates bag with nylon coil zipper on a washer door
Tables you can copy into your post
- Fabric selection matrix above
- Size cheat sheet above
- Bill of materials and operation time above
- Care guide above
- Troubleshooting above
Step by step summary card print friendly
- Pick a style and capacity
- Choose fabric and hardware
- Calculate dimensions from the size tables
- Cut pieces and label them
- Sew seams and finish edges
- Add casing or zipper
- Install grommets or thread cord
- Add straps or pockets if needed
- Bar tack stress points
- Wash test, then use and enjoy
Conclusion
You now have three practical laundry bag designs you can make. The drawstring sack gives you plenty of space, the mesh bag keeps delicates safe, and the backpack style makes carrying easier. We are a professional manufacturer, so if you need bulk custom laundry bags with your logo, we can handle everything from materials to printing and packaging. Contact us for samples or a quick quote, and let’s create laundry bags that fit your needs perfectly.
FAQ
What size laundry bag fits a standard washer
For a typical home washer, a medium 60 to 75 liter bag works well. Keep the bag flexible and do not overfill.
Which fabric is best for damp rooms
Polyester oxford or nylon ripstop. They dry fast and resist mildew better than cotton.
How do I stop the cord from disappearing
Use a cord lock and tie larger knots at both ends. You can also add two grommets and keep the knot outside.
Can I add a rigid frame or wheels
Yes. Make a sleeve at the base for a removable plastic insert, and add a simple rolling frame for cart style bags. For home use, a foam or plastic base insert is enough.
What needle and thread should I use for canvas
Size 100 16 needle and polyester thread, stitch length around 3.0. For very heavy canvas use bonded nylon and a walking foot if available.
Why does my zipper wave on mesh
Mesh stretches. Stabilize the edge with a narrow woven strip or wash away tape and reduce presser foot pressure.
Can I sublimate a logo
Yes on white polyester and some polyester coated fabrics. For cotton, use screen print, DTF, or heat transfer vinyl instead.