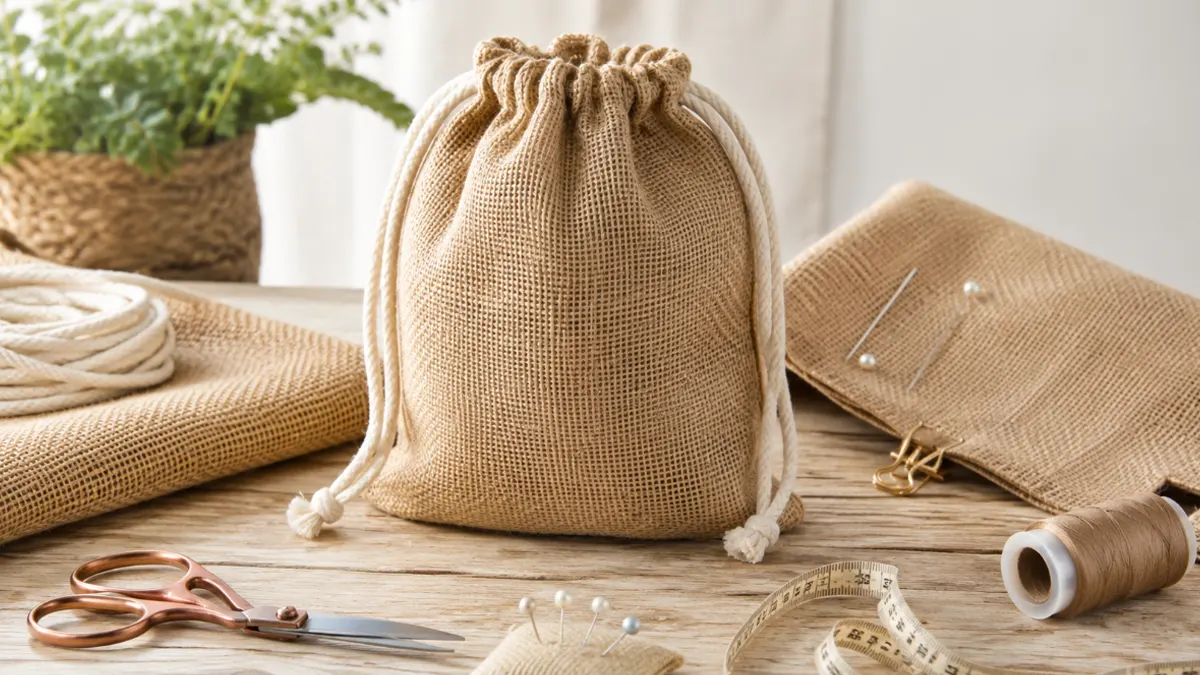
You might wonder how to make a jute drawstring bag without any sewing experience. This tutorial gives you easy instructions so you can make a drawstring bag at home. You only need a few tools and some jute fabric. Making a simple drawstring tote feels rewarding, and you help the planet at the same time. Jute bags use less chemicals, break down naturally, and do not add microplastics to the environment. Here are a few reasons why jute is a smart choice:
- Jute grows fast and needs little pesticide.
- The plant absorbs a lot of CO2.
- Jute bags decompose and enrich the soil.
You can follow each step and finish your bag with confidence!
Key Takeaways
- Making a jute drawstring bag is simple. You do not need to know much about sewing.
- Jute is good for the environment. It breaks down on its own and helps cut down on plastic trash.
- Get easy materials like jute fabric, cord, and some sewing tools before you start.
- Cut the jute fabric into two pieces. Each piece should be 10 inches by 13 inches for a normal bag.
- Sew the sides and bottom of the bag. Leave the top open so you can add the drawstring channel.
- Make a channel at the top by folding and sewing the fabric. This will help the bag look nice and tidy.
- Use a safety pin or a straw to pull the drawstring cord through the channel.
- You can make your bag special by adding things like fabric paint, stencils, or patches. This will make your bag one of a kind.
Materials for a Jute Drawstring Bag
Before you start making your bag, you need to gather a few simple supplies. This part of the tutorial helps you get everything ready so you can work smoothly from start to finish.
Jute Fabric and Cord
You need jute fabric for the main part of your bag. Jute feels strong and has a natural look. For a standard drawstring bag, cut your jute fabric into two pieces, each measuring 10 inches by 13 inches. This size works well for most uses, like holding small gifts or snacks.
For the drawstring, you need a cord that is about 15 inches long. Jute cord matches the fabric and gives your bag a rustic style. If you want a different look or feel, you can try other types of string. Here’s a quick guide to help you choose:
| Material | Durability | Appearance |
|---|---|---|
| Polyester String | Strong, lightweight | Variety of colors |
| Cotton String | Soft, eco-friendly | Natural texture, comfortable grip |
| Jute String | Biodegradable | Rustic, eco-conscious |
Tip: If you want a softer grip, cotton string feels gentle in your hands. Polyester string comes in many colors, so you can make your bag stand out.
You can also use ribbon, twine, or even recycled shoelaces if you want to get creative. Just make sure your cord fits through the channel at the top of your bag.
Tools Needed
You do not need fancy tools for this project. Most of these items are easy to find at home or in a craft store. Here’s what you should have ready:
- Paper scissors (these work well for cutting jute and keep your sewing scissors sharp)
- Sewing machine (a basic one works fine)
- Size 90 sewing needle (this needle handles thick jute fabric)
- Pins or clips (to hold the fabric in place)
- Ruler or measuring tape (for marking your fabric)
- Fabric marker or chalk (to draw cutting lines)
- Safety pin or bodkin (to help thread the cord through the channel)
If you want to add decorations, you might also want fabric paint, patches, or labels.
Note: Normal sewing machine settings work for jute. You do not need to change much. Just go slow and keep your stitches even.
Now that you have your materials and tools, you are ready to move on to the next step in this tutorial.
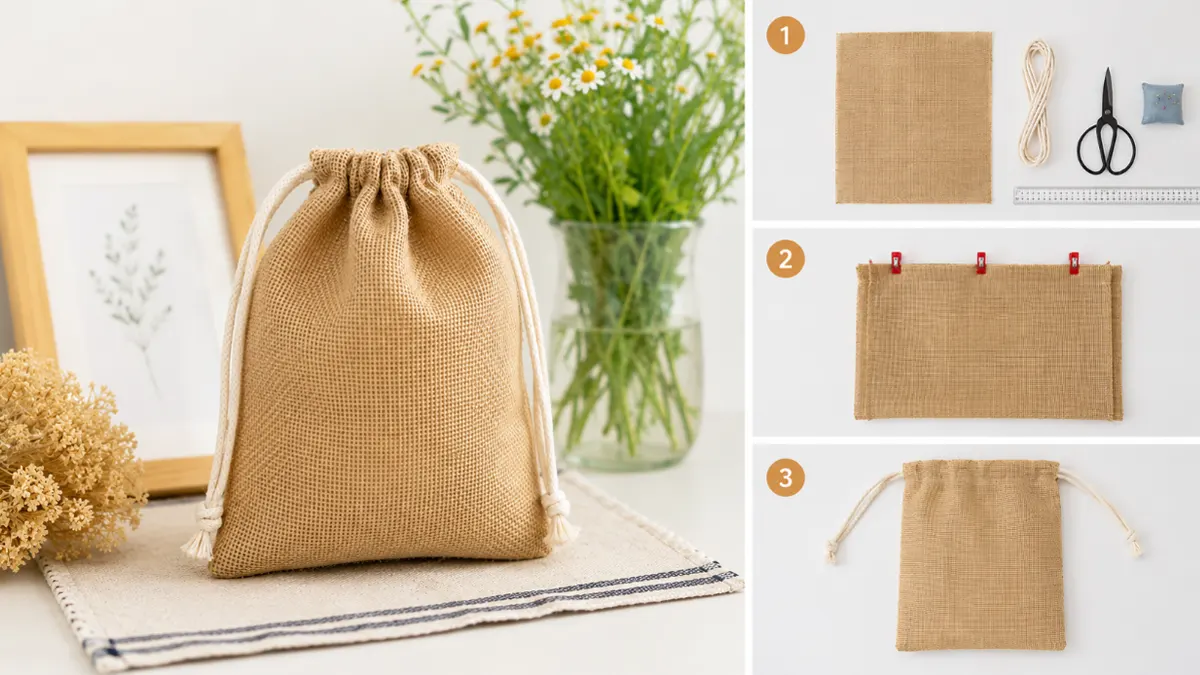
Cut and Prepare Fabric
Getting your jute fabric ready is an important step. You want your bag to look neat and last a long time. Let’s break this down so you can follow along easily.
Measure and Mark
Start by laying your jute fabric flat on a clean table. Smooth out any wrinkles with your hands. Use a ruler or measuring tape to measure two rectangles, each 10 inches wide and 13 inches tall. Mark the corners with a fabric marker or chalk. Draw straight lines to connect the marks. Double-check your measurements before you cut. This helps you avoid mistakes and saves fabric.
Tip: If your fabric has a strong smell or feels stiff, you can wash it in a 5% detergent solution for about 10 hours at room temperature. This removes dirt and makes the fabric softer.
Cut Jute Pieces
Now you’re ready to cut the fabric. Use sharp scissors or a rotary cutter for the best results. Hold the fabric steady with one hand and cut slowly along the marked lines. Try to keep your cuts straight. Clean edges make sewing much easier.
If you want to prepare your fabric even more, here’s a quick table with extra steps you can try:
| Method | Description |
|---|---|
| Detergent Washing | Wash in 5% detergent solution for 10 hours to remove dirt. |
| Dewaxing | Soak in 5% ethanol solution for 1 hour to remove waxes and pectin. |
| Alkali Treatment | Treat with 5% NaOH for 6 hours, then sprinkle with 2% acetic acid to harden and clean edges. |
These steps help your jute fabric feel smoother and make it easier to handle.
Cutting Tips
Jute can fray easily, so you want to protect the edges. Here are some simple ways to keep your fabric neat:
- Use pinking shears to cut a zigzag edge. This helps stop the threads from coming loose.
- Try a sharp rotary blade for a clean cut. This puts less stress on the fibers.
- Sew a zigzag stitch along the edge if you have a sewing machine. This holds the threads in place.
- Fold the edge over and sew a straight or running stitch. This is called hemming and gives a strong finish.
- If you like hand sewing, use a whip stitch around the edge.
- For a quick fix, dab a little clear nail polish along the cut edge to seal the threads.
- If you have a serger, run the edge through for a professional look.
Note: Burning the edge works only for synthetic fabrics. Jute is natural, so avoid this method.
Take your time with these steps. Neat edges make your bag look better and last longer. Now you’re ready to move on to sewing!
How to Make a Drawstring Bag – Sewing Steps
Now you have your fabric pieces ready, it’s time to start sewing. This part of the tutorial will show you how to make a jute drawstring bag with easy instructions. You’ll see that sewing can be simple and fun, even if you’re new to it.
Align and Pin Fabric
Lay both pieces of jute fabric on your table. Make sure the edges line up. The sides you want on the outside of your bag should face each other. This step helps your bag look neat when you turn it right side out.
You need to keep the fabric from moving while you sew. Here’s how you can do it:
- Use pins to hold the fabric in place.
- Place the pins about an inch apart along the edges.
- This will keep the fabric from shifting while you’re sewing.
Take your time with this step. If you rush, the fabric might slip and your bag could look uneven. Pinning well makes the next steps much easier.
Sew Sides and Bottom
Now you’re ready to sew the sides and bottom of your bag. Start at one top corner and sew down the side, across the bottom, and up the other side. Leave the top edge open. This is where you’ll make the drawstring channel later.
You might wonder which stitch works best for jute. Here’s a quick table to help you choose:
| Stitch Type | Purpose |
|---|---|
| Straight Stitch | Used for joining fabric, ideal for sides and bottom seams. |
| Lockstitch | Provides strong seams, perfect for high-stress areas like bag bottoms. |
| Overlock/Zigzag | Prevents fraying, suitable for edges of the bag. |
A straight stitch works well for most of the sewing. If you want extra strength, use a lockstitch at the bottom. You can also sew a zigzag or overlock stitch along the raw edges. This helps stop the jute from fraying.
Sew slowly and keep your stitches straight. Jute can be thick, so don’t rush. The average time to sew the sides and bottom of a jute drawstring bag is about 20 minutes. If you’re careful, you’ll get a strong, neat bag.
Reinforce Seams
You want your bag to last a long time. Reinforcing the seams makes a big difference. When you reach the bottom corners, sew back and forth a few times. This locks the stitches in place. You can also add a second row of stitches along the sides and bottom for extra strength.
If you see any loose threads, trim them with scissors. Check your seams before you move on. A strong seam means your bag can hold more without coming apart.
You’ve just finished the most important part of how to make a jute drawstring bag. With these instructions, you can feel proud of your sewing skills. Next, you’ll learn how to make the drawstring channel and finish your bag.
Make the Drawstring Channel
You’re almost done with your jute bag! Now it’s time to make the channel at the top so you can pull your drawstring through. This step helps your bag open and close easily.
Fold Top Edge
Start by turning your bag so the wrong side faces out. This means the seams you just sewed are on the outside. You want to fold the top edge down to make space for the drawstring. Here’s a simple way to do it:
- Fold the top edge of your bag down about one to two centimeters. This fold will help you create a casing for the cord.
- Pin the folded edge in place. Make sure the pins are secure so the fabric doesn’t move.
- Repeat this folding and pinning on both sides of your bag.
Tip: Take your time with the folding. If you keep the fold even all the way around, your bag will look neat and the drawstring will slide smoothly.
Sew Channel
Now you need to sew along the folded edge to make the channel. This step locks the fold in place and forms the path for your cord.
- Place your bag under the sewing machine foot. Start at one side seam and sew all the way around the top, close to the folded edge.
- Keep your stitches straight and even. If you sew slowly, you’ll get a cleaner finish.
- Stitch just below the edge of the fold. This makes the channel strong and gives your bag a tidy look.
Some people like to use a special stitch for extra strength. You can try a straight stitch or even a zigzag if you want the channel to last longer. If you want a really clean finish, line up your fold carefully before you sew.
Leave Openings
Don’t forget to leave a small gap in the channel. You need this opening to thread your drawstring through later. Stop sewing about an inch before you reach where you started. This gap should be big enough for your cord but not so big that it looks messy.
Note: If you accidentally sew the channel closed, don’t worry. Just use a seam ripper to open a small section. You can always fix it!
Once you finish this step, you have a neat channel at the top of your bag. You’re ready to add the cord and see your bag come together!
Insert Drawstring Cord
You have finished sewing the channel at the top of your bag. Now it’s time to add the cord so you can open and close your bag with a simple pull. This part is fun and lets you see your bag come together.
Thread the Cord
Getting the cord through the channel might seem tricky, but you have a few easy ways to do it. You can use tools you probably have at home. Here are some popular methods:
- Using a Straw: Slide your cord into a straw and staple them together. Push the straw through the channel. When you reach the other side, pull the cord out. This trick works well if your cord is soft or floppy.
- Using a Safety Pin: Attach a safety pin to one end of your cord. Push the pin into the channel and scrunch the fabric along as you go. The pin helps guide the cord through, even if the channel feels tight.
- Using a Bodkin: A bodkin is a special tool made for threading cords. You clip or tie your cord to the bodkin, then pull it through the channel. If you sew often, you might want to keep a bodkin in your sewing kit.
Tip: If your cord gets stuck, try wiggling the tool gently. Don’t pull too hard or you might tear the fabric.
Once you finish threading, make sure both ends of the cord stick out from the opening you left in the channel. Pull the ends to check that your drawstring slides smoothly.
Knot the Ends
Now you need to tie knots at the ends of your cord. This step keeps the cord from slipping back into the channel and adds a nice finish to your bag. You have several knot options, and some work better for thick jute cord.
Here are some secure knots you can try:
- Leaf knot
- Barrel knot
- Wrap knot
- Figure 8 knot
- Heaving line knot
- Overhand knot
The overhand knot is the easiest. Just make a loop at the end of your cord, then pull the end through and tighten. If you want a fancier look, try a figure 8 knot or a barrel knot. These knots hold well and look neat.
Note: If your cord starts to fray, wrap a small piece of tape around the end before you tie the knot. This keeps the fibers together and makes knotting easier.
Give each end a gentle tug to make sure the knots stay tight. Now your bag is ready to use! You can pull the drawstring to close your bag and keep your things safe inside.
Finish and Customize
You’ve made it to the fun part—finishing and personalizing your jute drawstring bag! This is where you get to add your own style and make sure your project looks neat and tidy.
Trim Threads
Before you show off your new bag, take a moment to check for any loose threads. Jute fabric can leave little strands after sewing. Here’s how you can tidy things up:
- Trim any loose threads you see along the seams or edges.
- Inspect all the seams to make sure everything looks neat.
- Give your bag a gentle shake and look for any threads that pop out.
- If you find extra threads, snip them off with sharp scissors.
- Some people like to do a final check after sewing, just like a quality inspector.
Tip: A neat finish makes your bag look professional and helps it last longer.
Add Decorations
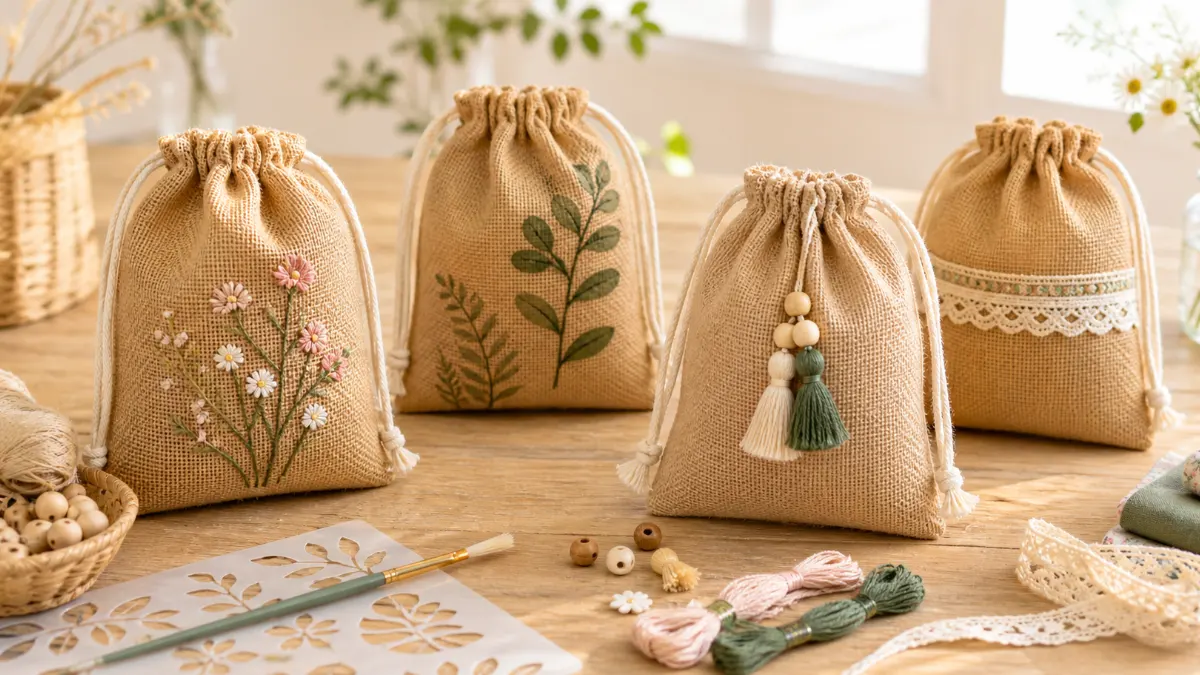
Now you can get creative! Decorating your bag lets you show off your personality. You can keep it simple or go wild with colors and textures. Here are some popular ideas for customizing your jute drawstring bag:
| Decoration Idea | Description | Materials Needed | Tips |
|---|---|---|---|
| Watercolor Splashes | Artistic paint splatters for a soft look | Fabric-safe watercolor paint, brush | Use pastel shades for a dreamy effect |
| Stenciled Patterns | Clean shapes and designs with stencils | Stencil, fabric paint, brush | Try different shapes and sizes |
| DIY Stamps with Potatoes | Fun, repeatable prints using potato stamps | Potatoes, fabric paint, knife | Layer stamps for cool effects |
| Badges and Pins | Add pins or badges for a unique touch | Pins, fabric glue (optional) | Pick pins that match your style |
| Fabric Collage | Mix fabric scraps for a textured design | Fabric scraps, fabric glue | Use different textures for interest |
| Iron-On Transfers | Custom images or text with transfer paper | Iron-on transfer paper, iron | Personal photos look great |
| Sequin Art | Sparkly designs with sequins | Sequins, fabric glue | Add glitter for extra shine |
| Button Mosaic | Playful patterns with colorful buttons | Assorted buttons, glue | Mix colors for a bold look |
| Leather Patches | Rugged style with leather scraps | Leather scraps, glue or needle and thread | Try initials for a classy touch |
| Metal Studs | Edgy look with metal studs | Metal studs, glue | Combine with leather for style |
| Wrapping the Handle with a Scarf | Elegant touch by wrapping a scarf around the handle | Lightweight scarf | Tuck in loose ends |
| Colorful Yarn Embellishments | Add texture with yarn tassels or shapes | Yarn, needle | Make tassels for a bold accent |
| Lace and Embellishments | Soft, elegant look with lace and beads | Lace, beads, glue | Match bead colors for harmony |
Try mixing two or three ideas for a one-of-a-kind bag. You can even invite friends to decorate together!
Labels or Tags
Adding a label or tag gives your bag a special touch. You can write your name, a fun message, or even a favorite quote. Here are some ways to add labels:
- Sew a small fabric tag inside or outside the bag.
- Use iron-on labels for a quick and easy option.
- Attach a paper tag with string for a gift bag look.
- Write on a wooden tag for a rustic feel.
Note: Labels help you remember which bag is yours, especially if you make more than one.
Take a final look at your bag. Check for any loose threads and make sure your decorations are secure. Now you have a neat, stylish bag that’s ready to use or give as a gift!
Drawstring Bag Tutorial Tips
Jute Handling Advice
Working with jute can feel different from other fabrics, but you can get great results with a few smart moves. Here are some tips to help you handle jute like a pro:
- Always check the quality of your jute before you start. If you buy from a supplier, ask for samples first. This helps you avoid surprises.
- Choose manufacturers with good reputations and certifications. Reliable sources make a big difference.
- If you want your simple drawstring tote to resist water, try laminated jute. It keeps your bag looking fresh even if you get caught in the rain.
- Store your jute bags in a dry place. Jute absorbs moisture, so keeping it dry helps your bag last longer.
- Let your friends know how to care for their bags. A little advice goes a long way.
Tip: If you want your simple drawstring tote to look its best, keep it away from sharp objects that might snag the fibers.
Common Mistakes
Even experienced crafters make mistakes. You can avoid the most common ones by paying attention to these points:
- Using the wrong material for printing can make your design fade or peel.
- Printing on rough jute can blur fine details or text. Smooth out the fabric before you start.
- Not matching your printing method to your fabric can ruin your finished bag.
If you run into trouble, don’t worry! Here’s a quick table to help you fix common problems:
| Common Issue | Recommended Solution |
|---|---|
| Frayed Drawstrings | Seal the ends with a lighter, dab on clear nail polish, or swap out the cord. |
| Holes in the Fabric | Patch with matching jute, use fabric glue, or sew on a patch for extra strength. |
| Broken Seams | Hand sew or use your machine to repair, and reinforce the seam for durability. |
Note: Take your time with each step. Rushing can lead to mistakes, but careful work gives you a bag you’ll love.
Customization Ideas
You can turn your bag into something truly special with a few creative touches. Here are some of the top trends for 2024:
- Hand-paint your bag with fabric paints for a personal touch.
- Add embroidery, like your initials or a fun pattern.
- Use screen printing for a bold, consistent look—great for groups or events.
- Try stenciling with fabric paint for easy, repeatable designs.
- Monogram your bag for weddings or gifts.
- Make rustic-themed party bags to match your event.
- Go green with eco-friendly personalization—jute is biodegradable!
Customizing your bag isn’t just fun. It also helps your brand or message stand out. Jute bags get five to ten times more brand impressions than disposable items. You get a big print area—about 30 by 30 centimeters—so your logo or design really pops. Eco-friendly bags also boost brand recall by 23%. That’s a win for you and the planet!
If you’re new to this tutorial, start with a simple design. Sketch your idea first, and use an embroidery hoop to keep your fabric tight. Take your time and enjoy the process. Making a simple drawstring tote can be relaxing and rewarding.
Conclusion
You did it! You followed this tutorial and made your own drawstring bag. You can use your bag every day or give it as a thoughtful gift. Try new designs and make each drawstring bag unique. If you want custom orders, we offer OEM and ODM services. Check out the table below to see the benefits:
| Advantage | Description |
|---|---|
| Customization Options | Choose types, colors, patterns, logos, and designs for your drawstring bag. |
| Quality Control | Get high-quality bags with strict quality checks. |
| Brand Requirements | Match your brand needs and boost recognition. |
FAQ
How do I wash my jute drawstring bag?
You should hand wash your bag in cold water with mild soap. Let it air dry. Avoid using a washing machine. Jute can shrink or lose shape if you use hot water or harsh detergents.
Can I make a bigger or smaller bag?
Yes! Just change the size of your fabric pieces. For a bigger bag, cut larger rectangles. For a smaller one, use smaller pieces. Make sure your cord matches the new width.
What if I don’t have a sewing machine?
You can sew your bag by hand. Use a strong needle and thick thread. Try a backstitch for strong seams. It may take longer, but you will still get a sturdy bag.
Will my bag hold heavy items?
Jute is strong, but it works best for light to medium items. You can carry snacks, small gifts, or craft supplies. For heavy things, reinforce the seams or use double layers.
How do I stop the edges from fraying?
Try pinking shears, zigzag stitches, or clear nail polish on the edges. You can also hem the edges. These tricks help your bag last longer and look neat.
Can I decorate my bag with markers?
Yes, you can use fabric markers or permanent markers. Test on a scrap first. Some markers may bleed on jute. Let your design dry before using the bag.
Is jute safe for food storage?
Jute is natural and eco-friendly. You can use it for dry snacks or wrapped food. Avoid putting wet or oily foods inside. Always wash your bag before first use.
Where can I buy jute fabric and cord?
You can find jute at craft stores, fabric shops, or online. Look for eco-friendly options. Some stores sell jute in rolls or pre-cut pieces. Ask for samples if you want to check quality.