
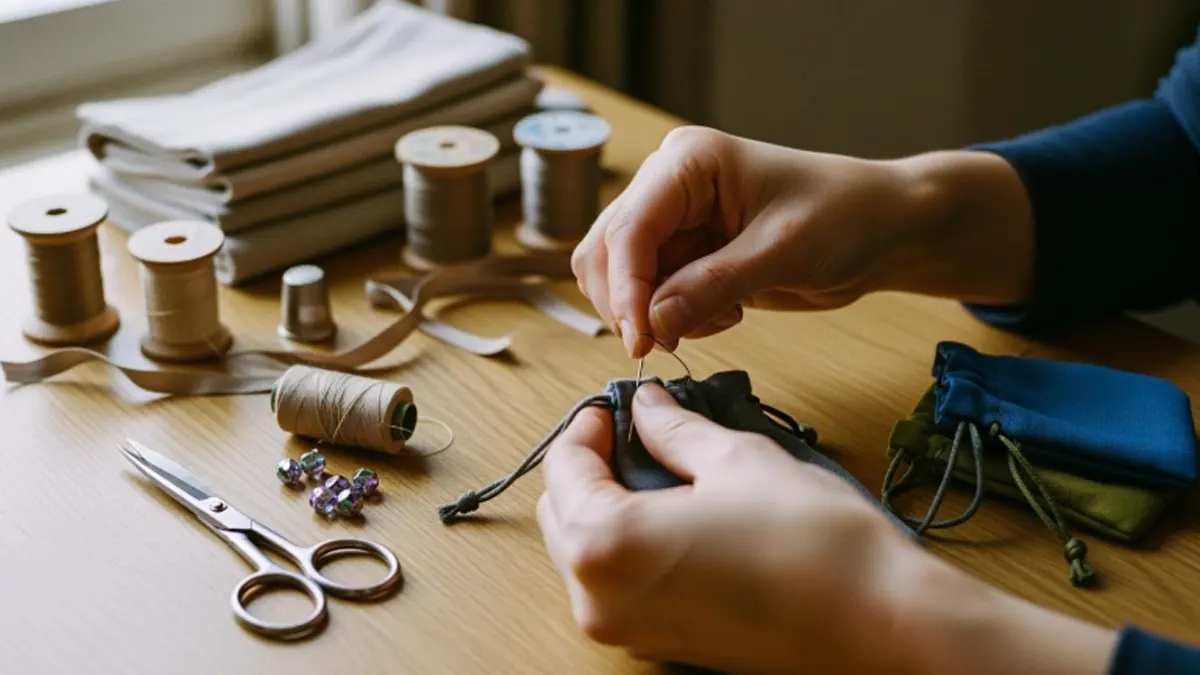
You want to know how to make a jewelry pouch? You can do it with a few simple steps, even if you are new to sewing. This diy project works great for keeping your jewelry safe or wrapping a special gift. You only need basic supplies like fabric, thread, and a satin cord. Grab some scissors, a ruler, and a marker to help you measure and cut. This beginner friendly tutorial gives you clear instructions so you can make a pouch you will love.
Tip: Choose a soft fabric so your jewelry stays scratch-free.
Key Takeaways
- Making a jewelry pouch is easy. You only need simple supplies like fabric, thread, and a drawstring.
- Pick soft fabrics such as cotton, velvet, or satin. These help protect your jewelry from scratches and damage.
- You can add pockets and compartments inside your pouch. This helps keep different jewelry pieces organized.
- A sewing machine works faster, but you can sew by hand too. Hand sewing is good for beginners.
- You can decorate your pouch with beads, embroidery, or special closures. This makes your pouch unique and special.
- Clean and store your pouch the right way. This keeps it looking nice and helps it last longer.
- Try making pouches in different sizes and shapes. This helps fit your jewelry and travel needs.
- Pouches with themes can make special occasions more fun. They also make your gifts thoughtful and unique.
Jewelry Pouch Overview
What Is a Jewelry Pouch
A jewelry pouch is a soft bag for jewelry. It is flexible and easy to fold. You can put it in your purse or suitcase. Hard boxes are bigger and heavier than pouches. Pouches save space and feel light. Many people use a diy jewelry pouch to keep jewelry safe and neat. It helps stop scratches and keeps things organized.
Tip: Pick a jewelry pouch pattern with slots or compartments. This helps you keep rings, earrings, and necklaces apart.
Jewelry pouches have special features:
- You can fold them and store them anywhere.
- Soft fabric protects each piece from scratches.
- Some materials help slow down tarnishing.
- They are light and easy to carry when you travel.
- Some pouches have loops or pockets to stop chains from tangling.
- Strong stitching helps your pouch last longer.
- Compartments and slots help you organize jewelry.
- You can choose colors and materials you like.
Uses and Benefits
Jewelry pouches are useful in many ways. People use them for gifts at weddings or anniversaries. Companies give them as gifts to workers or customers. If you travel, a pouch keeps your jewelry safe and untangled. Beginners like diy pouches because they are easy and useful.
Jewelry pouches protect your jewelry well. Soft velvet or cotton keeps jewelry from moving and getting scratched. This is good for rings, necklaces, or old pieces. Custom pouches give extra safety for fragile things like pearls. Some pouches are water-resistant and protect against spills.
- Easy to carry and small for travel
- Saves space compared to big boxes
- Water-resistant designs give more protection
Size and Style Options
Jewelry pouches come in many sizes and styles. Some have drawstrings. Others have pockets or decorations. You can make your own pouch with a diy jewelry pouch pattern.
Here are some common sizes:
| Size Option | Dimensions |
|---|---|
| Small | 3×4 inches |
| Medium | 4×6 inches |
| Large | 6×8 inches |
Small pouches are good for rings or earrings. Medium pouches fit bracelets or watches. Large pouches hold necklaces or bigger sets. Try different styles to match your taste or the event. You can add embroidery or ribbons to make it special.
If you want an easy project, start with a simple pouch with a drawstring. This diy project lets you try different colors and fabrics. You can make a pouch that matches your style and keeps your jewelry safe.
Materials and Tools
Before you start making your jewelry pouch, you need to gather the right materials and tools. Picking the best fabric and having the right supplies will make your project easier and more fun. Let’s look at what you need.
Fabric Choices
Cotton, Velvet, Satin
You have many fabric options for your jewelry pouch. Cotton, velvet, and satin are the most popular. Each one feels different and gives your pouch a unique look.
- Cotton feels soft and light. It is easy to sew and comes in many colors and prints. Cotton helps keep your jewelry safe from scratches.
- Velvet feels plush and looks fancy. It gives your pouch a rich, elegant style. Velvet protects your jewelry very well, especially for special pieces.
- Satin feels smooth and shiny. It looks elegant and works well for delicate jewelry. Satin makes your pouch look like a gift.
Here’s a quick guide to help you compare fabrics:
| Fabric Type | Durability | Description |
|---|---|---|
| Cotton | Medium | Soft, eco-friendly, easy to sew, many patterns |
| Velvet | High | Plush, protective, great for high-end jewelry |
| Satin | Medium | Smooth, shiny, elegant for delicate pieces |
| Muslin | High | Strong, natural, very durable |
| Felt | High | Cushions jewelry, prevents scratches |
| Linen | Medium | Rustic, eco-friendly, textured |
| Organza | Low | Lightweight, see-through, less protection |
| Suede Leather | High | Long-lasting, rustic texture |
Picking the Right Fabric
Think about what jewelry you want to store. If you have heavy or sharp pieces, pick a strong fabric like velvet or felt. For light jewelry, cotton or satin works well. Want a pouch that lasts a long time? Muslin or suede leather are great choices. You can also match the fabric to your favorite color or the style of your jewelry.
Tip: Choose a fabric that feels soft and does not scratch your jewelry.
Tools Needed
Scissors, Needle, Thread
You do not need many tools to make a jewelry pouch. Here’s what you should have:
- Sharp scissors for cutting fabric
- Sewing needles for hand stitching
- Thread that matches your fabric
- A ruler or measuring tape
- A fabric marker or chalk
These basic tools help you cut and sew your pouch neatly.
Optional: Sewing Machine
A sewing machine makes the job faster, but you can sew by hand if you want. If you use a machine, your stitches will look even and strong. You can also try a canvas pouch or a zippered pouch if you want to organize tools or supplies.
Extra Supplies
Drawstring Cord or Ribbon
You need something to close your pouch. A satin cord, ribbon, or even a shoelace works well. Pick a color that matches your fabric for a nice look.
Decorative Elements
Want to make your pouch special? Add beads, buttons, or embroidery. You can sew on a charm or use fabric paint for a custom design. These little touches make your pouch unique and fun to use.
Note: Gather all your materials before you start. This helps you finish your pouch without stopping to look for supplies.
How to Make a Jewelry Pouch
Ready to start your diy jewelry pouch? You can follow these simple sewing tutorials and learn to sew a pouch that keeps your jewelry safe and organized. This guide walks you through each step, so even if you are a beginner, you will know how to make a jewelry pouch with confidence.
Cut Fabric Circles
You need to cut two circles of fabric—one for the outside and one for the lining. The size depends on what you want to store. Here’s a quick table to help you pick the right diameter for your pouch:
| Size | Diameter |
|---|---|
| Large | 14 inches |
| Medium | 9 inches |
| Small | 3 inches |
Measuring and Marking
Start by laying your fabric flat on a clean surface. Use a ruler or measuring tape to find the center. You can use a compass, a circular template, or even a plate to mark your circle. If you want a medium pouch, set your compass to a 4.5-inch radius. Draw a neat circle with a fabric marker.
Cutting Tips
Cutting circles can be tricky, but you have options. Here’s a table with some methods and tips to help you get a perfect circle every time:
| Method | Steps | Tips |
|---|---|---|
| Using a Compass | 1. Set the compass to desired radius. 2. Draw the circle. 3. Cut. | Hold fabric taut to avoid distortion. |
| Using a Circular Template | 1. Place template on fabric. 2. Trace outline. 3. Cut. | Secure template with weights or pins if slippery. |
| Rotary Cutter and Mat | 1. Lay fabric flat. 2. Position template. 3. Cut with rotary cutter. | Practice on scrap fabric for accuracy. |
| Fold and Cut Technique | 1. Fold fabric. 2. Mark radius. 3. Cut along arc. | Ensure folds are precise for symmetry. |
| Using a Circle Cutter Tool | 1. Lay fabric on mat. 2. Set cutter to radius. 3. Cut. | Practice on scrap fabric before final use. |
| Embroidery Hoop Method | 1. Secure fabric in hoop. 2. Mark circle. 3. Cut. | Good for smaller circles; keeps fabric in place. |
Tip: Practice on scrap fabric before you cut your main piece. This helps you get comfortable with how to sew circles and keeps your diy project looking neat.
Sew Outer and Inner Circles
Now you have your circles ready. You need to sew them together to make the pouch strong and smooth.
Seam Allowance
Leave a seam allowance of ¼ inch when you sew the circles. This gives your pouch enough strength without making the edges bulky. Pin the circles together with the right sides facing each other. Sew around the edge, but leave a small gap so you can turn the pouch right side out.
Neat Finish
You want your diy jewelry pouch to look tidy. Here are some techniques for a neat finish:
- Use Wonder Clips instead of pins to hold layers together. This keeps the fabric stable.
- Edgestitch along the inner folded edges to bind the edges neatly.
- Trim away any excess fabric or threads after you sew.
- Topstitch around the edge for a polished look.
If you use vinyl or a zipper, try a Teflon presser foot for smoother sewing. Always stitch ¼ inch from the ends through both layers. These tips help you learn to sew with confidence and make your pouch look professional.
Add Pockets and Compartments
Want to keep your jewelry organized? You can add pockets and compartments inside your pouch. This step is great for holding earrings, rings, or small necklaces.
Marking Pocket Locations
Fold your inner circle in half, then in quarters, and finally in eighths. Use a fabric marker to mark each section. This helps you space out the pockets evenly.
Sewing Pockets
The tutorial describes cutting fabric and using batting for stability, which are effective methods for adding pockets to a jewelry pouch. It mentions marking the fabric in eighths and cutting circles from fleece or batting to create pockets for holding earrings or smaller pieces of jewelry.
Cut small circles or rectangles from fleece or batting. Place them on the marked spots. Sew around the edges of each pocket, leaving the top open. This gives you space to tuck in your jewelry.
Creating Compartments
If you want more compartments, sew lines from the center of the pouch out to the edge. This divides the pouch into sections. You can use contrasting thread for a fun look. Try adding a few pockets for rings and a larger one for bracelets. Your diy pouch will keep everything in its place.
You just finished the first steps of how to make a jewelry pouch. You learned how to sew circles, add pockets, and create compartments. These simple sewing tutorials make it easy to create a pouch that fits your style and keeps your jewelry safe.
Assemble the Pouch
You’re almost done with your diy jewelry pouch! Now it’s time to put everything together so your pouch looks neat and works well. This part shows you how to attach the lining, secure the seams, and get your pouch ready for the drawstring.
Attach Lining
Attaching the lining makes your pouch soft inside and gives it a professional look. Here’s how you can do it step by step:
- Sandwich the batting between the lining fabric and the outer fabric. Make sure the right sides face out.
- Place the trim piece right side down on top of the outer fabric. Line it up with the edge.
- Sew the trim piece to the pouch using a 1/4-inch seam allowance. This keeps the edges strong.
- Fold the trim piece over toward the lining. Iron the raw edge under so it looks smooth.
- Stitch the folded edge down. You can sew from the wrong side or use the ‘stitch in the ditch’ method for a clean finish.
Tip: Ironing the trim before you sew helps you get a crisp edge. This makes your diy pouch look tidy.
Secure Seams
You want your jewelry pouch to last a long time. Securing the seams is important. Use small, even stitches when you sew around the edge. Double back at the start and end to lock the thread. If you use a sewing machine, set it to a straight stitch for best results. Hand sewing works too—just take your time and keep your stitches close together.
Note: If you see any loose threads, trim them before you move on. This keeps your pouch looking neat.
Insert Drawstring
The drawstring lets you open and close your pouch easily. You can use silky-smooth cords, wax cords, or satin ribbons. Each type gives your diy pouch a different look and feel.
Create Channel
First, you need to make a channel for the drawstring. Fold the edge of your pouch over by about half an inch. Sew around the circle, leaving a small gap so you can thread the cord through. Press the fold with an iron to keep it flat.
Cut four small slits in the channel—two on each side. Use Fray Check on the slits to stop them from unraveling. Let it dry before you add the cord.
| Drawstring Type | Characteristics | Suitability for Jewelry Pouches |
|---|---|---|
| Silky-smooth | Sheen and softness, luxurious feel | Great for upscale diy projects |
| Wax cords | Stiffness and durability, water-resistant | Good for sturdy jewelry pouches |
| Satin cords | Glossy finish, elegant touch | Perfect for high-end jewelry gifts |
Thread and Knot
Now you’re ready to add the drawstring. Cut two pieces of cord or ribbon, each about 24 inches long.
- Tie a knot in one end of the first cord. Attach a safety pin to help you guide it through the channel.
- Thread the cord through one slit, around the pouch, and out the opposite slit.
- Remove the safety pin and tie the ends together in a knot. Trim any extra length.
- Repeat with the second cord, using the other two slits. This gives you a double drawstring so you can pull both sides to close the pouch.
Tip: If you want a fancy look, try using a satin cord. It feels smooth and looks elegant with any jewelry.
Final Touches
Your diy jewelry pouch is almost ready! These last steps make your pouch look polished and special.
Trim Threads
Check your pouch for any loose threads. Use sharp scissors to trim them close to the fabric. This keeps your pouch tidy and stops threads from catching on your jewelry.
Add Decorations
You can decorate your pouch to match your style or the jewelry inside. Try adding beads, buttons, or embroidery. You can sew on a charm or use fabric paint for a custom design.
Here’s a table with some materials you can use for decoration:
| Material | Description |
|---|---|
| Satin | Adds luxury and makes your pouch easy to use. |
| Densified Silk Satin | Gives a glamorous, shiny finish. |
| Suede | Feels soft and looks rich. |
| Flannel | Makes your pouch cozy and inviting. |
| Velvet | Brings timeless elegance to your jewelry pouch. |
| Cotton Canvas | Looks rustic and modern, plus it’s eco-friendly. |
| Twill Cotton | Adds a subtle pattern for extra style. |
| White Cotton | Keeps things simple and clean. |
| Beige Cotton | Matches many jewelry styles. |
| Linen | Breathes well and feels natural. |
Callout: Personalize your diy pouch with your favorite colors or patterns. This makes your pouch unique and fun to use.
You’ve learned how to make a jewelry pouch from start to finish. You know how to sew circles, add pockets, assemble the pouch, and insert a drawstring. These steps help you create a diy pouch that keeps your jewelry safe and looks beautiful.
Tips and Troubleshooting
Fabric Selection
Choosing the right fabric helps your pouch look nice. Soft fabric keeps your jewelry safe from scratches. Some fabrics stop moisture and oxidation. Check this table to see popular fabric choices:
| Fabric Type | Characteristics | Suitable For |
|---|---|---|
| Cotton | Eco-friendly, breathable, soft, prevents oxidation and moisture | Medium-sized brands focusing on affordability |
| Satin | Luxurious, soft, smooth, adds sophistication | Medium to high-end brands emphasizing elegance |
| Velvet | Classy, smooth, protects against scratches | High-end jewelry businesses |
| Organza | Delicate, transparent, lightweight, offers protection while displaying jewelry | Small to medium-sized brands with sophisticated design |
| Suede Leather | Organic, rustic, soft, adds texture | Brands seeking a natural and rustic aesthetic |
Cotton or velvet is good for travel pouches. Satin makes your pouch look fancy. Organza lets you see your jewelry inside. Suede leather feels natural and has texture. Pick a fabric that matches your jewelry.
Tip: Rub your fabric on a ring or earring. If it feels rough, choose a softer one.
Common Issues
Uneven Seams
Seams can look wavy or crooked sometimes. This happens if you sew too fast or pull the fabric. Sew slowly and keep the fabric flat. Use pins or clips to hold it still. If you make a mistake, take out the stitches and try again. Practice on scrap fabric before making your pouch.
Note: Short stitches make seams strong and neat.
Drawstring Problems
Drawstrings may get stuck or bunch up. If the channel is too tight, the cord will not move well. Leave enough space when you sew the channel. Use a safety pin to help thread the cord. If the ends fray, tie a knot or melt them with a lighter. Double drawstrings make opening and closing easier.
Tip: Sew a bead or button at the end so the drawstring does not slip out.
Personalization Ideas
You can make your pouch special with creative touches. Here are some ways to personalize your pouch:
- Customizable: Add stitching, stamping, or labels for your style.
- DIY-friendly: Use felt sheets or leftover fabric for easy crafts.
- Versatile: Make labels or compartments for different jewelry.
- Protective: Felt cushions jewelry and keeps delicate items safe.
Embroidery
Embroidery adds color and makes your pouch unique. Stitch your initials, a flower, or a simple shape. Use bright thread for fun or metallic thread for a fancy look. Embroidery shows your style and sewing skills.
Unique Closures
Try a different closure for your pouch. Use a button, snap, or a bead. Magnetic snaps are quick to open. Add a charm to the drawstring for a playful touch. These ideas make your pouch a special gift.
Callout: Make your pouch match your favorite jewelry or give it as a thoughtful present.
Care and Maintenance
Cleaning
You want your jewelry pouch to look fresh and last a long time. Cleaning it is easy if you follow a few simple steps. First, check the fabric type. Cotton and linen pouches can go in the washing machine. Use cold water and a gentle cycle. For velvet or satin, hand wash is best. Fill a bowl with lukewarm water and add a drop of mild soap. Dip a soft cloth in the water and gently wipe the pouch. Avoid scrubbing hard, especially on delicate fabrics.
If your pouch has embroidery or beads, spot clean those areas. Use a cotton swab dipped in soapy water. Dab gently and let it air dry. Never use bleach or harsh chemicals. These can damage the fabric and fade colors. After washing, lay the pouch flat on a towel. Press out extra water with another towel. Let it dry in a cool, shaded spot. Direct sunlight can fade the fabric and weaken threads.
Tip: Clean your jewelry pouch every few months, especially if you use it often. This keeps dust and oils away from your jewelry.
Here’s a quick table to help you choose the right cleaning method:
| Fabric Type | Cleaning Method | Drying Tip |
|---|---|---|
| Cotton | Machine or hand wash | Air dry, avoid sunlight |
| Velvet | Hand wash only | Lay flat, no wringing |
| Satin | Hand wash only | Hang or lay flat |
| Linen | Machine or hand wash | Air dry, iron if needed |
Storage
Storing your jewelry pouch the right way keeps your jewelry safe and your pouch looking new. You should pick a dry, dark place for storage. Humidity and light can cause damage over time. Closets or drawers work well. If you live in a humid area, try using a dehumidifier nearby.
Keep each pouch separate from others. This stops scratches and tangling. Felt-lined boxes or soft containers add extra protection. You can use airtight containers with silica gel packets to absorb moisture. These help prevent tarnish, especially for silver or brass jewelry.
Here’s a simple list to help you store your pouch and jewelry safely:
- Choose a dry, dark spot like a closet or drawer.
- Place silica gel packets inside the container to absorb moisture.
- Use felt-lined boxes or soft pouches for extra protection.
- Clean your jewelry before putting it in the pouch.
- Keep humidity and light levels low.
- Try vacuum-sealed bags for silver or brass items.
- Store valuable pouches in a secure place, like a safe.
Note: Always inspect your jewelry and pouch before storing. Remove dirt and oil to keep everything in top shape.
If you follow these steps, your jewelry pouch will stay clean and strong. Your jewelry will stay safe from scratches, moisture, and tarnish. You can enjoy your pouch for years and keep your favorite pieces looking their best.
Variations
Shapes and Sizes
There are lots of choices for jewelry pouch shapes and sizes. Some people like small pouches for rings or earrings. Others want bigger pouches for necklaces or bracelets. Pick a size that fits your favorite jewelry. If you travel often, use an extra-large pouch to hold everything.
Here’s a table with popular sizes and what they work best for:
| Size Category | Dimensions | Best For |
|---|---|---|
| Small Jewelry Pouches | 3 x 3 inches | Rings, stud earrings, mini pendants, small charms |
| 4 x 4 inches | ||
| Medium Jewelry Pouches | 5 x 4 inches | Bracelets, medium-sized earrings, small watches, necklaces |
| 6 x 4.5 inches | ||
| Large Jewelry Pouches | 7 x 5 inches | Statement necklaces, cuff bracelets, larger earrings, multi-layered necklaces |
| 8 x 6 inches | ||
| Extra-Large Jewelry Pouches | 9 x 7 inches | Large jewelry sets, oversized statement pieces, travel jewelry storage |
| 10 x 8 inches |
You do not have to use only circles or rectangles. Try making a pouch shaped like a heart or a star. Some people sew scalloped edges for a fancy look. You can make a pouch with a flat bottom so it stands up. Mix and match shapes and sizes if you want to be creative. Your jewelry pouch can be unique and special.
Tip: Use a template or trace around something you like. This helps you cut and sew the shape you want.
Themed Pouches
You can make your jewelry pouch fit any event or mood. Themed pouches add a special touch, especially for gifts. Pick colors and designs that match the occasion. For Valentine’s Day, use pink or red fabric and sew on heart shapes. Christmas pouches look nice in green or gold with holiday patterns. Weddings need elegant designs in white or pastel colors with flowers.
Here’s a table with ideas for themed pouches:
| Occasion | Color Suggestions | Design Features |
|---|---|---|
| Valentine’s Day | Pink, Red | Heart shapes, romantic motifs |
| Christmas | Green, Gold | Festive patterns, holiday symbols |
| Weddings | White, Pastel colors | Elegant designs, floral patterns |
| Birthdays | Bright colors | Fun designs, celebratory themes |
| Engagements | Soft colors, Gold | Ring motifs, romantic themes |
| Parties | Various colors | Thematic designs based on party type |
Add embroidery, beads, or charms to match your theme. For a birthday pouch, use bright colors and sew on balloons or stars. For a wedding pouch, try lace trim or a small flower. Themed pouches make your jewelry feel more special. They show you put extra thought into your gift.
Callout: Try new colors and patterns. Your jewelry pouch can celebrate any moment or style you like.
Conclusion
You now know how to make a travel jewelry pouch. Try making one at home for yourself. You can add pockets to hold small items. Use bright colors to make it stand out. Pick a shape that you think is fun. Your travel jewelry pouch keeps your jewelry safe when you travel. It also looks nice and neat in your bag. If you want a pouch with a special design, you can order one from us. Look at the table below to see why custom pouches are a good idea:
| Advantage | Description |
|---|---|
| Lightweight and portable | Easier to carry than rigid cases. |
| Versatile for storage and gifting | Suitable for various uses, including travel. |
| Aesthetically pleasing | Customization enhances visual appeal. |
| Eco-friendly | Better alternative to single-use packaging. |
| Cost-effective for bulk use | More economical when ordered in larger quantities. |
You can contact us to order a custom pouch. Or you can get ideas for your next travel jewelry pouch.
FAQ
How long does it take to make a jewelry pouch?
You can finish a simple pouch in about 30 minutes. If you add pockets or decorations, you might need an hour. Take your time and enjoy the process!
What fabric works best for beginners?
Cotton is easy to cut and sew. You can find it in many colors and patterns. Velvet and satin look fancy, but they need more care when sewing.
Can I sew a pouch without a sewing machine?
Yes! You can sew by hand using a needle and thread. Hand stitching works well for small pouches. Just make sure your stitches are close together for strength.
How do I keep my jewelry pouch clean?
Spot clean with a damp cloth for quick fixes. For deeper cleaning, hand wash with mild soap. Air dry your pouch to keep it looking fresh.
What size should I make for travel?
A medium pouch, about 4×6 inches, fits most jewelry for travel. You can use a larger pouch if you carry big pieces. Small pouches work well for rings and earrings.
Can I personalize my jewelry pouch?
Absolutely! You can add embroidery, beads, or charms. Try fabric paint or iron-on patches. Personal touches make your pouch unique and special.
Why does my drawstring get stuck?
The channel might be too tight. Use a safety pin to guide the cord through. Make sure you leave enough space when sewing the channel. Tie knots at the ends to prevent fraying.


