
You can create your own hydration backpack from scratch. The diy approach lets you customize every detail, save money, and enjoy the process. Want to know how to make a hydration backpack for your next adventure? You get to pick your gear, build your system, and even mix your own electrolyte drink. Stay hydrated, have fun, and discover how easy it is to make something useful.
Tip: Try different colors or patches to make your backpack unique!
Key Takeaways
- You can make a hydration backpack yourself. This lets you save money and change it how you want.
- First, get the main things you need. You will need a water reservoir, tubing, and fabric for your project.
- Pick a backpack that feels good to wear. Make sure it fits your water system and is easy to use.
- Clean your backpack before you start. Mark the spots where you will change it for the hydration system.
- You can pick a store-bought or homemade water reservoir. Choose what works best for you.
- Try out your hydration backpack before using it outside. Check for leaks and see if it feels comfortable.
- Add your own style to your hydration backpack. You can put in insulation, more pockets, or other cool things.
- Clean your hydration system often. This stops mold and keeps your water fresh.
Materials and Tools for DIY Hydration Backpack
To build your own hydration backpack, you need the right stuff. You do not need expensive tools. Good materials make the job easier and more fun. Let’s look at what you need to begin.
Essential Materials
Your hydration backpack should be light, strong, and comfy. Here is a table that shows common materials and what they cost:
| Material Description | Cost Estimate |
|---|---|
| Franzia 5 liter wine bag (empty) | N/A |
| Plastic epoxy | N/A |
| Water Filters for Brita Drinking bottle | N/A |
| 3/4 inch poly insert with male threads | N/A |
| 1 1/4 sch 40 bushing with female 3/4 threads | N/A |
| #8-32 nylon screws | N/A |
| Rubber grommet 11/32 x 1/8 | N/A |
| 3/4 inch rubber repair pipe | N/A |
| 3/4 inch sch 40 PVC adaptor | N/A |
| 3/4 inch sch 40 PVC Threaded cap | N/A |
| 1/4 inch vinyl tubing (4 feet) | N/A |
| Rubber repair tubing with pinch closure | N/A |
| Total Cost | $35 |
You can use fabric for the outside and inside. Lighter colors help keep your pack cool. For a simple diy hydration pack, you might want:
- 4 inches by 43 inches for the outside (light color is best)
- 3 1/2 inches by 43 inches for the inside
- 2 1/2 inches by 43 inches batting
Tip: Most of these things are at Walmart, Home Depot, or online stores for outdoor fabric.
Tools Checklist
You do not need a big workshop for a hydration backpack. Most tools are easy to use. Here is a list:
- Scissors or rotary cutter for fabric
- Sewing machine or needle and thread for sewing
- Measuring tape or ruler
- Marker or chalk for marking
- Drill for hose holes if needed
- Screwdriver for fittings
- Pliers for gripping and bending
- Hot glue gun or fabric glue for quick fixes
If you want it even easier, buy ready-made hydration bladders and tubes. This saves time and helps if you are new to diy.
Optional Add-ons
Want to make your hydration backpack even better? Try these extras:
- Insulation sleeves for the tube to keep water cool
- Extra pockets for snacks or keys
- Reflective tape for safety
- Custom patches or embroidery
- Hose clips or magnets to hold the tube
If you need good places to buy stuff, check these out:
- Ripstop by the Roll: Good for outdoor fabric and gear.
- Seattle Fabrics Inc.: Has nice fabric and patterns.
- Quest Outfitters: Good for carbon fiber tubing and fabric.
- Duchware: Has technical fabric and organized sections.
- Joann’s or Hobby Lobby: Great for learning to sew and finding fabric sales.
- Home Depot or Lowes: Good for hardware like aluminum bars.
- Walmart: Good for basic materials.
If you want to see what experts use, here is a table of popular hydration backpack brands for beginners:
| Brand/Model | Price | Features |
|---|---|---|
| Nathan Pinnacle 4L | $174 | Great for pockets and tall flasks |
| On Running Ultra Vest | $149 | Sleek and thin design |
| Camelbak Circuit Hydration Vest | $83 | Low cost with pockets |
| Ultimate Direction Vesta | $170 | Best for carrying a lot of gear |
| Salomon Adv Skin 5L | $145 | Best for shorter torso |
| Camelbak Classic Light | $75 | Minimal running pack |
| Lululemon Trail Vest | $145 | Smallest sizing available |
| UltraApsire Basham Race Vest | $89 | Best for race day |
| Osprey Duro/Dyna | $110 | Best small capacity |
| Nathan Laser Light Vest | $110 | Best for visibility |
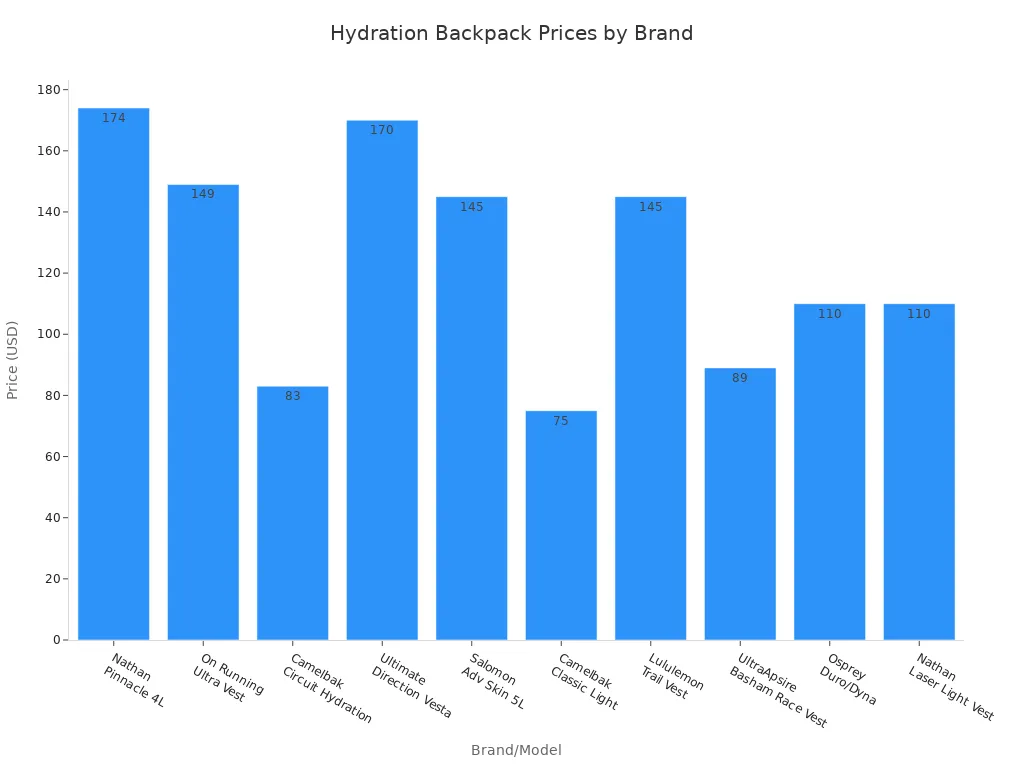
You can use these brands for ideas for your own diy project. Pick the features you like and add them to your pack. With the right materials and tools, your hydration backpack will fit your needs and style.
Choose Your Backpack
Best Backpack Types
Picking the right backpack makes your project much easier. You want something that feels good on your back and has enough space for your water system. Some backpacks work better than others for this kind of project. Here’s a quick look at popular choices and what makes them great:
| Backpack Type | Features |
|---|---|
| General Comfortable Backpack | Fits a water reservoir in the laptop sleeve. Good for short trips and easy hydration. |
| Fjällräven Kånken | Lets you attach a reservoir to the handles. Works well for day hikes, even without a waist strap. |
| Good Hydration Pack | Feels comfortable, has smart pockets, and stands up to trail use or daily life. |
You might already have one of these at home. If not, check local stores or online for a simple, sturdy backpack. Look for wide shoulder straps and a padded back. These features help you stay comfortable when you carry water.
Tip: Try your empty backpack on before you start. Make sure it fits your body and does not rub or pinch.
Prepping for DIY
Before you start cutting or sewing, you need to get your backpack ready. This step helps you avoid mistakes and keeps your project neat.
Cleaning and Inspection
First, clean your backpack. Dirt and dust can get in the way when you work. Use a damp cloth to wipe the inside and outside. Check all the zippers and seams. Make sure nothing is broken or worn out.
Next, inspect the inside. Look for a laptop sleeve or a big pocket. This spot works well for holding your water reservoir. If your backpack has loose threads or small holes, fix them now. You want a strong base for your diy hydration system.
Marking Modifications
Now, plan where you will add new parts. Use a marker or chalk to draw small dots where you want to make changes. Here’s a simple checklist to help you get started:
- Gather your materials: backpack, sewing kit, strap, clip or carabiner, water bladder, scissors or knife, and maybe a second strap or pocket.
- Decide where the water reservoir will go. Most people use the laptop sleeve or main compartment.
- Mark the spot for the hose port. Pick a place near the top or side, close to your shoulder.
- Plan where to sew a strap inside the backpack. This strap will hold the water bladder in place.
- Double-check your marks. Make sure everything lines up and feels right.
Note: Take your time with this step. Careful planning makes the rest of your project much smoother.
Once you finish these steps, you are ready to start building your hydration system. Your backpack is now clean, checked, and marked for easy diy upgrades.
Water Reservoir Options for DIY
Choosing the right water reservoir is a big step in making your hydration backpack. You have two main choices: buy a ready-made reservoir or make your own. Each option has its own pros and cons. Let’s break it down so you can pick what works best for you.
Store-Bought vs. DIY Reservoir
Store-bought hydration reservoirs are easy to find and simple to use. You just fill them up, pop them in your backpack, and go. DIY reservoirs let you get creative and save money. You can use things like empty wine bags or sturdy plastic bottles. Both options have different strengths.
Here’s a quick table to help you compare:
| Feature | Store-bought Hydration Reservoirs | DIY Water Reservoirs |
|---|---|---|
| Durability | Generally durable, withstands high pressure, but vulnerable to sharp objects and high temperatures. | Varies based on materials used; may not be as durable as store-bought options. |
| Leak Potential | Mouthpieces prone to leaks over time; regular inspection needed. | Depends on construction quality; may have higher risk of leaks if not properly made. |
| Cleaning Difficulty | Requires more maintenance to prevent mold and bacteria growth. | Cleaning ease varies; may be simpler if using basic containers. |
| Weight | Generally lightweight. | Can vary significantly based on materials used. |
Tip: If you want a quick and reliable solution, go with a store-bought reservoir. If you like to tinker and save money, try making your own.
Preparing the Reservoir
Once you pick your reservoir, you need to get it ready for use. This means cleaning it well and making sure it won’t leak.
Cleaning and Testing
Start by washing your reservoir with warm, soapy water. Rinse it out a few times to get rid of any soap. If you use a DIY container, check for any smells or leftover flavors. You want your water to taste fresh.
Fill your reservoir with water and squeeze it gently. Look for leaks around the seams, cap, or hose connection. If you spot a leak, you can fix it before you put it in your backpack.
Note: Always test your reservoir before your first trip. It’s better to find leaks at home than on the trail!
Attaching the Tube
Now it’s time to connect the drinking tube. Most store-bought reservoirs have a built-in port for the tube. For DIY options, you might need to make your own.
Here are some materials that work well for a leak-proof DIY reservoir:
- PVC: Strong and reliable, great for making hose connections.
- Plumber’s putty: Seals joints and keeps water from leaking out.
- Polyethylene liners: Flexible and safe for water storage.
- Galvanized steel: Super tough, but heavier and best for big tanks.
- NSF/ANSI 61 certified liner: Safe for drinking water.
Cut a small hole in your container for the tube. Use plumber’s putty or a rubber grommet to seal the connection. Push the tube in and make sure it fits snugly. Give it a gentle tug to check if it stays in place.
Pro Tip: Use a clear tube so you can see if water flows easily and spot any blockages.
Once your tube is attached and your reservoir is leak-free, you’re ready to move on to the next step—putting it all together in your backpack!
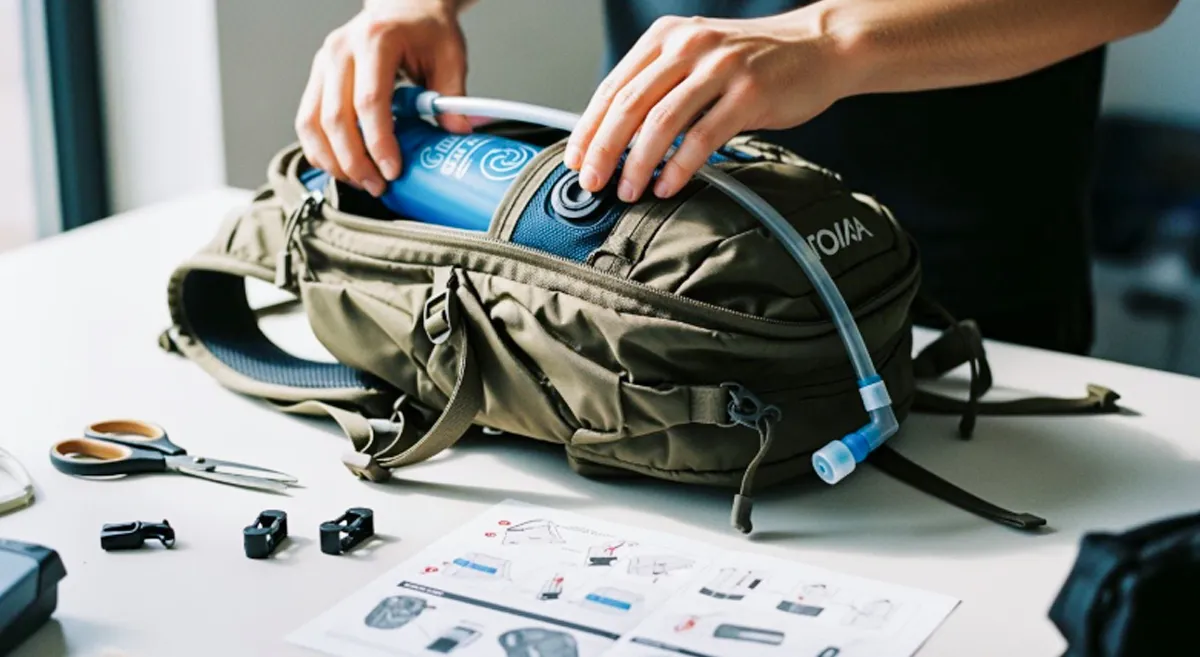
How to Make a Hydration Backpack: Assembly Steps
Install the Reservoir
Ready to put your water reservoir in your backpack? This step is where your project starts to look real. If you want to know how to make a hydration backpack that works well, follow this step-by-step guide. You will need your clean backpack and your water bladder.
- Check Backpack Compatibility
Look inside your backpack. Some backpacks have a special pocket for a water bladder. If yours does, you are in luck. If not, use the main compartment or a laptop sleeve. - Locate the Bladder Pocket
Find the spot that sits flat against your back. This keeps the weight close to your body and makes carrying water easier. - Clean the Backpack and Bladder Sleeve
Wipe the inside of the pocket with a damp cloth. Rinse your bladder with warm water. Clean gear means fresh water. - Insert the Bladder into the Sleeve
Slide the empty bladder into the pocket. Make sure the opening lines up with the top of your backpack. - Connect the Drinking Hose
Attach the hose to the bladder. Feed it through the top opening. Make sure the hose is straight and not bent. - Secure the Bladder with Clips
Use any clips or loops inside your backpack. These hold the bladder in place so it does not slide around. - Guide the Hose Through the Outlet
Route the hose through the outlet near your shoulder straps. This makes it easy to grab the hose while you walk or run.
Tip: If your backpack does not have a hose port, you can make one. Use a sharp knife or scissors to cut a small hole near the top. Make sure the hole is just big enough for the tube.
Create the Hose Port
You need a spot for your drinking tube to come out of the backpack. This step is important if you want to know how to make a hydration backpack that feels professional.
- Pick a spot near the top or side of your backpack. The best place is close to your shoulder strap.
- Use a marker to draw a small circle where you want the hose port.
- Cut a hole with sharp scissors or a craft knife. The hole should be just big enough for your tube.
- If you want extra strength, add a rubber grommet around the hole. This keeps the fabric from tearing and helps seal the port.
- Push the tube through the hole. Make sure it moves easily and does not pinch.
Note: Always test the fit before you finish. If the hole is too big, water might leak inside your backpack. If it is too small, the tube could get stuck.
Secure the Drinking Tube
Now you need to keep your drinking tube in place. This step helps you grab a drink quickly and keeps the tube from flopping around. If you want your diy hydration system to work well, pay attention here.
- Use a tube clip to attach the tube to your shoulder strap. This keeps the tube close and easy to reach.
- Position the bite valve over your shoulder. You can grab it and drink without stopping.
- Try magnets or Velcro strips if you want a simple way to hold the tube. These work well for quick access.
- Make sure the tube is not twisted or bent. Water should flow smoothly.
- Test the tube by taking a sip. If it feels loose, adjust the clip or strap.
Pro Tip: If you want to know how to make a hydration backpack that feels custom, add a second clip lower down. This keeps the tube from swinging when you move.
If you follow these steps, your hydration backpack will be ready for action. You will have a secure reservoir, a handy hose port, and a tube that stays put. This is the heart of any step-by-step guide for making your own hydration gear.
Test for Leaks and Comfort
You finished putting your hydration system together. Now you need to make sure it works and feels good. Testing for leaks and comfort helps you avoid surprises on your next hike or run.
Here’s how you can check for leaks:
- Fill your reservoir with clean water. Use cold water if you want to spot leaks faster.
- Close the cap tightly. Make sure the hose is attached.
- Hold your backpack over a sink or bathtub.
- Squeeze the reservoir gently. Watch for drops or wet spots around the seams, hose port, and bite valve.
- If you see water leaking, tighten the connections. You can use plumber’s tape or add a rubber washer if needed.
- Dry the outside with a towel. Check again after a few minutes.
Tip: If you spot a leak, fix it before you take your backpack outside. Small leaks can turn into big problems on the trail.
Now let’s test for comfort:
- Put on your backpack. Adjust the shoulder straps so the pack sits high on your back.
- Walk around your house or yard. Move your arms and bend over.
- Take a sip from the drinking tube. Make sure you can reach the bite valve easily.
- Check if the tube stays in place. If it swings or pulls, move the clip or magnet.
- Feel for any rubbing or pinching. If the straps dig into your shoulders, add padding or loosen them.
- Jump up and down. The reservoir should not bounce or shift inside the pack.
| Comfort Test | What to Look For | Quick Fixes |
|---|---|---|
| Straps | No pinching or rubbing | Add padding, adjust length |
| Tube | Easy to reach, stays put | Move clip, use magnet |
| Reservoir | No bouncing or shifting | Secure with extra strap |
| Bite Valve | Easy to drink from | Adjust tube position |
Note: You want your hydration backpack to feel like part of your body. If something feels off, change it now. You will thank yourself later.
You finished testing for leaks and comfort. Your DIY hydration backpack is ready for adventure!
DIY Electrolyte Water and Drinks
It is important to drink enough water. But sometimes, water alone is not enough. When you sweat, you lose minerals called electrolytes. These minerals help your body work well. They also help you stay strong during sports or outdoor fun. You can make your own electrolyte drink at home. It is easy and tastes good. You also get to choose what goes in your drink.
Homemade Electrolyte Drink Recipes
You can make an electrolyte drink with simple things from your kitchen. Many people use these drinks to get back lost fluids and feel more energy. Here are some ideas you can try:
- Start with milk, mineral water, herbal tea, or coconut water. Coconut water has lots of potassium and helps you stay hydrated.
- Add fruits or veggies like banana, avocado, cucumber, or kiwi. These give you potassium and natural sugar.
- Mix in a little salt, baking soda, or dried seaweed. These add sodium and chloride, which help you stay hydrated.
- Try adding ginger, mint, or cinnamon for more flavor.
- Use honey or maple syrup if you want your drink sweeter.
- For a smoothie, blend milk or plant milk, banana, sea salt, ice, and honey or maple syrup.
- For a simple rehydration drink, mix glucose powder, baking soda, salt, and water.
Coconut water and orange juice are both good choices. Coconut water gives you potassium, sodium, magnesium, and calcium. Orange juice adds vitamin C and magnesium. These help your body stay healthy and keep your fluids balanced. These homemade drinks help you stay hydrated and give you the benefits of electrolyte drinks without extra sugar.
Mixing DIY Electrolyte Water
Do you want to make your own electrolyte water? You only need a few things. Here is a simple recipe you can use:
| Ingredient | Measurement |
|---|---|
| Water | 4 cups |
| Salt (optional) | 1/4 to 1/2 teaspoon |
| Sugar/Sweetener | 2-4 tablespoons |
Pour water into a clean bottle. Add salt and sugar or honey. Shake or stir until it all mixes in. You can add orange juice or coconut water for more flavor and minerals. This drink is great for sports, workouts, or hot days. It helps you get back fluids and enjoy the benefits of electrolyte drinks.
If you want to make your drink special, add mint, ginger, or a slice of lemon. These extras make your drink taste better and give you more reasons to enjoy your homemade electrolyte drink.
Storing Your DIY Drinks
You want your homemade electrolyte drink to stay fresh and safe. Here are some easy ways to do that:
- Put your drink in the fridge right after you make it. This keeps germs away.
- Use bottles that close tightly to keep out air and germs.
- Make small amounts. Fresh drinks taste better and are safer.
- Write the date on your bottles. This helps you know when you made them.
- Always close your bottle tight after you use it. This keeps air and water out.
- Keep your drinks in a cool, dark place. Do not leave them in the sun or heat.
- Try to drink your homemade electrolyte drink within a few days for the best taste and safety.
With these tips, you can enjoy your homemade electrolyte drink anytime. You get all the natural flavors and the benefits of electrolyte drinks. Your body will feel good and ready for fun. Now you know how to make electrolyte water that tastes great and fits your needs!
Customizing Your DIY Hydration Backpack
You can make your hydration backpack truly yours. A customizable pack lets you add features that fit your style and needs. Here are some easy ways to upgrade your DIY hydration backpack.
Add Insulation
Keeping your water cool on a hot day feels great. You can add insulation to your backpack with just a few materials. Some work better than others:
- Closed cell foam works well in extreme cold. It keeps your water from freezing and helps on chilly hikes.
- Neoprene is a favorite for many DIYers. You can wrap it around your hose or bladder. It helps your water stay cool or warm longer.
- Insulated bottles, like stainless steel ones, also help. You can slip one into your pack for extra temperature control.
Tip: Cut a piece of closed cell foam to fit around your water bladder. Use Velcro to hold it in place. You can also buy neoprene sleeves for your drinking tube.
Adding insulation makes your hydration backpack more customizable. You get to decide how much insulation you want and where to put it.
Extra Pockets
Sometimes you need more space for snacks, keys, or your phone. Adding extra pockets is simple and makes your backpack even more useful. Here’s how you can do it:
- Gather fabric, Velcro, and fusible interfacing if you want your pocket to be sturdy.
- Cut the fabric to the size you want. Stitch the edges so they don’t fray. Add Velcro to the top for easy opening and closing.
- Attach the pocket to your backpack. Velcro lets you move it or take it off when you want.
- Want a permanent pocket? Leave the last few inches of the inside pocket panels unsewn during construction. This gives you a built-in pocket.
Note: Removable pockets are great for a customizable backpack. You can add or remove them based on your trip.
Personal Touches
A hydration backpack should show off your personality. You can make it stand out with a few creative ideas:
- Pick a theme for your backpack. Maybe you love a certain color or want to show off your favorite movie.
- Paint or draw on your backpack. You can even crochet a keychain or two.
- Swap pins or patches with friends and family. Ask them to add something special to your pack.
Callout: Decorating your backpack can be a fun group activity. Invite friends to help and share ideas!
A customizable hydration backpack is more than just gear. It becomes a part of your adventures and memories.
Maintenance and Cleaning Tips
Regular Cleaning
You want your hydration backpack to stay fresh and safe. Regular cleaning helps you avoid mold and bad smells. After each use, take a few minutes to clean your gear. Here’s what you should do:
- Wash the reservoir with soapy, lukewarm water. Swish the water around and rinse it well.
- Rinse the hydration bladder and let it air-dry. Make sure it is completely dry before you store it.
- Clean the drinking tube by running soapy water through it. Use a tube brush if you see any dirt inside.
- Rinse the bite valve with soapy water. This keeps it clean and ready for your next trip.
If you use only water, you can clean your backpack less often. If you use flavored drinks, clean it once or twice a month. Regular cleaning keeps your hydration system working well and helps you stay healthy.
Tip: Always let your gear dry upside down in a well-ventilated spot. This stops moisture from building up inside.
Deep Cleaning
Sometimes you need to give your hydration backpack a deeper clean. This helps remove any buildup and keeps your gear in top shape. You should deep clean your bladder once or twice a month, especially if you use flavored drinks.
Here are some safe and effective cleaning agents:
- Hot soapy water works well for hand cleaning.
- Natural cleaners like lemon juice, baking soda, and vinegar help remove stains and odors.
- Effervescent cleaning tablets make the process easy. Drop one in, fill with water, and let it fizz.
To deep clean, fill your bladder with your chosen cleaner. Let it sit for 30 minutes. Shake it gently, then rinse several times with clean water. Run boiling water through the tube and valve to kill any germs. Disassemble all parts and let them dry separately.
Note: Deep cleaning keeps your hydration backpack free from mold and bacteria. It also helps your gear last longer.
Storage Advice
Storing your hydration backpack the right way prevents mold and keeps it smelling fresh. You want to make sure everything is dry before you put it away.
To properly store your hydration bladder, clean it thoroughly after each use. This includes emptying it completely, rinsing with warm water, and using a cleaning brush for the tube and bite valve. After cleaning, dry the bladder upside down in a well-ventilated area to prevent moisture buildup.
Some people like to store their hydration bladder in the freezer. This method stops bacteria and mold from growing. Here’s how you can do it:
- Empty all water from the bladder.
- Roll it up and place it in a freezer-safe bag.
- Store it in the freezer until your next adventure.
You can also keep your gear in a cool, dry place. Make sure you disassemble the components and let them dry separately. Always run boiling water through the tube and valve if you notice any buildup.
Callout: Good storage habits help your hydration backpack stay clean and ready for your next trip. You spend less time cleaning and more time enjoying the outdoors!
Troubleshooting
Sometimes, your hydration backpack might not work the way you want. Don’t worry! You can fix most problems at home. Here are some common issues and how you can solve them.
1. Leaks in the Reservoir or Tube
Leaks are a big headache. You might notice water dripping from your backpack or a wet spot inside. Here’s what you can do:
- Check the seals and caps. Make sure you close the reservoir tightly. If the cap feels loose, twist it until it clicks.
- Inspect the hose connection. Push the tube in all the way. If it still leaks, try using plumber’s tape or a rubber washer.
- Look for holes or cracks. Hold the reservoir up to the light. Small holes can hide in the corners. Patch tiny holes with waterproof tape or a repair kit.
Tip: Always test your backpack with water before you head out. This helps you catch leaks early.
2. Bad Taste or Smell
Sometimes, your water tastes funny or smells bad. This can happen if you leave water in the reservoir for too long.
- Clean with baking soda or lemon juice. Fill the bladder with warm water and a spoonful of baking soda or lemon juice. Let it sit for an hour, then rinse well.
- Use cleaning tablets. These help remove stubborn smells.
- Dry completely after cleaning. Mold and bacteria love damp places.
| Problem | Quick Fix |
|---|---|
| Plastic taste | Soak with lemon juice overnight |
| Musty smell | Use vinegar and rinse well |
| Sticky residue | Scrub with baking soda paste |
3. Mold or Mildew
Black spots or slimy patches mean mold. You need to act fast.
- Mix vinegar and water. Fill the reservoir and tube, then let it soak for 30 minutes.
- Scrub with a brush. Use a tube brush for the hose and a soft brush for the bladder.
- Rinse and dry. Make sure everything is dry before you store it.
Callout: If mold keeps coming back, replace the tube or reservoir. Your health comes first!
4. Blocked Tube or Bite Valve
If water won’t flow, you might have a blockage.
- Remove the tube and bite valve. Run warm water through both.
- Use a tube brush. Push it through to clear out any gunk.
- Check for kinks. Straighten the tube if it’s bent.
5. Hard to Drink or Low Flow
If you have to suck really hard to get water, try these steps:
- Check for air bubbles. Squeeze the reservoir to push out extra air.
- Inspect the bite valve. Sometimes, dirt or sand gets stuck. Clean it with warm water.
- Make sure the tube isn’t pinched. Adjust the hose so it sits straight.
Note: If you fix these problems and your hydration backpack still doesn’t work, it might be time for new parts.
Troubleshooting helps you keep your hydration backpack in top shape. You’ll spend less time fixing problems and more time enjoying your adventures!
Conclusion
You now know how to make a hydration backpack and even mix your own electrolyte drink. Creating it yourself gives you flexibility, saves money, and makes the process enjoyable. Be proud of your work!
If you need custom-made or large-volume hydration packs, our team is here to help. As a professional hydration backpack manufacturer, we use durable materials, reliable production processes, and offer full OEM/ODM customization to match your exact requirements. With rich industry experience and innovative design capabilities, we can turn your ideas into high-quality products—whether for your brand, business, or outdoor customers.
Contact us anytime to discuss your project. We’re ready to support your next custom hydration pack with true factory expertise.
FAQ
How much water should I carry in my hydration backpack?
You should carry enough water for your activity. For short hikes, 1–2 liters works well. For longer trips, aim for 2–3 liters. Always check the weather and your route before you go.
Can I use any backpack for a DIY hydration system?
Yes, you can use almost any backpack. Look for one with a main compartment or laptop sleeve. Make sure it feels comfortable on your back and has space for your water reservoir.
How do I stop my water from tasting like plastic?
Wash your reservoir with warm water and baking soda. Let it air out overnight. You can also add a slice of lemon to help remove the plastic taste.
What should I do if my hydration tube gets moldy?
Take the tube off and soak it in vinegar or baking soda water. Use a tube brush to scrub inside. Rinse well and let it dry completely before using it again.
Can I put sports drinks or juice in my hydration bladder?
You can, but clean your bladder right after. Sugar and flavors can cause mold and bad smells. Water is always the safest choice for your hydration system.
How do I keep my water cool on hot days?
Add ice cubes to your reservoir or use an insulated sleeve. Keep your backpack out of direct sunlight when you take breaks. Cold water feels great on a hot hike!
Is it safe to freeze my hydration bladder?
Yes, you can freeze your empty bladder to stop mold and bacteria. Just make sure it is dry before you put it in the freezer. Never freeze a full bladder, as water expands and can damage it.
What if my bite valve leaks?
Check if the valve is clean and properly attached. If it still leaks, replace it with a new one. Carry a spare bite valve on long trips for quick fixes.


