

You might wonder how to make a grocery bag from scratch. You just need some simple materials and a little creativity. Reusable grocery bags help you cut down on plastic waste and show off your style. Most people use cotton, canvas, or even old T-shirts for their bags. You can try these materials, too:
- Cotton fabrics feel soft and are easy to wash.
- Upcycled T-shirts or scrap fabric give your bag a unique look.
- Canvas or polyester blends last a long time and resist stains.
- Lightweight nylon folds up small for easy storage.
Want to make your bag special? Check out some fun ways to personalize it:
| Customization Type | Description |
|---|---|
| Design Templates | Hundreds of themes to choose from. |
| Personalization Styles | Add your name, a photo, or a logo. |
| Patterns and Colors | Pick your favorite colors or prints. |
Just follow the instructions, and you’ll have a handy, eco-friendly bag in no time!
Key Takeaways
- Making a reusable grocery bag is easy and fun. You can use materials like cotton, canvas, or old T-shirts.
- Personalize your bag with colors, patterns, or your name to make it unique and stylish.
- Reusable bags are eco-friendly. They help reduce plastic waste and protect wildlife.
- You can use your grocery bag for more than just shopping. They are great for carrying books, snacks, or picnic supplies.
- Keep your bags clean by washing them regularly. This helps prevent germs and keeps your food safe.
- Choose sturdy handles and reinforce them to ensure your bag can carry heavy items without breaking.
- Experiment with different styles and sizes to find the perfect bag for your needs.
- Remember to keep your bags visible and accessible so you never forget to take them shopping.
Finished Bag Overview
When you finish your grocery bag, you get a sturdy, roomy tote that feels both practical and personal. The bag stands up on its own, holds a lot of groceries, and folds flat when you want to tuck it away. You can carry it by hand or sling it over your shoulder. The best part? You get to pick the fabric, colors, and even the shape, so your bag matches your style.
Bag Style Options
You have so many choices when it comes to making reusable grocery bags. Here are some popular styles that DIY fans love:
- Foldable bags fit right into your purse or backpack. You can pull them out whenever you need them.
- Some people sew bags that look like strawberries or other fun shapes. These cute designs make shopping more fun.
- Upcycled bags use old T-shirts, jeans, or even pet food sacks. You turn something old into something useful and help the planet.
- Add ruffled fabric scraps to your tote for a stylish, one-of-a-kind look.
- If you want a classic farmer’s market bag, try a sturdy canvas tote with long handles. This style works for groceries, books, or even a picnic.
You can mix and match these ideas. Maybe you want a foldable bag with a bright print, or a simple canvas tote with a pocket for your phone. The choice is yours!
Uses for Reusable Grocery Bags
You can use your new bag for so much more than just groceries. Here are some great times to bring your reusable shopping bags:
- Grocery shopping at your local store or supermarket.
- Visiting the farmer’s market for fresh fruits and veggies.
- Picking up snacks and crafts at a fair or festival.
- Carrying books to the library or school.
- Packing a lunch or picnic for a day out.
Many cities now ask you to bring your own bags. Some even charge a fee if you need a plastic one. When you use reusable grocery bags, you help protect wildlife and keep plastic out of the ocean. In just two weeks, your bag becomes more eco-friendly than any single-use bag. You make a real difference every time you shop.
Tip: Keep a few bags in your car or by the door. That way, you never forget them when you head out!
Materials and Tools
Ready to gather your supplies? You don’t need fancy equipment or expensive materials to make a diy grocery tote. Let’s walk through everything you’ll need for your eco-friendly grocery bag project.
Fabric and Lining
Choosing the right fabric is the first step. You want something sturdy, washable, and easy to sew. Here are some popular options:
Cotton, Canvas, T-Shirt
- Cotton: Soft and easy to work with. It’s a classic choice for reusable grocery bags.
- Canvas: Thicker and more durable. Canvas bags last longer and hold heavier items.
- Old T-Shirts: If you have a pile of shirts you never wear, you can turn them into grocery totes for free! Upcycling t-shirts is super beginner-friendly and saves money.
Tip: Upcycling old t-shirts costs nothing if you already have them at home. Buying new fabric costs more, but you get to pick your favorite colors and prints.
Let’s compare how different fabrics hold up over time. Check out this durability ratings table:
| Bag Type | Durability Rating |
|---|---|
| Bamboo | 4/5 |
| Cotton | 3.4/5 |
| Hemp | 4.4/5 |
| Jute | 3.8/5 |
| Paper | 1.6/5 |
| Woven natural materials | 3.6/5 |
| Composite bags | 2.8/5 |
| LDPE | 3/5 |
| Recycled PET | 4/5 |
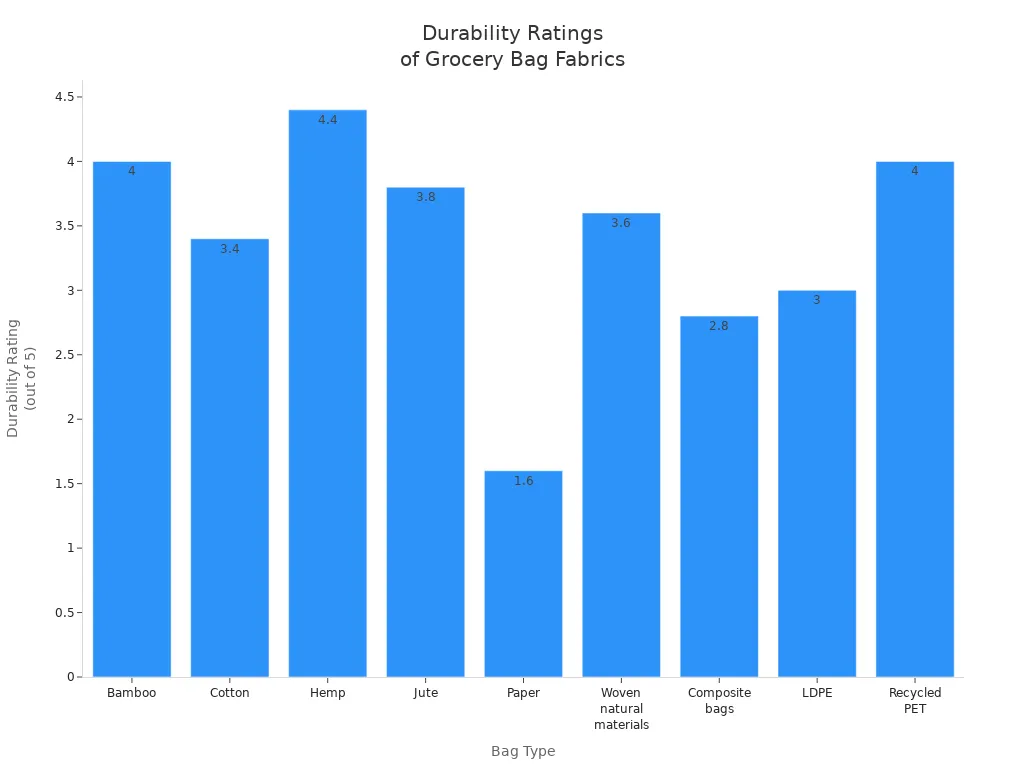
If you want the most sustainable option, look for recycled PET (rPET), organic hemp, or certified organic cotton. Here’s what environmental groups recommend:
| Fabric Type | Recommendation | Preferred Options |
|---|---|---|
| Recycled PET (rPET) | Great for weatherproof and durable bags. | 100% recycled (rPET) |
| Organic Cotton | Choose recycled or certified organic cotton when possible. | Regenerative Organic Certified Cotton |
| Jute | Good for totes, but not for wet weather. | N/A |
| Organic Hemp | Strong and eco-friendly, best for retail totes. | Organic |
| Recycled Linen | Works well for totes, not for mailers. | Recycled Linen, Organic Linen |
Stabilizer and Webbing
You might want your bag to stand up on its own or carry heavier groceries. That’s where stabilizer and webbing come in.
- Stabilizer: Adds structure to your bag. You can use interfacing or even a piece of an old placemat.
- Webbing: Makes strong handles. You’ll need about 2 yards for one bag. If you don’t have webbing, you can sew handles from fabric strips.
Note: If you’re just starting out, skip the stabilizer for a softer, foldable bag. You can always add it next time!
Essential Tools
You don’t need a fancy sewing machine to make a reusable grocery bag. Here’s what you’ll want on hand:
- Fabric scissors
- Measuring tape or ruler
- Pins or clips
- Sewing machine (or needle and thread for hand sewing)
- Iron (optional, but helps with crisp seams)
- Chalk or fabric marker for marking lines
Pro tip: If you’re making a diy grocery tote from a t-shirt, you can even skip the sewing machine and use a simple zigzag stitch by hand.
You’re all set! With these materials and tools, you’re ready to start your reusable grocery bag project. Whether you choose cotton, canvas, or upcycled t-shirts, you’ll end up with a bag that’s both practical and eco-friendly.
How to Make a Grocery Bag: Cutting and Measuring
Ready to start cutting your fabric? This is where your grocery bag really begins to take shape! If you want to know how to make a grocery bag that fits your needs, you’ll want to pay attention to the size and shape before you pick up your scissors. Let’s break it down step by step.
Standard Dimensions
Most people like their bags roomy but not too bulky. If you want a classic look, you can follow the standard dimensions used by major retailers. Here’s a quick table to help you see what works best:
| Bag Type | Width | Height | Depth |
|---|---|---|---|
| Standard Grocery Bag | 13″ | 14″ | 7″ |
These measurements give you a bag that stands up on its own and holds a good amount of groceries. You can fit milk, bread, and even a few snacks without worrying about space. If you want to compare with other bags, check out this table:
| Bag Type | Typical Dimensions (W x H x D) | Best For |
|---|---|---|
| Plastic Grocery Bag | 12″ x 22″ x 6″ | Light groceries, everyday items |
| Paper Retail Bag | 10″ x 14″ x 5″ | Apparel, books, and accessories |
| Reusable Tote Bag | 15″ x 18″ | Heavy grocery loads, books |
| Bulk Shopping Bag | 18″ x 24″ x 10″ | Large purchases, wholesale |
You can see that a standard grocery bag sits right in the middle. It’s not too big or too small—just right for most shopping trips.
Adjusting Size
Maybe you want a bag for just a few items, or maybe you need something huge for a big shopping day. You can adjust the size to fit your lifestyle. Here are some tips to help you decide:
- Make a smaller bag for snacks or books by trimming a few inches off the width and height.
- Go bigger for bulk shopping by adding extra inches to all sides.
- Change the depth (the side panel) if you want a bag that holds more or less.
If you want to get creative, sketch out your own layout on paper first. This helps you see how the panels and gussets fit together. You can also find free downloadable templates online. Many tutorials offer patterns in two sizes, so you can pick what works best for you.
Tip: Always allow an extra inch or two for seam allowances and cutting errors. It’s better to have a little extra fabric than not enough!
Cutting Pieces
Now, let’s talk about how to make a grocery bag by cutting your fabric the right way. Start by laying your fabric flat and smoothing out any wrinkles. Use a ruler or measuring tape to mark your panels. For most bags, you’ll need two main panels (front and back) and one long strip for the sides and bottom (the gusset).
Here are some handy tips for cutting:
- Draw your layout on the fabric before you cut. This helps you avoid mistakes.
- Cut panels on the grain of the fabric. This keeps your bag from twisting or stretching out of shape.
- Use the selvedge (the finished edge of the fabric) when possible. This saves fabric and gives you a neat edge.
- Keep your angles at 90° for a nice, square bag.
- If you’re using a template, pin it to the fabric and cut around it for perfect shapes every time.
Some people like to use 13-by-15-inch panels for easy measuring. If you want to make more than one bag, adjust the gusset width to fit your fabric and reduce waste. Always add a little extra for seam allowances and kerf (the bit of fabric lost to the cut).
Pro tip: Spend a few minutes drawing your layout before you cut. This simple step can save you fabric and frustration!
Once you finish cutting, you’re ready for the next step in how to make a grocery bag. You’ll see your project come together quickly from here!
Sewing the Bag
You’ve got your fabric pieces ready. Now comes the fun part—putting your diy grocery tote together! If you’re new to sewing, don’t worry. I’ll walk you through each step, and you’ll see how easy it is to make a sturdy, stylish bag.
Assembling Panels
Let’s start by joining the main panels. Lay your front and back pieces right sides together. Line up the edges so everything matches. Pin or clip the sides and bottom. Leave the top open for now.
Here’s a simple way to sew the panels:
- Sew down one side, across the bottom, and up the other side. Use a straight stitch if you have a sewing machine. If you’re hand sewing, small running stitches work well.
- If your bag has a gusset (the strip for the sides and bottom), pin it around the edges of one panel first. Sew it in place, then attach the other panel.
- Trim any loose threads. Turn the bag right side out and check your seams.
Tip: If you want extra strength, sew the seams twice. You can also zigzag over the raw edges to keep them from fraying.
Adding Lining
A lining makes your bag look neat and helps it last longer. You can use a lighter cotton or even another old t-shirt. Here’s how you add a lining:
- Cut lining pieces the same size as your outer panels.
- Sew the lining together just like you did with the outer bag, but leave a small gap at the bottom for turning.
- Slip the lining inside the outer bag, right sides facing.
- Match up the top edges and pin them together.
- Sew around the top edge.
- Turn the bag right side out through the gap in the lining. Stitch the gap closed.
Now your bag looks professional inside and out! If you want to add pockets, sew them onto the lining before you assemble it.
Note: A lining helps keep your bag clean. You can wash it more easily, which is important for food safety.
Zigzag Stitch Method
If you’re tackling a beginner sewing project or working with a t-shirt, the zigzag stitch is your best friend. You can use it with a machine or by hand. This stitch keeps edges from fraying and adds a bit of stretch, which is perfect for grocery bags.
Here’s how you do it:
- Set your sewing machine to the zigzag setting. If you’re hand sewing, make wide, angled stitches that cross over the edge.
- Sew along all raw edges, especially the sides and bottom seams.
- For extra durability, zigzag the handles too.
Let’s compare the zigzag stitch to other beginner-friendly techniques:
| Feature | Zigzag Stitch | Other Techniques (Straight/Back Stitch) |
|---|---|---|
| Edge Finishing | Prevents fraying, ideal for unlined bags | Less effective for raw edges |
| Flexibility | Creates stretchy seams for various materials | Limited flexibility |
| Decorative Aspect | More decorative than straight stitches | Less decorative |
| Ease of Adjustment | Easy to remove with a seam ripper | More difficult to adjust |
You can see why so many people choose the zigzag stitch for their first diy grocery tote. It’s forgiving, looks nice, and works on lots of fabrics.
Pro tip: If you make a mistake, the zigzag stitch is easy to undo. Just grab a seam ripper and try again!
Keeping Your Bag Clean and Safe
Sewing your own grocery bag is fun, but keeping it clean is just as important. Only 15% of Americans wash their reusable grocery bags regularly. That means bacteria like Norovirus and E. coli can build up. Washing your bag can reduce germs by 99.9%.
Here are some simple ways to keep your bag safe:
- Wash your bags often to prevent bacteria buildup.
- Use your grocery bags only for groceries.
- Label bags for meat, produce, and dry goods to avoid cross-contamination.
- Don’t store bags in your car, especially in hot weather.
- Use separate bags for meat, seafood, and produce.
- Place meat in a plastic bag before putting it in your reusable bag.
- Wash your bags according to the fabric care instructions.
Keep your reusable bags dry and clean. Moisture helps bacteria grow, so store your bags in a dry spot and clean them often.
You’re almost done! With these instructions, you can sew a grocery bag that’s strong, safe, and ready for your next shopping trip.
Handles and Finishing
Making Handles
Handles make your reusable grocery bag easy to carry, so you want them strong and comfortable. You can use webbing, fabric strips, or even upcycled materials. Webbing is a favorite because it’s sturdy and comes in lots of colors. If you want a softer look, try making handles from matching or contrasting fabric.
Here’s a simple way to make fabric handles:
- Cut two strips of fabric, each about 22 inches long and 2 inches wide.
- Fold each strip in half lengthwise, right sides together.
- Sew along the long edge, then turn the strip right side out.
- Press the handle flat with an iron for a crisp finish.
Webbing skips the sewing—just cut to length and attach. If you want extra comfort, wrap the webbing with a bit of fabric or add padding.
Tip: Wide straps help you carry heavy groceries without hurting your hands or shoulders.
Attaching Handles
Attaching handles is where your DIY grocery tote gets its strength. You want to make sure the handles stay put, even when you load up on produce or cans. Here are some ways to reinforce your handles:
- Add extra stitches at the points where the handles meet the side panels. This helps prevent tears and spills.
- Sew a small square or “X” pattern at each attachment point for added durability.
- Use a double layer of fabric or webbing for handles if you plan to carry heavy items.
- Reinforce the bottom of your bag with a sturdy panel. This keeps the bag from sagging and helps it last longer.
If you want to see how different bags handle reinforcement, check out this quick table:
| Handle Type | Reinforcement Method | Durability Level |
|---|---|---|
| Webbing | Extra stitches, “X” box | High |
| Fabric Strips | Double layer, square stitch | Medium |
| Upcycled T-shirt | Zigzag stitch, overlap | Medium |
Pro tip: Always backstitch at the start and end of your seams. This locks the thread and keeps handles secure.
Final Touches
Now you get to add your personal style! Many craft blogs suggest finishing touches that make your reusable grocery bag unique and practical. You can try these ideas:
- Crochet a tote bag from “plarn” (plastic bag yarn) for a recycled twist.
- Upcycle juice pouches or pillowcases for a fun, eco-friendly look.
- Sew a double lining and reinforce the corners for extra strength.
- Make a square-shaped tote for big shopping trips.
- Add wide straps for comfort.
- Create a foldable bag that fits in your pocket.
- Use old t-shirts for a quick, no-sew option.
- Try a drawstring closure for produce bags.
Want to keep your groceries safe? You can add closures like zippers, buttons, or ropes. These help keep everything inside, especially if you’re carrying small items.
Note: Pockets are a great way to store your phone, keys, or coupons. Sew a small pocket onto the lining before you finish the bag.
With these finishing touches, your DIY grocery tote will stand out at the store, farmers market, or anywhere you shop. You’ll have a bag that’s strong, stylish, and ready for anything!
How to Make Reusable Shopping Bags: Tips and Variations
Beginner Tips
Starting your journey with reusable shopping bags can feel exciting, but you might wonder how to make reusable shopping bags a regular part of your routine. Here are some expert-backed tips to help you get the most out of your new bags:
- Keep your bags where you’ll see them. Try hanging them by the door or stashing a few in your car. This way, you never leave home without one.
- Use reminders. Stick a note on your fridge or add a reminder to your shopping list. A little nudge goes a long way!
- Make mental connections. Tuck coupons or spare change into your bags. When you reach for your wallet, you’ll remember your bags, too.
- Personalize your bags. Add patches, pins, or fabric paint. When your bags look fun and unique, you’ll want to use them every time you shop.
Tip: The more you use your reusable grocery bags, the easier it gets to remember them. Soon, grabbing a bag will feel like second nature!
Common Mistakes
Everyone makes mistakes when they first start using reusable shopping bags. If you know what to watch for, you can avoid these common slip-ups:
- Forgetting your bags at home or in the car. Try keeping a foldable bag in your purse or backpack for emergencies.
- Overloading your bag. Even sturdy bags have limits. Spread heavy items across two bags to keep them from tearing.
- Not washing your bags often enough. Dirty bags can carry germs. Toss them in the wash after a few trips, especially if you carry produce or meat.
- Using the same bag for everything. Try using different bags for groceries, books, or gym clothes. This keeps things organized and clean.
Note: Label your bags or use different colors for different uses. This simple trick helps you stay organized and safe.
Easy Variations
You don’t have to stick to just one style. There are so many ways to make your reusable shopping bags fit your life:
- Try a no-sew bag. Cut the bottom off an old t-shirt, tie the ends, and you have a quick tote—no sewing needed!
- Upcycle materials. Old pillowcases, jeans, or even curtains can become sturdy bags. You save money and help the planet.
- Add pockets or closures. Sew on a pocket for your phone or keys. Attach a button or drawstring to keep things secure.
- Watch video tutorials. If you learn best by watching, search for step-by-step videos online. Seeing the process can make everything clearer.
| Variation Type | Materials Needed | Skill Level |
|---|---|---|
| No-sew T-shirt Bag | Old T-shirt, scissors | Beginner |
| Upcycled Denim Tote | Old jeans, needle, thread | Intermediate |
| Foldable Nylon Bag | Nylon fabric, webbing | Beginner |
Remember: There’s no right or wrong way to make a bag. Try different methods until you find what works for you!
Conclusion
You can make your own DIY grocery tote. This helps the planet, too. When you use homemade reusable bags, you:
- Use less plastic and stop microplastic pollution.
- Keep the environment and yourself safe from bad chemicals.
Want to give someone a cool gift? Try these fun ideas:
- Paint or draw with fabric markers for bright designs.
- Add embroidery, patches, or pockets to make it special.
- Put names or quotes on the bag so each one is different.
If you want more choices, we are a grocery bag manufacturer. We have non-woven, canvas, cotton, and eco-friendly materials. We also do custom OEM/ODM orders. Show off your bags and help others start using reusable bags!
FAQ
How do I wash my reusable grocery bag?
You can toss most DIY grocery totes in the washing machine with cold water and mild detergent. Air dry your eco-friendly grocery bag to keep it in good shape. If you use a bag made from old t-shirts or cotton, washing is super easy. Always check the care label if you use special fabrics.
Can I make a grocery bag without a sewing machine?
Absolutely! You can make a no-sew reusable grocery bag using an old t-shirt and scissors. Just cut off the sleeves and neckline, then tie the bottom. You get a quick DIY grocery tote in minutes. Hand sewing works, too, if you want a sturdier finish.
What fabric works best for a sturdy reusable grocery bag?
Canvas and cotton are top choices for durability and easy cleaning. If you want a lightweight bag, try recycled PET or nylon. Upcycled denim or old jeans make strong DIY grocery totes. Pick a fabric that matches your style and holds up to heavy groceries.
How do I reinforce the handles on my grocery bag?
You can sew an “X” or a box where the handles meet the bag for extra strength. Use webbing or double-layered fabric strips for sturdy handles. Backstitch at the start and end to lock the thread. Reinforced handles help your eco-friendly grocery bag last longer.
Can I add pockets or closures to my DIY grocery tote?
Yes! You can sew a pocket onto the lining or outside for keys, coupons, or your phone. Add a button, zipper, or drawstring for a secure closure. These extras make your reusable grocery bag more useful and keep your items safe while you shop.
How do I keep my reusable grocery bag clean and safe for food?
Wash your bag often, especially after carrying produce or meat. Use separate bags for different foods to avoid cross-contamination. Store your eco-friendly grocery bag in a dry spot. Label bags for meat, veggies, and dry goods to keep everything organized and safe.
What size should I make my grocery bag?
A standard size is about 13 inches wide, 14 inches tall, and 7 inches deep. This fits most groceries and folds flat for easy storage. You can adjust the size for snacks, books, or bulk shopping. Templates online help you pick the perfect dimensions for your DIY grocery tote.
Can I personalize my reusable grocery bag?
Definitely! You can decorate your bag with fabric paint, patches, embroidery, or iron-on designs. Add your name, favorite quote, or a fun pattern. Personalizing your eco-friendly grocery bag makes shopping more fun and helps you spot your bag in a crowd.


