Ever wondered how to make a fishing tackle bag that fits your style? This guide walks you through each step so you can craft your own bag from scratch. You don’t need special skills or fancy equipment. Just follow along, and soon you’ll have a tackle bag built for your fishing adventures. Want extra pockets or a cool color? You get to decide!

Tip: Personalize your bag to match your favorite fishing spots or gear.
Key Takeaways
- Pick a strong, water-resistant fabric for your tackle bag. This will help keep your gear dry.
- Use a simple sewing machine and tough thread. This will make the seams strong.
- Think about your fishing gear before you plan the bag’s size and shape. This helps you organize better.
- Add pockets and compartments to your bag. This keeps your tackle neat and easy to find.
- You can use a tote or backpack as a base. This makes a custom tackle bag faster.
- Make straps and handles stronger. This helps them hold heavy things without ripping.
- Clean and take care of your tackle bag often. This will help it last longer and work well.
- Make your bag special with colors and features you like. This shows your fishing style.
How to Make a Fishing Tackle Bag: Materials & Tools
Before you start, you need the right materials and tools. This guide will help you pick strong fabrics and handy extras so your tackle bag lasts for many fishing trips.
Choose Durable Fabric
When you want to sew a nylon bag for fishing, fabric choice matters. You want something tough and water-resistant. Here’s a quick look at the most popular fabrics for fishing tackle bags:
| Fabric Type | Durability Characteristics |
|---|---|
| 600D Oxford | Heavy-duty, strong, water-resistant |
| 1000-denier PVC | Excellent abrasion resistance, suitable for outdoors |
| Coated Canvas | Waterproof, protection against wear |
| Weather-resistant Polyester | Keeps gear dry, long-lasting |
| 1000D Nylon | Known for strength, handles tough conditions |
Nylon and water-resistant options
Nylon and polyester are top picks if you want to keep your tackle dry. PVC and rubber-coated fabrics block water completely, but they don’t breathe much. Polyester with a PU coating gives you a lighter bag that still keeps water out. If you fish in wet places, look for advanced membrane fabrics. These keep water out but let air in, so your gear stays dry and you stay comfortable. Always check the seams. Sealed or welded seams stop water from sneaking in through needle holes.
Tip: Pick a fabric that matches your fishing style. If you fish in the rain, go for waterproof options.
Essential Sewing Supplies
You don’t need fancy tools to follow these instructions. Here’s what you need to sew a nylon bag for your tackle:
- Sewing machine (a basic one works fine)
- Strong thread (nylon or polyester)
- Sharp scissors
- 2/3 yard of rip stop or sport nylon fabric
- Double fold bias tape (1/4″ wide or wider)
Sewing machine, thread, scissors
A sewing machine helps you make strong, even stitches. Use tough thread so your bag holds up. Sharp scissors make cutting fabric easy and neat.
Double fold bias tape
Bias tape covers raw edges and makes seams stronger. It also gives your bag a clean look.
Extra Features
Want to make your bag even better? Add these extras for more comfort and protection.
Bungee cords
Bungee cords help you secure extra gear on the outside of your bag. They stretch and hold things tight.
Adjustable straps
Adjustable straps make your bag easy to carry. You can change the length to fit your body.
Waterproof lining
A waterproof lining adds another layer of protection. It keeps water out, even if you drop your bag in a puddle.
Note: When you plan how to make a fishing tackle bag, think about what you want to carry. More pockets and strong straps make your bag more useful.
If you follow this guide and use these instructions, you’ll have everything you need to make a tackle bag that’s tough, dry, and ready for your next trip.
Plan Your Bag
Designing your fishing tackle bag starts with thinking about what you want to carry and how you want to use it. You get to decide the size, shape, and features that fit your fishing style.
Decide Size & Shape
Measure for gear
Grab your fishing gear and lay it out. Measure your longest rod handle, biggest lure box, and any other must-have items. Write down these measurements. This helps you figure out how big your bag needs to be.
Sketch design
Draw a simple sketch of your bag. Mark where you want pockets, straps, and compartments. You don’t need to be an artist—just make sure you know where everything goes. Standard tackle bags give you lots of storage and easy access, which works great if you fish from a boat and need to grab lures quickly. Tackle backpacks let you carry gear hands-free, but you might have to dig for items since they store things vertically. Think about how you fish and pick a shape that makes grabbing gear easy.
Tip: If you fish on the move, a backpack style keeps your hands free. If you want to see all your gear at once, a classic tackle bag works best.
Compartments & Pockets
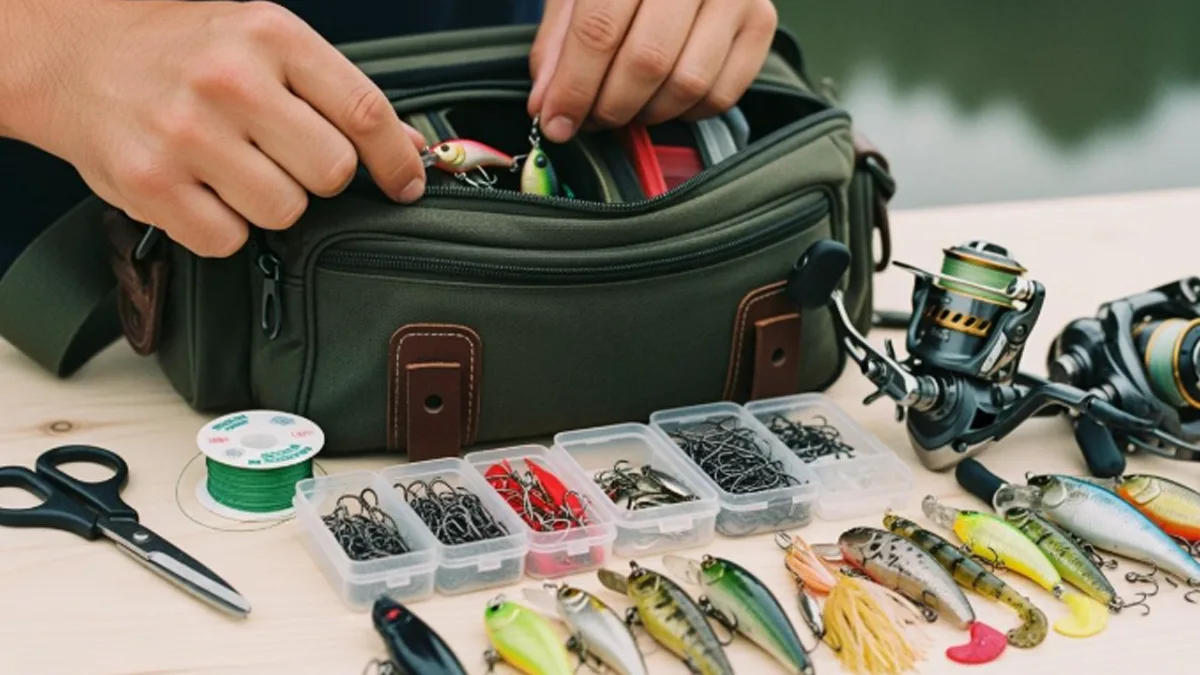
Organize lures, hooks, lines
You want your tackle bag to keep everything neat. Here are some ways to organize your gear:
- Measure and adjust compartments to fit your lures so they don’t rattle around.
- Group lures by type and size for quick access.
- Use labels on pockets so you know what’s inside.
- Use every inch of space, including corners and sides.
Placement tips
Put pockets where you can reach them easily. Side pockets work well for pliers or small boxes. Inside dividers help keep hooks and lines separate. Try not to stack items too deep, so you don’t have to dig for what you need.
Modify Existing Bags
Tote or backpack base
Want a shortcut? Start with a sturdy tote or backpack. You can add pockets, dividers, and waterproof lining to turn it into a fishing tackle bag. A backpack tackle box makes carrying gear easier, especially if you walk long distances to your fishing spot. It also helps you move through hills or wet grass without lugging a heavy box. Just remember, backpacks need regular care. Saltwater can rust zippers and hardware, so clean your bag often. If you skip maintenance, your bag might wear out faster.
Note: Customizing a tote or backpack saves time and gives you a strong base for your tackle bag.
Now you have a plan for your tackle bag. You know what size you need, how to organize your gear, and how to use an existing bag if you want. Next, you’ll start cutting your materials and bringing your design to life.
Cut Materials
Ready to bring your fishing tackle bag design to life? Cutting your materials is the next big step. You want clean edges and accurate shapes so your bag looks great and holds up on every trip.
Mark & Cut Fabric
Before you start snipping, grab your fabric and lay it flat on a clean surface. You want to make sure every piece matches your plan.
Use templates
Templates help you cut the right shapes every time. You can make simple templates from cardboard or thick paper. Place your template on the fabric and trace around it with tailor’s chalk or a dressmaker’s pencil. If you want to cut strips for handles or pockets, fold the fabric in half. This makes it easier to handle and keeps your cuts straight. Cut strips along the folded edge for even widths. Stack the strips and fold them again to cut squares or rectangles for pockets and dividers.
Step-by-step cutting method:
- Fold your fabric in half to make it easier to manage.
- Cut strips of the width you need along the folded edge.
- Stack the strips and fold them again to cut squares or rectangles.
Tip: Templates save time and help you avoid mistakes. You can reuse them for future projects.
Safety tips
Cutting fabric sounds simple, but safety matters. Always use sharp scissors or a rotary cutter. Dull blades can slip and cause uneven edges or even injuries. Keep your fingers away from the cutting line. If you’re working with kids or beginners, remind them to cut slowly and pay attention. Clean up scraps right away so you don’t trip or lose small pieces.
Safety checklist:
- Use sharp scissors or a rotary cutter.
- Keep fingers clear of the blade.
- Cut on a stable, flat surface.
- Remove scraps after each cut.
Note: Choose marking tools that won’t damage your fabric. Tailor’s chalk, dressmaker’s pencils, and even soap slivers work well. For delicate fabrics, tailor’s tacks give the best results.
Prep Straps & Handles
Straps and handles take a lot of stress, so you want them strong and comfortable.
Reinforce for strength
Cut your strap material a little longer than you think you’ll need. Fold the ends under and stitch them down to stop fraying. If you want extra strength, sew a double layer or add bias tape along the edges. Reinforce the points where straps attach to the bag with extra stitching or a small patch of fabric. This keeps your handles from tearing loose when you carry heavy gear.
Pro tip: Test your straps by pulling on them before you sew them to the bag. If they stretch or feel weak, add another layer or switch to a tougher material.
Now your fabric pieces, straps, and handles are ready for assembly. You’ve set yourself up for a sturdy, custom tackle bag that will last for many fishing trips.
Sew and Assemble
You’re ready to put your fishing tackle bag together. This part of the guide shows you how to sew each piece and add all the features you planned. You’ll see how simple steps can turn your cut fabric into a sturdy bag that keeps your tackle safe and organized.
Stitch Main Body
Simple sewing steps
Start by joining the main panels of your bag. Place the right sides of the fabric together. Sew along the edges, leaving the top open. Use a straight stitch for most seams. If you want extra strength, sew a second line next to the first. You can use bias tape to cover the raw edges inside. This keeps the seams neat and stops fraying.
Tip: Go slow with your sewing machine. Check your stitches as you go. If you see loose threads, stop and fix them before moving on.
Attach lining
A good lining makes your bag last longer and keeps water out. Pick a lining material that matches your fishing needs. Here’s a quick look at how different linings work:
| Material Type | Water Resistance | Durability |
|---|---|---|
| 1000-denier PVC | True waterproofing | High abrasion resistance |
| Coated canvas | True waterproofing | High abrasion resistance |
If you fish in wet places, choose 1000-denier PVC or coated canvas. These linings give you real waterproofing and stand up to rough use. Sew the lining to the inside of your bag before you attach pockets or straps. Make sure the lining fits snugly so it doesn’t bunch up.
Add Pockets & Dividers
Secure compartments
Pockets and dividers help you organize your tackle. Sew pockets onto the inside and outside of your bag. Use double stitching for the edges. This keeps the pockets strong, even when you fill them with hooks or lures. If you want zippered pockets, sew the zipper in place first, then attach the pocket to the bag.
Note: Place pockets where you can reach them easily. Side pockets work well for pliers or small boxes.
Create organizers
Dividers keep your gear sorted. Cut strips of fabric or use mesh for flexible organizers. Sew these dividers inside the main compartment. You can make small sections for lures, hooks, and lines. If you want removable organizers, use Velcro strips. This lets you change the layout whenever you need.
- Use mesh for see-through pockets.
- Add Velcro for adjustable dividers.
- Label each section for quick access.
Attach Straps
Position for comfort
Straps make your tackle bag easy to carry. Place shoulder straps so the weight sits evenly on your back. If you want extra comfort, add padding to the straps. Here are some ways to make your bag more comfortable:
- Padded shoulder straps reduce pressure on your shoulders.
- Load-lifter straps pull the weight closer to your back.
- Hip belts shift weight from your shoulders to your core.
- Sternum straps keep shoulder straps in place while you move.
Try the bag on before you sew the straps down. Adjust the position until it feels right.
Reinforce stress points
Straps take a lot of force, especially when your bag is full. Reinforce the spots where straps attach to the bag. Sew a small patch of fabric under each strap end. Use extra stitching, like a box or an X pattern, to keep the straps from tearing loose. If you want your bag to last, don’t skip this step.
Pro tip: Pull on each strap after you sew it. If it feels loose, add more stitches or another layer of fabric.
Now you know how to make a fishing tackle bag that’s strong, comfortable, and organized. This guide helps you build a bag that fits your gear and your fishing style.
Organize Tackle
Arrange Compartments
Store gear efficiently
You want your fishing bag to help you find gear fast. The way you arrange compartments can make a big difference. Here are some simple ways to keep everything in order:
- Use tackle trays like the 3500, 3600, or 3700 series. These trays fit most bags and keep lures, hooks, and weights sorted.
- Pack eight to ten small tackle boxes with gear for different fishing trips. You can grab the box you need and go.
- Keep universal items, such as snaps, swivels, leader material, and tools, in a dedicated spot. You always know where to find them.
- Change what you pack based on your fishing plans. If you’re heading out for bass, swap in your favorite crankbaits and soft plastics.
Tip: Group similar items together. Put all your crankbaits on one side and your soft plastics on another. You’ll spend less time searching and more time fishing.
Professional anglers use smart tricks to keep their tackle bags organized. Take a look at this table for some of their best tips:
| Tip | Description |
|---|---|
| Label everything | Clear labels help you find gear quickly. |
| Use dividers | Dividers separate hooks, lures, and tools so you don’t mix things up. |
| Maintain regularly | Clean out your bag after each trip and refill anything you used. |
You can also make your bag work better by keeping your most-used gear on top. Put things you rarely use at the bottom. This way, you grab what you need without digging through everything.
“Like items adjacent to one another keep search time to a minimum. It’s easier to spot that selection of crankbaits if they’re together on one side, instead of widely dispersed.”
Use Organizers
DIY or store-bought options
You have lots of choices for organizers. You can buy tackle trays and boxes at the store, or you can make your own. Some anglers use small plastic containers, zippered pouches, or even old lunch boxes to sort gear.
Here are a few ideas to get you started:
- Try mesh pockets for soft baits. You can see what’s inside and grab it fast.
- Use Velcro dividers to change the size of compartments. Move them around to fit new gear.
- Label each box or pouch with the type of tackle inside. You’ll know what’s where at a glance.
- Store tools like pliers and scissors in side pockets for easy access.
If you keep your tackle bag neat, you’ll always be ready when the fish start biting. An organized bag saves time and helps you enjoy your trip. You don’t want to miss a chance because you’re searching for a lure.
Note: After each fishing trip, take a few minutes to clean out your bag and put everything back in its place. This habit keeps your gear fresh and ready for next time.
Tips & Troubleshooting
Making your own fishing tackle bag is fun, but you might run into a few bumps along the way. Don’t worry! You can fix most problems with a little know-how. Let’s look at some common mistakes and how to keep your bag in top shape.
Avoid Common Mistakes
Sewing errors
Sewing can be tricky, especially if you’re new to it. Sometimes stitches come out uneven or seams don’t line up. If your needle skips or thread breaks, check your machine settings. Use the right needle for thick fabric. Go slow and keep your fabric flat. If you see loose threads, stop and fix them before moving on. Double-check your seams so your tackle bag stays strong.
Tip: Practice on scrap fabric before you sew the real pieces. This helps you get comfortable with your machine and avoid mistakes.
Material issues
Choosing the wrong material can cause problems later. If your fabric isn’t water-resistant, your gear might get wet. Some fabrics fray easily or tear under heavy weight. Always pick tough, waterproof fabric for your tackle bag. Reinforce stress points with extra stitching or patches. If you notice wear or small holes, patch them right away so they don’t get bigger.
| Problem | Quick Fix |
|---|---|
| Fraying edges | Use bias tape or zigzag stitch |
| Weak spots | Add extra fabric patches |
| Water leaks | Seal seams with waterproof tape |
Care & Maintenance
Clean and repair
Taking care of your tackle bag helps it last longer. After each fishing trip, rinse your bag with fresh water to remove salt and dirt. Wipe the surfaces with a damp cloth. Use a toothbrush to clean small pockets and corners. Let your bag dry completely in the shade. Direct sunlight can damage the fabric over time.
If you want a deeper clean, take out any removable parts and wash them separately. Apply a little lubricant to zippers and clips so they work smoothly. Use a technical fabric detergent to keep the waterproof coating strong. Store your bag in a cool, dry place. This stops mildew and protects it from UV rays, just like you would with ice fishing bibs.
Note: Regular cleaning and careful storage keep your tackle bag ready for every adventure. Fix small problems early so your bag stays tough and reliable.
Conclusion
You now know how to make a fishing tackle bag yourself. You chose tough materials and planned where everything goes. You also added features that match how you fish. Making your own bag means you can change the compartments, carry it easily, and feel comfortable. Here are some benefits:
| Feature | Tackle Bag (Custom) | Tackle Box (Pre-made) |
|---|---|---|
| Layout | Adjustable | Fixed |
| Portability | High | Moderate |
| Comfort | Ergonomic straps | Basic handles |
If you want a special design, we can help you. We offer free samples, custom fabrics, and logo choices. Most orders are ready in 15 to 30 days after you approve the design. Contact us if you want more information or want to order your own custom bag!
FAQ
How do I choose the best fabric for my tackle bag?
Pick nylon or polyester if you want durability and water resistance. Look for coated fabrics if you fish in wet places. Always check the fabric’s strength before you start.
Can I make a tackle bag without a sewing machine?
Yes, you can sew by hand. Use strong thread and small stitches. It takes longer, but you still get a sturdy bag.
What size should my fishing tackle bag be?
Measure your gear first. Sketch your design. Make sure your bag fits your largest lure box and leaves room for extras.
How do I keep my tackle bag waterproof?
Use waterproof fabric and seal seams with tape. Add a waterproof lining for extra protection. Always check for leaks after you finish.
What’s the easiest way to organize my tackle?
Try using tackle trays or small boxes. Group similar items together. Label pockets so you find gear fast.
Can I add extra pockets later?
You can sew or glue new pockets onto your bag. Use strong fabric and reinforce the edges. Make sure the pockets fit your gear.
How do I clean my fishing tackle bag?
Wipe your bag with a damp cloth after each trip. Rinse with fresh water if you fish in saltwater. Let it dry in the shade.
What if my bag gets a tear?
Patch small holes with bias tape or fabric glue. For bigger tears, sew a patch over the spot. Reinforce with extra stitches.