
Ready to learn how to make a drawstring makeup bag? You can finish this project in about 30 minutes, even if you’ve never sewn anything before. The bag opens flat, so you can see all your makeup at once—no more digging for lipstick!
Grab your favorite fabric and gather your supplies. You’re about to start a fun DIY project that anyone can do!
Key Takeaways
- Making a drawstring makeup bag is a fun project. You can finish it in about 30 minutes. Beginners can do it too.
- Pick fabrics like cotton or canvas. These are easy to use and look nice. They are great for your first bag.
- The bag has a round shape. It opens flat on the table. You can see all your makeup at once. You do not need to search for things.
- Try different drawstring materials. Use polyester cord or cotton ribbon. Match the style of your bag. These choices make your bag strong.
- Change your bag to fit your needs. Make it bigger or smaller. Add pockets if you want. Use special fabrics to show your style.
- Read each step in the guide closely. Be careful when you cut and sew. This helps you avoid mistakes.
- Press the seams as you work. Finish with topstitching. These steps make your bag look better and last longer.
- You can give your handmade bags as gifts. Friends and family will like them. They are useful and show you care.
Drawstring Makeup Bag Overview
What Is a Drawstring Makeup Bag
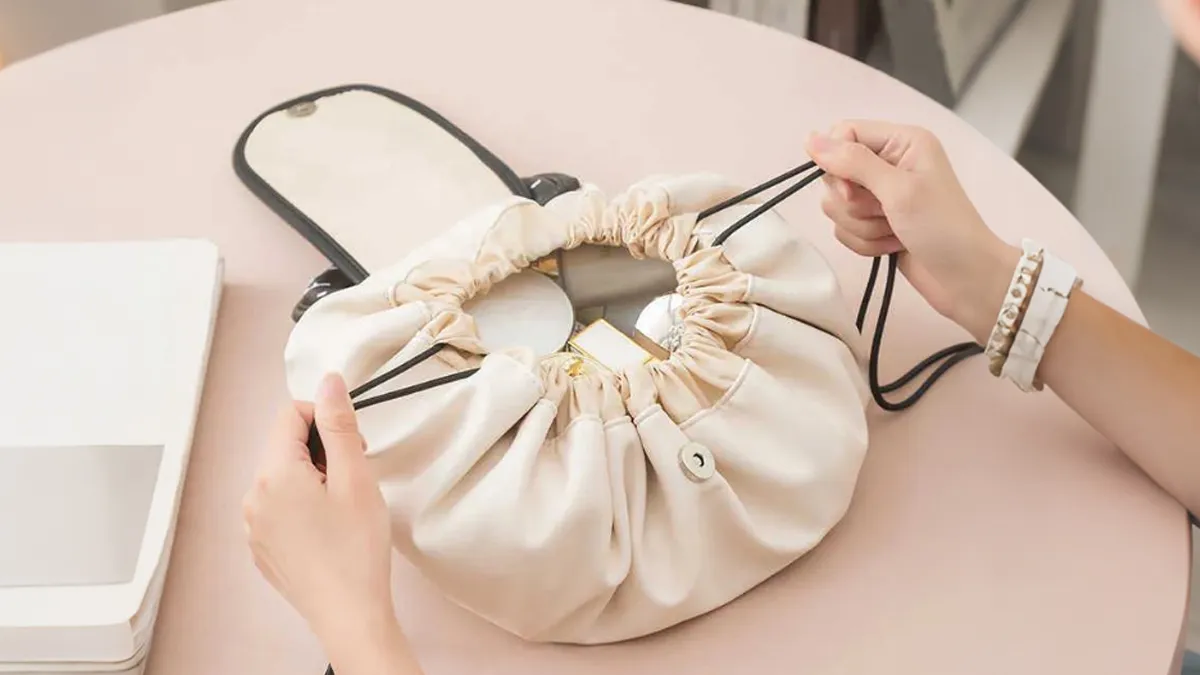
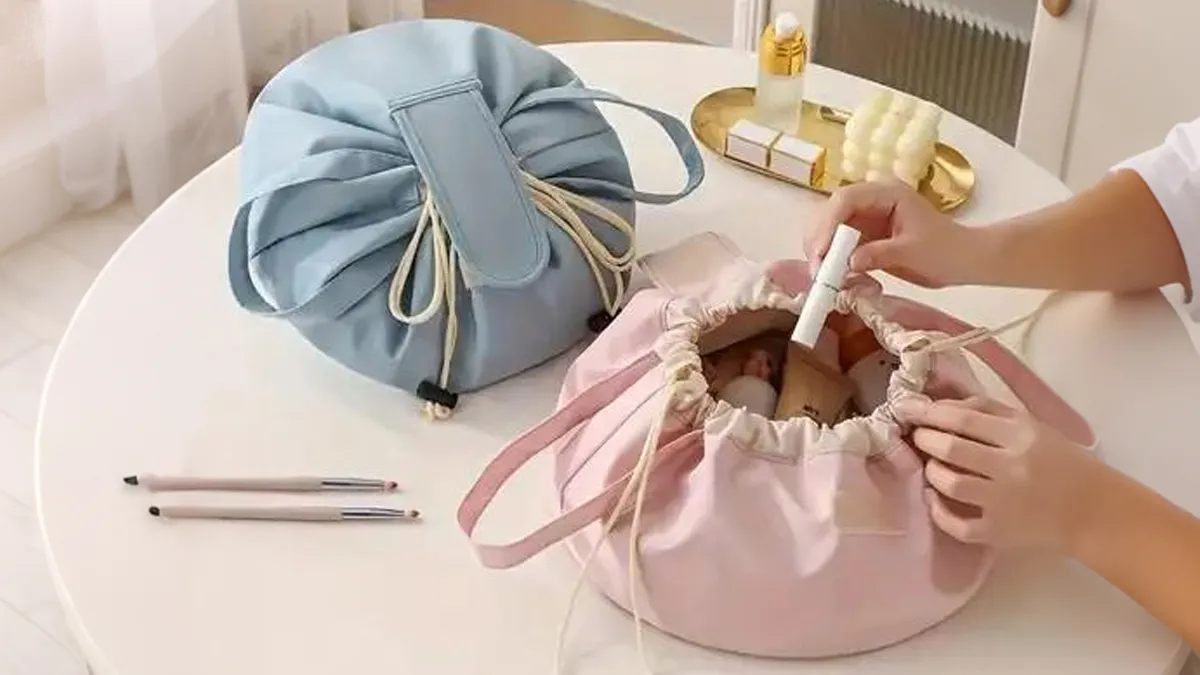
A drawstring makeup bag is a handy pouch that you can open and close with a simple pull of a cord. You might see these bags in stores or online, but making one yourself lets you choose your favorite colors and patterns. The best part? You can lay the bag flat on your counter, so you see all your makeup at once. No more digging through a deep pouch for your mascara!
You’ll find several types of drawstring bags out there. Here are some common ones:
- Cotton drawstring bags feel soft and light. You can use them for errands or eco-friendly shopping.
- Canvas drawstring bags are thicker and last longer. Many people use them for fashion or storage.
- Polyester drawstring bags resist water and wear. They work well for gym or school.
- Nylon drawstring bags are tough and tear-resistant. You can use them for many things.
- Mesh drawstring bags let air flow through, so your items stay fresh.
- Waterproof drawstring bags keep everything dry, which is great for outdoor adventures.
You can pick the style that fits your needs. For makeup, cotton or canvas works well, but waterproof options help if you travel a lot.
Benefits and Uses
You might wonder why you should use a drawstring makeup bag. These bags offer lots of benefits for travel and daily life. Take a look at this table to see how they help:
| Benefit | Description |
|---|---|
| Versatility | Use the bag for makeup, packing cubes, or even snacks. |
| Portability | The bag feels light and easy to carry. Perfect for trips or your purse. |
| Organizational Advantages | Keep your items neat and easy to find. No more clutter! |
| Space-saving | Fold the bag flat when you’re not using it. It takes up very little room. |
| Easy Access | Open the bag wide and grab what you need in seconds. |
You can use your drawstring makeup bag for more than just cosmetics. Try it for jewelry, hair ties, or even small toys. The simple design makes it easy to use every day.
Circular Design Features
The circular shape of this makeup bag makes it special. When you pull the drawstring, the bag closes tight and keeps your items safe. Open it up, and the bag lays flat so you can see everything inside. This design saves you time and keeps your space tidy.
Here’s what makes the circular design so useful:
- The bag opens and lays flat, so you get quick access to all your beauty essentials.
- Internal elastic bands hold brushes, lipsticks, and eyeliners in place.
- An internal zipper pocket gives you extra space for small accessories.
- The drawstring closure keeps everything secure and prevents spills.
If you’re new to sewing, you’ll love how easy this project feels. The circular pattern is simple to cut and sew. You don’t need fancy skills or tools. Just follow the steps, and you’ll have a stylish, practical makeup bag in no time.
Materials and Tools
You’re about to start sewing your own drawstring makeup bag, so let’s talk about what you’ll need. Picking the right materials and tools makes the whole process easier and helps your bag look great.
Fabric Choices
Choosing fabric is one of the most fun parts of this project. You get to decide how your bag will look and feel!
Best Fabrics for Beginners
If you’re new to sewing, you want fabric that’s easy to handle and forgiving. Here are some popular options for drawstring makeup bags:
- Cotton: Soft, easy to sew, and comes in lots of prints.
- Canvas: Durable and holds its shape well.
- Polyester: Lightweight and resists wrinkles.
- Nylon: Strong and water-resistant.
- Satin: Smooth and shiny, but a bit slippery.
- Velvet: Plush and fancy, though it can be tricky for beginners.
- Faux Leather (PU): Stylish and wipes clean easily.
- Felt: Simple to cut and sew, great for crafts.
Tip: Cotton and canvas are perfect for beginners. They don’t slip around and they’re easy to press.
Pattern and Color Ideas
You can show off your personality with your fabric choice. Try bright florals, bold stripes, or classic solids. If you want something unique, mix two fabrics—one for the outside and one for the lining. You can even use laminated or waxed fabric for the lining to make your bag easy to clean.
Essential Supplies
Gathering your supplies before you start saves time and keeps you organized. Here’s what you’ll need:
- 20 inch x 20 inch piece of fabric for the outside
- 20 inch x 20 inch piece of fabric for the lining (laminated, vinyl, or waxed fabric works well)
- 20 inch x 20 inch piece of fusible fleece or batting for padding
- 2 to 4 yards of ribbon or cord for the drawstring
- Grommets or cord stops (optional, for a polished finish)
- 2-inch piece of sew-on Velcro (optional, for extra closure)
- Sewing machine or hand sewing needle
- Thread that matches your fabric
- Scissors or rotary cutter
- Pins or clips
- Free PDF pattern (print and cut out before you start)
- Bodkin or safety pin (helps thread the drawstring)
Note: You can sew this bag by hand or with a machine. If you’re using a machine, make sure it’s threaded and ready to go.
Sewing Machine or Hand Sewing
You don’t need fancy equipment. A basic sewing machine works great, but you can sew by hand if you prefer. Just take your time and use small, even stitches.
Free PDF Pattern
Many DIY blogs offer free printable patterns. Download one that matches the size you want. Cut out the pattern and use it to trace your fabric pieces.
Tip: Always check your pattern for seam allowance. Most patterns for drawstring makeup bags recommend a 3/8 inch seam allowance. This extra space keeps your seams strong and helps prevent fraying.
A good seam allowance makes your bag last longer. It gives you room to sew without worrying about the edges coming apart. If you’re unsure, measure and mark your seam allowance before you start sewing.
Now that you have your materials and tools ready, you’re set to start making your own drawstring makeup bag!
How to Make a Drawstring Makeup Bag
Ready to dive into the step by step tutorial? You’re about to learn how to make a drawstring makeup bag from start to finish. This tutorial will guide you through each stage, so you can follow along with confidence. Let’s get started with the first part: cutting your fabric pieces.
Cut Fabric Pieces
Measuring and Marking
Before you begin making the bag, you need to measure and mark your fabric. This is a key step in any sewing instructions. Start by laying your fabric flat on a clean surface. Make sure the edges are straight and the fabric is squared up. Pre-wash your fabric to prevent shrinking later. Use a quilting ruler and a rotary cutter for clean lines. Always cut along the grain of the fabric. This helps your diy drawstring makeup bag keep its shape.
Here’s a quick table to show you the standard dimensions for each piece:
| Fabric Type | Dimensions |
|---|---|
| Outside Fabric | 20 inch x 20 inch |
| Lining Fabric | 20 inch x 20 inch |
| Fusible Fleece | 20 inch x 20 inch |
| Ribbon | 2 yards |
You’ll also need your drawstring makeup bag pattern. Print out your simple diy pattern or easy pattern and use it to trace a circle onto your fabric. If you want a larger or smaller bag, adjust the pattern size before you start.
Tip: Always read through the entire pattern before you cut anything. This helps you avoid surprises and mistakes.
Using a Circular Pattern
Now, grab your drawstring makeup bag pattern and place it on your fabric. Trace around the pattern with a fabric marker or chalk. Cut out the circle for the outside fabric, lining fabric, and fusible fleece. If you want to add pockets or extra features, mark those spots now.
Many beginners rush this part, but taking your time here makes the rest of the tutorial much easier. Use clips to hold the pattern in place while you cut. If you’re using a video tutorial, pause and check your work after each step.
Don’t forget to follow the pattern’s seam allowance. Most drawstring makeup bag patterns use a 3/8 inch seam allowance. Mark this on your fabric for accuracy.
Sew a Drawstring Makeup Bag
Stitching Main and Lining Fabrics
You’ve got your pieces ready. Now it’s time to sew a drawstring makeup bag. Here are the step by step instructions:
- Treat your shell (outside fabric) and lining as separate pieces. Assemble each one fully.
- Align the lining with the outer fabric. Pin them together at the edges.
- Stitch around the edge using a 3/8 inch seam allowance. Go slow and keep your stitches even.
- If your pattern includes armholes or pockets, align and stitch those areas next.
- Turn the bag right side out through a small gap at the edge.
- Sew the side seams of both shell and lining. Make sure everything lines up.
- Match the front and hem edges, leaving a gap for turning.
- Press well and edge stitch around the front, neckline, and hem edges for a polished look.
Always test your stitch length on a scrap piece first. This helps you avoid skipped stitches and keeps your bag looking neat.
Pressing Seams
After you finish stitching, press your seams with an iron. This step makes your bag look professional and helps the drawstring casing sit flat. Pressing also helps set the stitches and keeps the fabric smooth.
Many beginners forget this step, but it’s important for making the bag sturdy. If you want your diy drawstring makeup bag to last, don’t skip pressing.
Create Drawstring Casing
Folding and Stitching
The next part of the tutorial is creating the drawstring casing. This is where your drawstring will go, so you want it to be neat and strong. Follow these instructions:
- Fold each short end of the casing pieces over about 1/4 inch twice to hide the raw edges. Sew along the edge.
- Sew the top edges together, placing the casing pieces between the lining and exterior fabric.
- Pin the casing strips in place. Make sure all raw edges line up.
- Sew a 1/4 inch seam around the top edge. Don’t leave a turnhole.
- Flip the bag right side out. Close the turnhole by folding raw edges in and topstitching.
- Tuck the lining inside the bag. Topstitch around the top edge for extra strength.
- Use a safety pin or bodkin to thread the drawstring through the casing.
If you’re following a video tutorial, watch how the casing is folded and stitched. Pause and repeat the steps if you need to.
Common Mistakes to Avoid
Here are some mistakes beginners often make when learning how to make a drawstring makeup bag:
- Skipping the pattern prep. Always read the pattern before you start.
- Choosing the wrong fabric. Cotton or canvas is best for your first bag.
- Using the wrong needle size. Pick a 90/14 or 100/16 needle for thick fabrics.
- Ignoring seam allowances. Mark and follow the pattern’s seam allowance.
- Rushing the cutting process. Use a rotary cutter and mat for precision.
- Skipping pressing and finishing details. Press seams and topstitch for a polished look.
Remember, every step in this tutorial helps you create a beautiful bag. Take your time and enjoy the process.
You’ve now completed the main steps for how to make a drawstring makeup bag. You’ve learned how to sew, cut, and assemble your bag using a drawstring makeup bag pattern. The next part of the tutorial will show you how to finish your bag and add the drawstring. Keep your instructions handy and refer to your video tutorial if you need extra help. Making the bag is fun and rewarding, especially when you see your finished project!
Thread Drawstring
You’re almost done with your drawstring makeup bag! Now it’s time to add the drawstring. This step brings your bag to life and makes it easy to open and close. Let’s look at the best types of drawstrings and how you can thread them through the casing.
Types of Drawstrings
You have lots of choices for drawstrings. Some work better than others for makeup bags. You want something strong, smooth, and easy to pull. Here are some popular options:
- Polyester Cord: This is a top pick for durability. The Unique Bargains Durable Drawstring Makeup Bag uses polyester cord because it lasts a long time and slides easily. You won’t have to worry about fraying or breaking.
- Cotton Ribbon: Soft and gentle, cotton ribbon feels nice in your hands. It comes in many colors and patterns. It’s easy to tie and untie.
- Nylon Cord: Tough and water-resistant, nylon cord works well if you travel or need extra strength.
- Satin Ribbon: Shiny and smooth, satin ribbon adds a touch of luxury. It can slip out of knots, so tie it tightly.
- Braided Cord: This style looks fancy and holds up well. It’s a good choice if you want a thicker drawstring.
Tip: Choose a drawstring that matches your bag’s style and use. Polyester and nylon cords are best for durability. Cotton and satin ribbons are great for a softer look.
Finishing Touches
Threading the drawstring through the casing can feel tricky, but you have several easy methods. You don’t need special tools—just a little patience and creativity.
Here’s how you can thread your drawstring:
- Use a Straw and Stapler
- Grab a loose drawstring, a straw, and a stapler.
- Thread the drawstring through the straw.
- Staple the end of the straw to the drawstring.
- Push the straw through the casing until it comes out the other side. Pull the drawstring through.
- Try a Bodkin or Safety Pin
- Attach a large safety pin to the end of your drawstring.
- Push the safety pin through the casing, bunching up the fabric as you go.
- If you have a flat bodkin, use it for straight channels.
- For circular casings, a flexible needle bodkin works best.
- Use Masking Tape
- Wrap masking tape around the end of your drawstring if you don’t have a safety pin or bodkin.
- The tape makes the end stiff and easy to push through the casing.
- Prevent Snags
- Fuse a small piece of interfacing over the seams inside the casing.
- This helps the drawstring glide smoothly and keeps it from catching.
If you get stuck, try threading from the opposite end or use a different tool. Sometimes a simple trick like masking tape saves the day!
Once your drawstring is threaded, tie knots at both ends to keep it from slipping out. You can add cord stops or grommets for a polished finish. If you want extra security, sew a small piece of Velcro near the opening.
Now, pull the drawstring tight and watch your bag close up. Open it wide to see all your makeup at once. You’ve made a custom bag that’s both practical and stylish!
Congratulations! You’ve finished your drawstring makeup bag. Take a moment to admire your work and think about how you’ll use it every day.
DIY Drawstring Makeup Bag Customization
You finished your basic drawstring makeup bag. Now, you can make it truly your own! Customizing your bag lets you match your style, fit your needs, and have fun with the process. Here are some easy ways to get creative.
Adjust Size and Shape
You do not have to stick with one size. You can make your bag bigger for travel or smaller for quick touch-ups. Try these ideas:
- Make a large bag for all your makeup and brushes.
- Create a mini version for lip balm and hair ties.
- Change the shape. Try an oval or even a heart for a cute twist.
- Add a flat bottom so your bag stands up on its own.
Unique bag shapes help you show off your personality. Drawstring pouches work great for storing cosmetics, but you can use them for jewelry or snacks, too.
Tip: Use your pattern as a guide, but feel free to draw your own shape on paper first. Cut it out and see how it looks before you sew.
Personalize with Fabrics
Fabric choice changes everything. You can pick bold prints, soft textures, or even add your name. Here is a quick table to help you choose:
| Fabric Type | Characteristics |
|---|---|
| Silk | Luxurious and soft, perfect for a fancy look. |
| Linen | Light and breathable, gives a rustic feel. |
| Cotton | Durable and easy to clean, great for every day. |
| Velvet | Plush and premium, feels special. |
| Suede | Soft and stylish, looks high-end. |
You can also:
- Mix two fabrics for the outside and lining.
- Use fabric paint or iron-on patches for names or logos.
- Pick bold prints and rich textures you do not see in regular bags.
- Choose fabrics that resist scratches and wear, so your bag lasts longer.
- Go for easy-to-clean materials to keep your bag looking fresh.
Try adding a special print or your favorite color. Your bag will stand out and feel like it was made just for you!
Add Pockets or Linings
Want more organization? Add pockets or a special lining. Here are some ideas:
- Sew a small zipper pocket inside for jewelry or tiny items.
- Add elastic bands to hold brushes or pencils in place.
- Use a waterproof lining to protect against spills.
- Try a bright lining fabric for a fun surprise every time you open your bag.
You can even use leftover fabric scraps for pockets. This saves money and helps the planet.
Don’t be afraid to experiment. Every change you make turns your bag into something unique. You might even come up with a new design that everyone wants!
Customizing your drawstring makeup bag is all about having fun and making something that fits your life. Mix and match ideas, try new shapes, and play with fabrics. Your bag, your rules!
Tutorial Tips and Troubleshooting
Common Mistakes
You might run into a few bumps while making your drawstring makeup bag. Don’t worry—everyone does! Here are some mistakes you might see:
- Cutting fabric without checking the pattern size. You could end up with a bag that’s too small or too big.
- Forgetting to mark the seam allowance. Your seams may look uneven or fray.
- Using the wrong needle or thread. Thick fabrics need sturdy needles, while thin fabrics need lighter ones.
- Skipping the pressing step. Seams can look messy and the bag may not lay flat.
- Overloading the bag with too many items. This can strain the drawstrings and seams.
- Sewing the casing too narrow. The drawstring might get stuck or bunch up.
Tip: Take your time with each step. Double-check your measurements and supplies before you start sewing.
Quick Fixes
Mistakes happen, but you can fix most of them easily. Here’s a table with common problems and simple solutions:
| Problem | Quick Fix |
|---|---|
| Drawstring stuck | Use a safety pin or bodkin to guide it through. |
| Uneven seams | Trim the edges and re-stitch slowly. |
| Fraying fabric edges | Zigzag stitch or use pinking shears. |
| Bag won’t lay flat | Press seams with an iron and reshape. |
| Loose drawstring | Tie a knot at each end or add cord stops. |
| Small holes in fabric | Patch with a small piece of matching fabric. |
If you get stuck, step back and look at your work. Sometimes a fresh look helps you spot what went wrong.
Care and Safety
You want your handmade bag to last. Good care keeps it looking fresh and strong. Here are some easy tips:
- Always check the care instructions for your fabric before cleaning.
- Clean stains right away so they don’t set in.
- Lay your bag flat on a towel to dry. Hanging it by the drawstrings can stretch or warp the shape.
- Rotate between different bags if you have more than one. This helps spread out wear and tear.
- Don’t stuff your bag too full. Overloading can pull on the seams and drawstrings.
- Store your bag in a clean, dry spot away from sunlight. Sun can fade colors and weaken fabric.
- Handle your bag gently to avoid friction and damage.
- Inspect your bag often for loose threads or small tears. Fix them early to prevent bigger problems.
A little care goes a long way. Treat your bag kindly and it will stay beautiful for years!
If you follow these tips, you’ll keep your drawstring makeup bag looking great and working well. Sewing gets easier with practice, and you’ll learn new tricks every time you make something. Happy crafting!
Next Steps and Gift Ideas
Make for Friends and Family
You finished making a drawstring makeup bag. Why not give one to someone you care about? Handmade bags are great gifts for friends or family. People can use them for makeup, jewelry, or travel. Everyone likes getting something special and useful.
Here are some fun ways to give your handmade bags:
- Put treats or small gifts inside for a surprise.
- Pick holiday prints and use them as party favor bags.
- Store chargers, earbuds, or tech stuff in the bag.
- Choose pretty floral prints for an old-fashioned style.
- Use bright linings to make the inside stand out.
- Add a note to make your gift feel personal.
- Decorate the cord ends with beads for a fancy look.
Tip: Small details make your gift unique. Try adding a name tag or a charm to the drawstring.
Explore More DIY Projects
If you liked making your makeup bag, try other sewing projects. You can make a whole set of organizers for beauty or travel. Each project helps you learn new things and show your style.
Check out these cool DIY ideas:
- Cute Corners Cosmetic Case
- Boxy Zipper Bag
- Pochi Pouch
- Twice As Nice Organizer
- Flat Bottom Zippered Pouch
- The Pillbox Pouch
- Wide Open Zipper Case
- Accordion Zipper Case
- Make Up Bag With Handles
- Easy Drawstring Pouch
- Peek A Boo Pouch
Mix fabrics, add pockets, or change the shape. Every project lets you be creative and make something helpful.
Try making a matching set for yourself or as a gift. You will see your skills get better with each new project.
Wholesale and Custom Orders
Maybe you want to buy lots of makeup bags or design your own style. You can work with companies that make custom bags. This process is easy and gives you many choices.
Here’s how ordering in bulk or custom works:
- Decide on your order details like logo, size, material, artwork, and delivery time.
- Get a price based on how many bags and the design.
- See a sample to check the look and quality.
- Pay a deposit and start making the bags after you approve the sample.
- Finish payment to get your bags.
- Set up shipping and pay for delivery.
- Pick up your bags when they arrive.
Ordering custom bags has lots of benefits:
| Advantage | Description |
|---|---|
| Brand Differentiation | Special designs help your bags stand out and look high-end. |
| Cost Efficiency | Buying more bags at once saves money. |
| Quality Assurance | Custom checks make sure your bags are good quality. |
| Flexibility in Design | You can try new styles quickly and easily. |
If you want your own line of makeup bags or need a special design, contact a manufacturer. They can help you make your ideas real.
Now you know how to make a drawstring makeup bag and how to share, customize, or order more. Keep trying new things, keep making, and enjoy every part of your DIY adventure!
Conclusion
You just learned how to make a drawstring makeup bag step by step. Here’s a quick recap:
- Gather your materials and cut out circles.
- Install the grommet and sew the bag together.
- Turn it right side out, press, and edgestitch.
- Create the ribbon channel and feed the ribbon through.
As a China-based makeup bag factory, we build drawstring makeup bags for brands and distributors. Request OEM/ODM, eco materials, retail-ready packs, and set bundles—send your brief to get samples and lead-time details.
FAQ
How long does it take to make a drawstring makeup bag?
You can finish your bag in about 30 minutes. If you are new to sewing, you might need a little more time. Take it slow and enjoy the process!
Can I sew this bag by hand?
Yes, you can sew the bag by hand. Use small, even stitches for strong seams. A sewing machine makes things faster, but hand sewing works great for beginners.
What fabric works best for beginners?
Cotton and canvas are easy to cut and sew. They do not slip around and hold their shape well. You can also try felt for a simple project.
How do I keep my bag clean?
Spot clean with a damp cloth. For tough stains, use mild soap and water. Let your bag air dry flat. Avoid putting it in the washing machine.
My drawstring keeps getting stuck. What should I do?
Try using a safety pin or bodkin to guide the drawstring through the casing. Make sure the channel is wide enough. If it still sticks, use a smoother cord.
Can I make the bag bigger or smaller?
Absolutely! Adjust the pattern size before you cut your fabric. You can make a large bag for travel or a small pouch for quick touch-ups.
What can I store in my drawstring makeup bag?
| Item | Use |
|---|---|
| Makeup | Everyday essentials |
| Jewelry | Rings, earrings |
| Hair ties | Keep organized |
| Snacks | On-the-go treats |
You can use your bag for anything small!


