
Ready to learn how to make a coin bag? This easy tutorial is great for beginners. Coin bags can look different. They can be made from fabric or leather. Some have zippers, clasps, or drawstrings. Before you begin, get your materials together. This helps you work smoothly. You will enjoy how fast this project is. It feels rewarding to finish. You can also add your own style.
Key Takeaways
- Get all your materials ready before you start. This helps your sewing go smoothly.
- Pick the best fabric for your coin bag. Cotton is a good choice if you are new to sewing.
- Use interfacing to make your coin bag strong and keep its shape.
- Pick a closure that matches your style. Zippers keep things safe. Drawstrings are easy to open.
- Cut your fabric with the right measurements. This makes your coin bag look neat.
- Press the seams after you sew them. This makes your bag look nice and finished.
- You can add things like embroidery or patches to make your coin bag special.
- Go slow and have fun. Sewing helps you learn and get better.
Materials & Tools for Coin Purse Tutorial
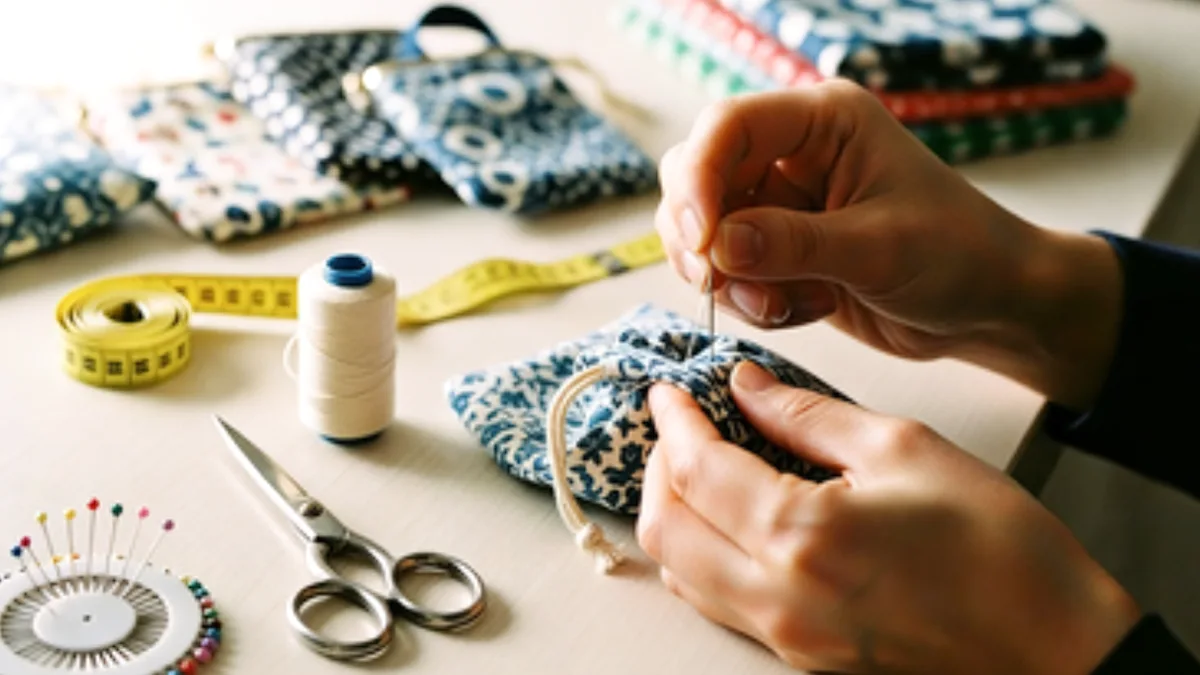
When you start a coin purse tutorial, you want to have the right materials and tools ready. This makes the process smoother and more fun. Let’s look at what you’ll need for this tutorial.
Fabric Choices
Outer Fabric Options
You can pick almost any fabric for the outside of your coin bag. Cotton is a favorite because it’s easy to sew and comes in many patterns. Denim gives a sturdy feel and looks trendy. If you want something fancy, try faux leather or real leather. These materials make your coin purse look professional. For a playful touch, canvas or printed fabric works well. Choose a fabric that matches your style and feels good in your hand.
Lining Fabric
The lining keeps your coins from rubbing against rough seams. Lightweight cotton is a top choice for lining. It’s soft and easy to work with. You can also use satin or polyester if you want a smooth finish inside your bag. Pick a color that matches or contrasts with your outer fabric for a fun surprise every time you open your coin purse.
Notions & Closures
Zipper, Snap, Clasp, Drawstring
Closures keep your coins safe. Zippers are popular because they are secure and easy to use. You can also use snaps, clasps, or drawstrings. Many people love the classic metal clasp. It opens when you squeeze both sides and closes tightly on its own. Here’s what users say about these closures:
| User Review | Description |
|---|---|
| Review 1 | ‘To open it you squeeze it open from both hinged sides.’ |
| Review 2 | ‘Simple, reliable, one-hand operation. Have used this type purse for years.’ |
| Review 3 | ‘It has a metal pressure band closure. You squeeze the ends toward each other to open.’ |
| Review 4 | ‘This is a squeeze-to-open pouch. It closes firmly by default thanks to the spring of the metal slats at the top.’ |
| Review 5 | ‘It is a metal pressure band in the top that opens when you squeeze the sides.’ |
| Review 6 | ‘It stays closed tight as if it has a magnet holding it closed. To open, you squeeze the ends and it opens in the middle.’ |
You can see that squeeze-to-open clasps are reliable and easy to use. Try different closures to see which one you like best for your coin purse tutorial.
Essential Tools
Scissors, Pins, Sewing Machine, Zipper Foot
You don’t need fancy equipment for this project. Here’s a quick list:
- Sharp fabric scissors for cutting your fabric cleanly.
- Straight pins or clips to hold pieces together.
- A sewing machine makes the job faster, but you can sew by hand if you want.
- A zipper foot helps you sew close to the zipper teeth.
Some kits include everything you need, like pre-cut leather, waxed thread, blunt needles, scissors, and clips. These kits usually cost around $48.99 and come with video instructions. If you’re new to sewing, a kit can make your first coin purse tutorial even easier.
Tip: Gather all your materials before you start. This helps you avoid searching for tools in the middle of your project.
Optional Supplies
Interfacing, Decorative Elements
You might want to add a few extras to your coin bag project. These optional supplies can make your bag look better and last longer. Let’s talk about two popular choices: interfacing and decorative elements.
Interfacing
Interfacing is a special material that you place between layers of fabric. You use it to give your coin bag more structure. If you pick a soft fabric, your bag might feel floppy. Interfacing helps it stand up and keep its shape. You can choose fusible interfacing, which sticks to your fabric when you iron it, or sew-in interfacing, which you attach with stitches. Fusible interfacing is quick and easy for beginners. Sew-in interfacing works well for thicker fabrics or leather.
When you use interfacing, your coin bag feels sturdier. It also looks more professional. The type of interfacing you pick changes how your bag feels and how long it lasts. If you want a coin bag that holds up over time, don’t skip this step.
Tip: Always test your interfacing on a scrap piece of fabric first. This helps you see how it changes the feel and look before you use it on your main project.
Decorative Elements
Decorative elements let you show off your style. You can add embroidery, patches, beads, or even iron-on designs. Some people like to sew on buttons or use fabric paint. These extras make your coin bag unique. You can match your bag to your favorite outfit or give it as a special gift.
Decorative touches do more than just look pretty. They can also change how you use your bag. For example, a big button might make it harder to fit in your pocket. Beads and sequins can catch on other items in your purse. Think about how you want to use your coin bag before you add decorations.
Here’s a quick list of popular decorative elements:
- Embroidery or appliqué
- Iron-on patches
- Beads or sequins
- Fabric paint or markers
- Decorative buttons
- Ribbon or lace trim
| Decorative Element | Adds Style | May Affect Use |
|---|---|---|
| Embroidery | ✅ | ❌ |
| Beads/Sequins | ✅ | ✅ |
| Iron-on Patch | ✅ | ❌ |
| Ribbon/Lace | ✅ | ❌ |
You get to decide how much you want to decorate your coin bag. Sometimes, less is more. If you want your bag to last, pick sturdy decorations and attach them well.
Note: Decorative elements can make your coin bag stand out, but they might also change how you use it. Always think about both style and function.
Adding interfacing and decorations is a fun way to make your coin bag special. You control the look and feel. Try different options and see what works best for you!
How to Make a Coin Bag: Cutting & Prepping
You’re ready to start making your coin bag! This part of the coin purse tutorial will show you how to measure, cut, and prep your fabric. You’ll also learn how to add interfacing for strength and make a zipper tab for a neat finish. Let’s break down the steps so you can follow along easily.
Measure & Cut Fabric
Before you sew, you need to cut your fabric pieces. This is one of the most important steps in how to make a coin bag. If you cut your pieces carefully, your bag will look neat and fit together well.
Here’s a simple table to help you cut the right size for a standard coin bag:
| Width (W) | Height (H) |
|---|---|
| 14 cm | 24 cm |
You’ll need two pieces of outer fabric and two pieces of lining fabric. If you want to add a pocket or extra detail, cut those pieces now too.
Using Patterns or Templates
If you want your coin bag to have a special shape, you can use a pattern or template. You can draw your own on paper or print one from a coin purse tutorial online. Place the template on your fabric, pin it down, and cut around it. This keeps your pieces even and helps you follow the steps with confidence.
Tip: Always double-check your measurements before you cut. It’s easier to trim a little extra than to fix a piece that’s too small.
Iron on Interfacing
Interfacing makes your coin bag stronger and helps it keep its shape. You’ll want to add this step if you use soft fabric or want your bag to last longer. Lay your fabric pieces flat with the wrong side up. Place the interfacing on top, sticky side down. Press with a hot iron for a few seconds. Let it cool before you move the fabric.
Choosing the right interfacing is important. Some interfacing is stiff, while others are soft and flexible. The type you pick changes how your bag feels and how long it lasts. If you want a coin bag that stands up and doesn’t get floppy, use a medium-weight fusible interfacing. This step helps your bag look neat and professional.
Interfacing gives your bag structure and helps it last longer. Different types of interfacing give different levels of support. If you want your bag to keep its shape and handle daily use, don’t skip this step.
Create Zipper Tab
A zipper tab makes your coin bag look tidy and helps the zipper last longer. It also makes it easier to open and close your bag. Here’s how to make a simple zipper tab:
- Cut a small rectangle of fabric, about 4 cm wide and 6 cm long.
- Fold the short ends toward the center, then fold in half again so the raw edges are inside.
- Press with an iron to keep the folds in place.
- Slide one end of the zipper into the folded tab.
- Pin and sew across the tab to secure it.
You can repeat these steps for the other end of the zipper if you want both sides to match. This little detail adds style and strength to your coin bag.
Note: Zipper tabs are optional, but they make your bag look finished and help the zipper work smoothly.
Now you’ve finished the cutting and prepping part of how to make a coin bag. You’ve measured, cut, added interfacing, and made a zipper tab. You’re ready for the next steps in the coin purse tutorial. Keep your pieces organized so you can move on to sewing without any trouble.
Sew Outer & Lining Pieces
Now that you have your fabric pieces ready, it’s time to sew them together. This step brings your coin bag to life. You’ll work with both the outer fabric and the lining. Let’s walk through each part so you get a neat and professional finish.
Stitch Outer Fabric
Start with your outer fabric pieces. Place them right sides together. Line up the edges carefully. Pin or clip the sides to keep everything in place. Use your sewing machine or hand stitch along the sides and bottom. Leave the top edge open. You want straight seams, so take your time. If you’re using a sewing machine, set it to a straight stitch. A seam allowance of about 1 cm works well for most coin bags.
Tip: Backstitch at the beginning and end of each seam. This keeps your stitches from coming undone.
If you chose a sturdy fabric like denim or leather, you might need a heavier needle. For lighter fabrics, a regular needle works fine. Check your stitches as you go. You want them even and secure.
Sew Lining
Your lining gives the coin bag a smooth inside. Place the lining pieces right sides together. Pin or clip the edges. Sew along the sides and bottom, just like you did with the outer fabric. Make sure the lining fits the bag. If you used interfacing, like Pellon SF101 Shape Flex or Vilene G700, your lining will feel stronger and look more polished.
Leave Opening for Turning
Here’s an important step. When you sew the lining, leave a small opening at the bottom. About 5 cm is enough. You’ll use this opening to turn the bag right side out later. Don’t skip this part! If you forget, you’ll have trouble finishing the bag.
- Double-check the size of your lining before you sew.
- Use a layer of light-to-medium-weight interfacing for extra quality.
- Try understitching or top-stitching the lining edge for a clean look.
| Step | Why It Matters |
|---|---|
| Leave opening | Needed for turning the bag |
| Use interfacing | Adds structure and durability |
| Understitch/Topstitch | Makes the lining look neat |
Press Seams
After you sew the outer and lining pieces, press the seams flat with an iron. This helps your bag look crisp and professional. Pressing also makes it easier to join the pieces later. Use a medium heat setting. If you’re working with delicate fabric, place a cloth between the iron and your bag.
Pressing seams is a simple step, but it makes a big difference. Your coin bag will look smooth and finished.
You’ve now sewn the outer and lining pieces. You’ve left an opening for turning and pressed the seams. These steps set you up for a coin bag that looks great and lasts a long time. Ready for the next part? Let’s keep going!
Attach Closure: Zipper, Snap, or Clasp
You’re almost done with your coin bag. Now it’s time to attach the closure. You have a few options: zipper, snap, clasp, or drawstring. Each style gives your bag a different look and feel. Let’s walk through the steps so you can pick the best one for your project.
Sew in Zipper
Adding a zipper is a popular choice. It keeps your coins safe and looks neat. Follow these instructions to get a smooth finish:
- Place the zipper face down along the top edge of your bag panel.
- Clip the zipper in place. Make sure the ends line up with the edges of your fabric.
- Attach the zipper foot to your sewing machine. This tool helps you sew close to the zipper teeth.
- Sew the zipper panel to the side piece with a 1/4” seam allowance. Use a sewing stiletto if you want to keep the edges lined up.
- Flip the bag over. Place the lining piece right side down over the exterior. Clip all the way around with the zipper sandwiched in between.
- Sew around with a 1/4” seam allowance, right on top of your previous stitching.
- Turn the piece right side out. Press both sides open and topstitch using a 1/8” seam allowance for a crisp look.
Tip: Place your clips upside down so they’re easy to remove as you sew. This keeps your zipper straight and your bag looking professional.
Using Zipper Foot
The zipper foot makes sewing easier. It lets you stitch close to the zipper without hitting the teeth. You get a clean line and a secure closure. Always check that the zipper is centered before you sew. If you follow these steps, your coin bag will open and close smoothly every time.
Add Snap or Clasp
Snaps and clasps give your coin bag a classic touch. You can choose from split key rings, lobster clasps, carabiner clips, or leather straps with metal loops. Each has its own pros and cons.
| Material/Tool | Pros | Cons | Ideal For |
|---|---|---|---|
| Split Key Rings (Metal) | Strong, affordable, easy | Tricky to open sometimes | Everyday keychain use |
| Lobster Clasps | Quick release, secure lock | Less durable under strain | Swapping purses often |
| Carabiner Clips | Very strong, multipurpose | Bigger, bulkier | Outdoor lifestyles |
| Leather Straps w/ Metal Loops | Stylish, sturdy | Needs care, can wear over time | Fashion-conscious users |
You can attach a snap or clasp by marking the spot, punching a small hole, and pressing the pieces together. Some tutorials show you how to use special tools for this step. If you want a secure closure, pick a metal option.
Drawstring Option
Drawstrings are easy to use and quick to open. You just pull the ends to close the bag. This style works well for kids or anyone who wants fast access. However, drawstrings don’t lock as tightly as zippers or clasps.
| Closure Type | Security Level | Access Speed |
|---|---|---|
| Zippered | High | Moderate |
| Drawstring | Low to Moderate | Very Fast |
A travel gear designer once said, “From a security standpoint, zippers offer a measurable advantage. They create a physical lock point that drawstrings simply can’t replicate without additional accessories.” If you want your coins to stay put, a zipper is the best choice. If you want speed, try a drawstring.
You’ve learned how to attach closures with clear instructions. Pick the style that fits your needs and finish your coin bag with confidence. This tutorial helps you create a bag that’s both stylish and secure.
Assemble & Finish the Coin Bag
Join Outer & Lining
Now comes the fun part—putting your bag together! You want your coin bag to look neat inside and out. Here’s how you join the outer and lining pieces for a smooth finish:
- Place your outer bag right side out. If you added straps or a key ring, attach them to the outer bag now.
- Turn your lining inside out. Slide the outer bag into the lining so the right sides touch each other. The pretty sides should face each other.
- Match up the side seams. Pin or clip all the way around the top edge. Make sure everything lines up.
- Sew around the top edge with a ½ inch seam allowance. Leave a small opening for turning. If your bag has a handle or is more structured, make the opening big enough to pull everything through.
- Press a fold at the opening on both the lining and the outer bag. This makes it easier to close later.
Tip: Double-check that your zipper or closure is open before you sew the top edge. This makes turning the bag much easier!
Turn Right Side Out
You’re almost there! Now you need to turn your bag right side out. This step can feel a little tricky, but you have a few options. Here’s a quick table to help you pick the best method:
| Method | Pros | Cons |
|---|---|---|
| Safety Pin | Easy to find, cheap | Slow, tough with thick fabric |
| Quick Turn Tool | Fast, less hand strain | Not great for tiny straps or thick fabric |
| Loop Turner | Works for small tubes, easy to restart | Can be fiddly, might tear delicate fabric |
Most people use their fingers for a small coin bag. If you have a turning tool, give it a try! Gently pull the bag through the opening. Take your time so you don’t stretch or tear the fabric. Once the bag is right side out, push out the corners with a blunt tool or the eraser end of a pencil.
Note: If your bag has a zipper, make sure it’s open before turning. This saves you a lot of trouble!
Close Lining Opening
You want your coin bag to look tidy inside. Closing the lining opening is the last step before you finish up. Here’s a simple way to do it:
- Fold the raw edges of the lining opening to the inside. Pin or clip them together.
- Use a ladder stitch (also called an invisible stitch) to sew the opening closed by hand. If you prefer, you can use your sewing machine for a quick straight stitch.
- Push the lining back inside the bag. Smooth out the edges so the lining sits flat.
If your bag has a zipper, fold the top zipper panels in place. Make sure the lining sits just under the zipper teeth so it doesn’t get caught. Pin everything in place, then topstitch along the edge to secure the lining and give your bag a crisp finish.
Pro Tip: Take your time with this step. A neat lining makes your coin bag look professional and helps it last longer.
Now your coin bag is almost ready! You’ve joined the outer and lining, turned it right side out, and closed the lining opening. Next up: topstitching and the final press for that perfect, polished look.
Topstitch & Final Press
You’re almost done! Now you get to add the final touches that make your coin bag look sharp and last longer. Topstitching and pressing are the secret steps that turn a homemade bag into something that looks store-bought.
Topstitching means sewing a line close to the edge of your bag. You do this on the outside, so everyone can see it. You might wonder why you need this extra stitch. Topstitching does more than just look nice. It helps hold everything together and keeps the lining from moving around inside your bag.
Here’s a quick table that shows what topstitching adds to your coin bag:
| Contribution | Description |
|---|---|
| Durability | Topstitching holds pieces together and strengthens joins, making the bag stronger. |
| Appearance | It adds decorative detail and enhances the overall look, making the bag appear more professional. |
| Lining Securement | Topstitching at the edges secures the lining in place, preventing it from riding up and ensuring a neat finish. |
You want your coin bag to last. Topstitching helps with that. It keeps the edges crisp and the lining flat. Your bag won’t get floppy or messy after a few uses.
How to Topstitch:
- Set your sewing machine to a straight stitch.
- Place your bag so the edge you want to stitch is under the needle.
- Sew about 1/8 inch from the edge. Go slow and keep the line straight.
- If you want a fancy look, use a contrasting thread color or a decorative stitch.
Tip: Use a longer stitch length for topstitching. It looks more professional and helps the fabric lay flat.
You can topstitch all the way around the top edge of your coin bag. If you added a zipper, stitch close to the zipper teeth. This keeps the zipper neat and stops the lining from getting caught.
Final Press
After you finish topstitching, grab your iron. Pressing makes your bag look smooth and finished. Lay your bag flat and press the seams. Use a medium heat setting. If your fabric is delicate, put a cloth between the iron and your bag.
- Pressing helps set the stitches.
- It flattens any bumps or wrinkles.
- Your coin bag will look crisp and ready to use.
Note: Don’t skip pressing! It’s the last step that makes your bag look like you bought it from a shop.
Now you have a coin bag that’s strong, stylish, and neat. You did it! Enjoy your new creation and show it off to your friends.
Easy Leather Coin Pouch & Mini Coin Purse Variations
You might want to try something new after making your first coin bag. Let’s look at three fun variations: the easy leather coin pouch, the mini coin purse, and a custom clasp coin purse. Each style gives you a chance to show off your creativity and learn new skills.
Easy Leather Coin Pouch
If you want a classic look, you can make an easy leather coin pouch. Leather feels sturdy and ages well. You don’t need to worry about fraying edges. You can use a simple envelope shape or a folded design. Punch holes along the sides and use waxed thread to stitch them together. Some people add a snap or a metal clasp for extra security.
Here’s a quick table that shows how leather coin pouches compare to fabric coin bags:
| Feature | Leather Coin Pouches | Fabric Coin Bags |
|---|---|---|
| Durability | Highly durable, ages beautifully | Less durable, may wear out faster |
| Cost | Generally more expensive | Usually more affordable |
| Aesthetics | Classic look, premium feel | Variety of colors and patterns |
| Maintenance | Requires special care (conditioning) | Easier to clean, often machine washable |
| Weight | Heavier, sturdy grip | Lighter, breezy feel |
Tip: You can use denim for a rugged style or add decorative stitching to make your pouch stand out.
You only need a few tools for an easy leather coin pouch. Try a leather punch, waxed thread, and a blunt needle. You can finish this project in less than an hour.
Mini Coin Purse
A mini coin purse is perfect for carrying just a few coins or small items. You can make one with leftover fabric or leather scraps. Choose a fun shape or stick with a classic rectangle. Add a zipper, snap, or clasp for closure.
Check out these popular mini coin purse designs and their sizes:
| Design | Dimensions (inches) | Dimensions (cm) |
|---|---|---|
| TRIA Mini Coin Purse | 5″ wide, 4″ tall, ⅜” deep | 13 x 10 x 1 cm |
| Sunset Mini Coin Purse (Mini) | 4 1/2″ wide, 3″ high, 2 1/2″ deep | 12 x 7.5 x 6 cm |
| Sunset Mini Coin Purse (Medium) | 7″ wide, 4″ high, 3 1/2″ deep | 18 x 10 x 9 cm |
You can make a mini coin purse with a zipper or a squeeze clasp. Try adding a patch or embroidery for a personal touch.
Custom Clasp Coin Purse
Do you want a purse with a vintage vibe? You can make a custom clasp coin purse using a template. Here’s a simple way to do it:
- Gather supplies: coin purse clasp (about 3.5″), woven fabric for main and lining, sewing machine, basic sewing tools, and optional fusible interfacing.
- Trace the clasp on paper and extend the edges to your desired size. Cut out the template and check for symmetry.
- Cut two main fabric pieces and two lining pieces. If you want extra structure, cut two interfacing pieces.
- Iron interfacing onto the lining. Mark hinge positions on the fabric.
- Pin and sew the main pieces together. Repeat for the lining. Box the corners for a flat bottom.
- Turn the main piece right side out and insert the lining. Pin and get ready for the clasp.
- Baste the clasp to the fabric, then sew it securely. Remove the basting thread to finish.
Note: You can use decorative stitching or denim for a unique look. Try mixing colors for a fun effect.
You can make these coin bags in many styles. Try different materials and closures. You’ll find a favorite in no time!
Troubleshooting & Tips
Common Mistakes
You might run into a few bumps while making your coin bag. Don’t worry! Everyone makes mistakes, especially when learning something new. Here are some of the most common problems people face and how you can avoid them:
- Skipping interfacing can make your bag floppy. Interfacing gives your coin bag shape and structure.
- Using the wrong needle size can cause broken stitches or damage to your fabric. Always match your needle to the material.
- Rushing through the sewing process often leads to crooked seams or missed details. Take your time and enjoy each step.
- Neglecting finishing details like pressing seams or topstitching can make your bag look messy.
Here’s a quick table to help you spot and fix these mistakes:
| Mistake | How to Avoid It |
|---|---|
| Skipping interfacing | Use interfacing to provide shape, stability, and structure to the bag. |
| Using the wrong needle size | Choose the appropriate needle size for the fabric being used. |
| Neglecting finishing details | Press seams, topstitch edges, and finish raw edges for a polished appearance. |
| Rushing through the sewing process | Take your time to ensure quality and attention to detail in your work. |
Tip: Test your stitch length on a scrap piece of fabric. Use longer stitches for thick fabrics and shorter stitches for lightweight materials.
Beginner Tips
If you’re new to sewing, you might feel a little nervous. That’s normal! Here are some tips to help you get a neat finish and enjoy the process:
- Read through the tutorial before you start. This helps you know what’s coming next.
- Gather all your materials and tools so you don’t have to stop and search for something.
- Pin or clip your fabric pieces together. This keeps everything lined up and makes sewing easier.
- Press your seams after sewing. An iron helps your bag look crisp and professional.
- Go slow, especially around corners and closures. You’ll get better results if you don’t rush.
Note: If you make a mistake, you can always take out the stitches and try again. Sewing is all about learning and improving.
Customization Ideas
You can make your coin bag truly unique. There are lots of ways to add your own style. Try these ideas:
- Add embroidery or appliqué for a personal touch.
- Use iron-on patches or fabric paint to show off your favorite designs.
- Sew on decorative buttons, beads, or sequins for extra sparkle.
- Mix and match fabrics for a fun look. Try denim with bright cotton or leather with printed lining.
- Attach a key ring, wrist strap, or small charm to make your bag easy to carry.
Get creative! Your coin bag can match your backpack, show off your favorite colors, or even become a special gift.
You have plenty of options to make your coin bag stand out. Try different decorations and closures. Every bag you make will teach you something new and help you build your sewing skills.
Conclusion
You made a coin bag by yourself. That is something to be proud of. Next time, try using new materials or different closures. You can show off your coin bag by posting pictures in the comments. If you have questions, ask them there too. If you want a unique bag, we can help with custom services. You get to pick your favorite color. You can add your logo. You can also choose extra pockets or zippers.
| Custom Service Type | Description |
|---|---|
| Logo Printing | Silk Stitching, Embroidery, Screen Printing, Woven Labels |
| Material Choices | Genuine leather and quality fabrics |
| Custom Features | Pockets, zippers, custom sizes |
- We make coin purses with your own design.
- The materials are strong and good for showing your brand.
- You can add things like pockets or zippers to make it useful.
FAQ
How long does it take to sew a coin bag?
You can finish a basic coin bag in about 45 minutes. If you add decorations or use leather, you might need more time. Beginners usually finish in under two hours.
What fabric works best for beginners?
Cotton is the easiest fabric for you to sew. It does not slip and holds its shape. You can also try canvas or denim if you want a sturdy bag.
Can I sew a coin bag by hand?
Yes, you can sew a coin bag by hand. Use small, tight stitches for strong seams. A sewing machine makes the process faster, but hand sewing works well for small projects.
Do I need interfacing for every coin bag?
You do not need interfacing for every bag. If you want your coin bag to stand up and last longer, add interfacing. Skip it for thick fabrics like denim or leather.
How do I attach a metal clasp?
You mark the hinge spots, then sew the fabric to the clasp using a needle and strong thread. Some clasps need glue. Always check the instructions for your clasp type.
What should I do if my zipper gets stuck?
Try rubbing a little candle wax or soap on the zipper teeth. Move the zipper back and forth gently. Do not force it. If it still sticks, check for loose threads.
Can I wash my coin bag?
You can wash fabric coin bags by hand or in the machine. Use cold water and gentle soap. Leather coin bags need a damp cloth and special cleaner. Always air dry your bag.
How can I personalize my coin bag?
Add embroidery, patches, or beads. Use fabric paint or iron-on designs. Try mixing colors or adding a key ring. Your coin bag can show off your style!


