
You can create a stylish clear tote bag right in your own home. This diy project is simple and fun, even if you have never sewn before. Want to know how to make a clear vinyl tote bag that stands out at concerts, school, or shopping trips? This tutorial will guide you every step of the way. You can even make a diy clear stadium bag for your next big event.
Materials & Tools for Clear Vinyl Tote Bags
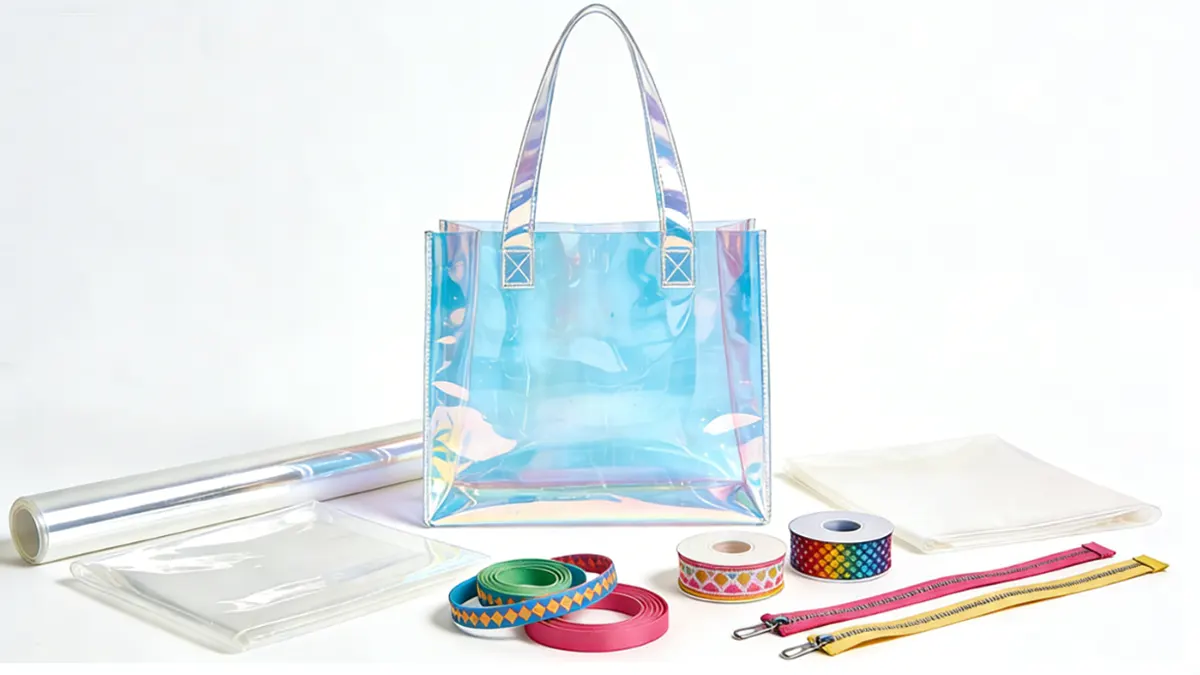
Before you start making your clear vinyl bag, you need to gather the right materials and tools. Having everything ready makes the process smooth and fun. Let’s break down what you’ll need.
Essential Materials List
- Clear vinyl: This is the main material for your bag. You can find it at most craft stores. Choose a medium weight so your bag holds its shape but stays flexible. If you want to save money, you can even use clear vinyl from packaging, like bedding covers.
- Trim or bias tape: This covers the raw edges of the vinyl and gives your bag a neat finish. You can pick any color or pattern you like.
- Handles or straps: Use webbing, ribbon, or even make handles from extra vinyl. Handles make your clear vinyl bag easy to carry.
- Zipper or Velcro: These help keep your items secure inside the bag. You can skip this if you want an open tote.
- Eyelets or grommets: These are great for no-sew options. You can use them to attach handles without sewing.
- Decorative items: Add patches, stickers, or charms to make your bag unique.
Tip: If you want a mini tote or a no-sew version, try using medium weight vinyl from old packaging. It’s sturdy and easy to work with.
Recommended Tools
Professional bag makers use special tools to get the best results with clear vinyl. Here’s a handy table to show you what works best:
| Tool Type | Description |
|---|---|
| Clear Vinyl | For creating see-through pockets |
| Needles | Use sharp, strong needles for sewing vinyl |
| Adhesives | Great for bonding vinyl if you don’t want to sew |
| Cutting Tools | Scissors or rotary cutters for clean edges |
You don’t need fancy equipment to start. Sharp scissors, a ruler, and a marker will do the trick for most projects. If you want to sew, use a heavy-duty needle and strong thread. For no-sew bags, strong glue or double-sided tape works well.
Optional Customization Supplies
Want to make your clear vinyl bag stand out? Here are some fun extras:
- Colored trims or ribbons: Add a pop of color to the edges.
- Iron-on patches or decals: Show off your favorite designs or team spirit.
- Removable inner bags: Use a small fabric pouch inside for privacy or extra storage.
- Keychains or charms: Clip them to the handles for a personal touch.
You can mix and match these supplies to create a bag that fits your style. Whether you sew or use glue, you’ll end up with a clear vinyl bag that’s both practical and fun.
How to Make a Clear Vinyl Tote Bag: Preparation
Getting ready is the most important part of making your own tote. You want your bag to look neat and last a long time. Let’s walk through each step together so you feel confident before you start sewing or gluing.
Measure & Mark Vinyl
First, grab your clear vinyl and lay it flat on a clean table. Use a ruler and a washable marker to mark out your pieces. For a standard tote, you need:
- Main body: 34 cm by 34 cm (cut 2 pieces)
- Sides and bottom: 34 cm by 12 cm (cut 2 pieces)
If you want a mini tote, try 24 cm by 24 cm for the body and 24 cm by 8 cm for the sides and bottom. You can also make a removable inner bag by cutting a smaller rectangle from fabric or mesh.
Tip: Always double-check your measurements before you cut. Vinyl can be tricky to fix if you make a mistake.
Cut Bag Pieces
Cutting vinyl feels different from cutting fabric. It can slip or stick, so take your time.
Main Body & Sides
Use sharp scissors or a rotary cutter for the best results. Hold the ruler steady as you cut along your marked lines. If you want super straight edges, place a strip of painter’s tape along the line and cut right next to it.
- Cut two squares for the main body.
- Cut two rectangles for the sides and bottom.
Note: If you want to know how to make a clear vinyl tote bag that holds its shape, keep your cuts as straight as possible.
Cut 2-Inch Corners for Structure
Now, let’s give your bag a nice boxy shape. On each bottom corner of your main body and side pieces, measure and mark a 2-inch (about 5 cm) square. Cut these corners out. This step helps your bag stand up and gives it a professional look.
- Mark a 2-inch square on both bottom corners of each piece.
- Cut out the squares carefully.
Pro Tip: Save the small vinyl squares. You can use them later to reinforce handles or patch up any mistakes.
Prep Handles & Trim
Handles make your tote easy to carry. You can use webbing, ribbon, or even extra vinyl strips. Cut two handles, each about 50 cm long. If you want shorter handles, try 35 cm. For a crossbody bag, cut a longer strap.
Trim or bias tape covers the raw edges and makes your bag look finished. Cut enough trim to go around the top edge and any seams you want to cover. If you want to add color, pick a bright trim or even use school colors.
Want to add a removable inner bag? Cut a fabric pouch that fits inside your tote. You can attach it with snaps or Velcro for easy cleaning.
Now you’re ready to move on to the next step. You’ve measured, marked, and cut all your pieces. You’ve prepped your handles and trim. You know how to make a clear vinyl tote bag that fits your style and needs. Let’s get ready to put it all together!
Sew a Clear Bag: Step-by-Step Assembly
Ready to put your bag together? This is where your project really starts to look like a tote! Follow this tutorial step by step, and you’ll see how to make a clear vinyl tote bag that’s sturdy and stylish.
Assemble Main Panels
Start by laying out your two main body pieces. Place them right sides out since vinyl doesn’t have a wrong side. Line up the edges carefully. If you want to know how to assemble this tote bag so it looks neat, use binder clips instead of pins. Pins can leave permanent holes in vinyl.
Set your sewing machine to a straight stitch. Use a stitch length of about 3.0 mm. This helps prevent the vinyl from tearing. Keep your stitches spaced out, not too close together. If you sew too many holes in one spot, the vinyl can weaken.
Tip: Place a piece of tissue paper under the vinyl as you sew. This keeps the vinyl from sticking to your machine and helps your stitches stay even.
Sew along the sides and bottom edges, leaving the top open. Go slow and steady. If you’re new to sewing, don’t worry—vinyl is easier to handle than it looks!
Attach Sides & Bottom
Now it’s time to give your bag its boxy shape. Take your side and bottom pieces and line them up with the main panels. Match the edges and corners carefully. Use clips to hold everything in place.
Sew the side and bottom panels to the main body, one edge at a time. Keep using a 3.0 mm stitch length. Make sure your seams are straight. When you reach the corners, stop with your needle down, pivot the vinyl, and keep sewing. This helps you get sharp, clean corners.
To make your bag extra strong, reinforce the seams. Lay a strip of binding over each seam, raw edges lined up. Stitch about 1/4 inch from the edge. Then, fold the binding over the seam allowance and edgestitch it down. This covers the raw edges and makes your bag last longer.
Note: If you want your bag to stand up better, use vinyl that’s thicker than 0.3 mm. Thicker vinyl holds its shape and adds durability.
Add Handles or Straps
Handles make your tote easy to carry. You can use webbing, ribbon, or vinyl strips. For a professional look, follow these steps:
- Cut your handle fabric on the grain. This keeps your stitching from getting wavy.
- Fuse interfacing to the wrong side of your handle fabric if you’re using fabric handles.
- Fold the handle in half, wrong sides together, and press to make a crease.
- Fold each long edge to the center crease and press again.
- Place the handle on your bag where you want it. Clip it in place—don’t use pins!
- Sew along the edge of the strap, about an eighth inch from the edge. Sew both ends in the same direction for a neat finish.
- Attach the handles securely to the main bag pieces. Make sure you backstitch at the start and end to lock the stitches.
If you want to sew a clear bag with a crossbody strap, just cut a longer strip and attach it the same way. For extra strength, sew a small square or X at the base of each handle.
Pro Tip: Topstitch with a longer stitch length for a clean look. Always sew slowly when working with vinyl.
Now you’ve finished the main assembly! You’ve learned how to make a clear vinyl tote bag that’s strong and ready for your personal touch. The next steps will show you how to finish the edges and add closures.
Finish Edges & Seams
Now it’s time to make your clear vinyl tote bag look polished and last longer. You want the edges and seams to be smooth and strong. Here’s how you can do it:
- Cover Raw Edges: Take your trim or bias tape and place it over the raw edges of the vinyl. This hides any rough spots and gives your bag a clean look.
- Clip, Don’t Pin: Use binder clips or small sewing clips to hold the trim in place. Pins can leave holes in vinyl, so avoid them.
- Sew the Trim: Set your sewing machine to a longer stitch length, about 3.0 mm. Sew slowly along the edge of the trim. Keep your stitches straight and even. If you’re new to sewing, practice on a scrap piece first.
- Reinforce Stress Points: Go over the corners and where the handles attach one more time. This makes those spots extra strong.
- Remove Tissue Paper: If you used tissue paper under the vinyl while sewing, gently tear it away now.
Tip: If you see any small gaps or loose threads, trim them with sharp scissors. A neat finish makes your bag look store-bought!
You can also add a second row of stitches along the trim for extra strength. This helps your bag hold up to daily use.
Add Zipper or Eyelets (No-Sew Option)
You might want to close your bag with a zipper or make a no-sew version using eyelets. Both options are easy and give your tote a different style.
Adding a Zipper
A zipper keeps your things safe inside the bag. Here’s how you can add one:
- Choose the Right Zipper: Pick a zipper that matches the width of your bag’s opening.
- Align the Zipper: Place the zipper face down along the top edge of the bag. Use clips to hold it in place.
- Sew the Zipper: Use a zipper foot on your sewing machine. Sew slowly along the edge, making sure the zipper stays straight. Repeat for the other side.
- Test the Zipper: Open and close it a few times to make sure it works smoothly.
Note: If you want a pop of color, choose a bright zipper!
No-Sew Option with Eyelets
If you don’t want to use a sewing machine, you can still make a strong and stylish bag with eyelets.
- Mark Handle Spots: Use a marker to show where you want the handles to go.
- Punch Holes: Use an eyelet tool to punch holes through the vinyl at each spot.
- Add Eyelets: Place the eyelets in the holes and press them with the tool until they snap tight.
- Attach Handles: Thread ribbon, rope, or webbing through the eyelets and tie knots to secure.
Tip: Eyelets come in many colors and sizes. Pick ones that match your style!
With these steps, you can finish your clear vinyl tote bag with neat edges and a secure closure. Whether you choose sewing or a no-sew method, your bag will look great and last a long time.
Tips for Working with Vinyl
Working with clear vinyl can feel tricky at first, but you can master it with a few smart tricks. Here are some tips to help you get the best results and enjoy the process.
Prevent Sticking & Slipping
Vinyl sometimes sticks to your sewing machine or slips out of place. You can stop this from happening with a few simple tools:
- Use a Teflon foot if you have one. This special foot lets the vinyl glide smoothly under the needle.
- Try a walking foot. It helps feed both layers of vinyl evenly, so nothing bunches up.
- No special foot? Place a strip of clear tape under your regular presser foot. This trick works well and peels off easily when you finish.
- Put a piece of tissue paper under the vinyl as you sew. The tissue helps the vinyl move along and stops it from sticking.
- Hold your vinyl pieces together with clips instead of pins. Pins can leave holes that never go away.
Tip: Always test how your vinyl moves on your machine before you start your real project. If it sticks, try lifting the vinyl gently as you sew or add a bit of washi tape to the machine bed.
Achieve Clean Seams
You want your seams to look neat and last a long time. Here’s how you can do that:
- Use a stitch length of about 3.0 mm. Short stitches can make the vinyl tear.
- Pick a strong, 100% polyester thread. It holds up well and keeps your bag sturdy.
- Always use a brand new, sharp needle. A dull needle can skip stitches or even damage the vinyl.
- Practice on a scrap piece of vinyl to check your tension and stitch length.
- Place tissue paper between the vinyl and the machine to help the thread feed smoothly and avoid sticking.
- Keep your seams straight by sewing slowly and using a ruler or painter’s tape as a guide.
Note: If you see wrinkles or bubbles, stop and smooth out the vinyl before you keep sewing. This helps your bag look crisp and professional.
Maintain Bag Shape
You want your clear vinyl tote to keep its shape and look great every day. Here are some easy ways to do that:
- Fill your bag with soft items like foam, air cushions, or clean clothes when you’re not using it. This keeps the sides from folding or creasing.
- Store your bag in a dust bag or wrap it in a soft cloth. This protects it from dust and sunlight.
- Keep your bag away from hot places or direct sunlight. Heat can make vinyl age faster and lose its shape.
- Don’t stack heavy things on top of your bag. This helps prevent dents and keeps your tote looking new.
Pro Tip: If your bag gets a crease, try gently warming it with a hair dryer on low and smoothing it out with your hands. Always test on a small spot first.
With these tips, you’ll find that working with vinyl gets easier every time. Your clear tote will look neat, strong, and ready for anything!
Troubleshooting & Fixes
Even if you follow every step, you might run into a few bumps while making your clear vinyl tote bag. Don’t worry! You can fix most problems with a few simple tricks. Let’s look at some common issues and how you can solve them.
Common Sewing Issues
Sometimes, working with vinyl feels different from working with fabric. You might notice the vinyl sticking to your machine or slipping out of place. Here are some things you can try:
- Place tissue paper between the vinyl and the feed dogs when you sew with the vinyl side down. This stops the vinyl from sticking.
- Use a walking foot if you sew with the vinyl side up. This helps the vinyl move smoothly under the needle.
- Choose a regular size 80 needle and regular sewing thread for best results. This combo gives you strong seams without tearing the vinyl.
- Try a Sewline Glue Pen for basting instead of pins. Pins can leave holes in the vinyl, but glue holds things in place without damage.
Tip: Always test your machine settings on a scrap piece of vinyl before you start your real project. This helps you avoid surprises.
Fixing Wrinkles or Bubbles
Wrinkles and bubbles can show up in your vinyl, especially if you fold or press it too much. You can fix these with a few easy steps:
- Use a sharp object, like a knife or sewing pin, to gently poke any bubbles. This lets the trapped air escape.
- After poking, press your finger over the spot and push the air out from under the vinyl.
- For bigger bubbles, make a tiny slit with the knife, squeeze the air out, and press the vinyl back together. The slit will be almost invisible.
Note: Always work slowly and carefully so you don’t make the hole too big.
Reinforcing Weak Spots
Some parts of your tote bag, like the handles and corners, need extra strength. You can make these spots stronger by following these steps:
- Mark the areas around the handle attachments and gusset corners.
- Apply fusible webbing to the inside of the bag in these marked spots. This adds support.
- Anchor the handle seam with a whip stitch. This stitch wraps around the edge and keeps the handle secure.
- Box-stitch the gusset corners. This spreads out the force and helps the bag hold its shape.
- Stabilize the fold line with running basting stitches. This stops the vinyl from folding or cracking over time.
Pro Tip: Reinforcing these areas helps your bag last longer, even if you use it every day.
With these fixes, you can handle almost any problem that comes up while making your clear vinyl tote bag. You’ll end up with a bag that looks great and stands up to daily use!
Personalize Your Clear Vinyl Tote
You can turn your clear vinyl tote bag into something that shows off your personality. Customizing your bag is fun and easy. You get to decide how bold or simple you want your tote to look.
Add Trim or School Colors
Start with the trim. You can pick any color or pattern you like. Want to show school spirit? Choose trim in your school colors. You can use ribbon, bias tape, or even fabric strips. Wrap the trim around the top edge or along the seams. This gives your bag a neat finish and a pop of color.
If you want to go further, try using holographic or translucent vinyl for the trim. These materials catch the light and make your bag stand out. You can even mix and match colors for a unique look.
Tip: If you have leftover fabric from another project, use it for the trim. This saves money and adds a personal touch.
Decorative Elements & Closures
Decorating your tote bag is where you can get really creative. Here are some popular ways to add style and function:
- Silkscreen printing works well if you want a simple, one-color design. It’s great for adding your initials or a logo.
- Heat transfer lets you add bright, detailed images. You can use this method for team mascots, favorite quotes, or fun patterns.
- Stickers and patches are easy to apply. Just peel and stick or iron them on.
- Charms and keychains clip onto the handles. They add movement and personality.
- Try using holographic or colored vinyl for extra shine.
For closures, you have options. Add a zipper for security. Velcro works if you want something quick and easy. If you prefer a no-sew method, use eyelets and thread ribbon or rope through them to tie the bag shut.
Note: Closures not only keep your things safe but also add to the style of your tote.
Mini Tote & Removable Inner Bag
Sometimes you need a smaller bag or a little extra privacy. You can make a mini tote by cutting your vinyl pieces smaller. Use the same steps as before, just with smaller measurements. Mini totes are perfect for carrying snacks, makeup, or small school supplies.
A removable inner bag is another smart idea. Sew a simple pouch from fabric or mesh. Place it inside your clear tote to hide personal items or keep things organized. You can attach it with snaps or Velcro so you can take it out whenever you want.
Pro Tip: If you’re new to sewing, start with a basic pouch. You’ll get practice and end up with a handy extra for your tote.
Personalizing your clear vinyl tote bag makes it truly yours. You can mix colors, add decorations, and choose the features that fit your life best.
Conclusion
You now know how to make a clear vinyl tote bag from start to finish. This diy project is simple, fun, and lets you create a bag that fits your style. You can use your tote for so many things:
- Sports events, music festivals, and beach days
- School supplies for students
- Even for safe garbage disposal in some places
If you want something unique or need bulk orders, we specialize in custom tote bags. As a professional bag manufacturer, we offer tailored solutions to help bring your ideas to life. Reach out to us today for high-quality, custom-designed tote bags that perfectly match your needs!
FAQ
How do I clean my clear vinyl tote bag?
You can wipe your bag with a damp cloth and mild soap. Avoid harsh cleaners. Let it air dry. If you see stubborn spots, use a soft sponge. Never put your vinyl bag in the washing machine.
Can I sew vinyl with a regular sewing machine?
Yes! You can use a regular sewing machine. Use a sharp needle and a longer stitch length. Try a Teflon or walking foot if you have one. Always sew slowly for best results.
What thickness of vinyl works best for tote bags?
Medium-weight vinyl, around 0.3 mm to 0.5 mm, works great. It holds its shape but stays flexible. Thicker vinyl makes a sturdier bag, but it’s harder to sew.
How do I stop vinyl from sticking while sewing?
Try placing tissue paper under the vinyl. You can also use a Teflon presser foot or clear tape on your machine. Clips work better than pins for holding pieces together.
Can I make a clear vinyl tote bag without sewing?
Absolutely! Use strong double-sided tape, glue, or eyelets for a no-sew version. Thread ribbon or rope through eyelets for handles. You can finish the edges with decorative tape.
Will my bag turn yellow over time?
Vinyl can yellow if exposed to sunlight for long periods. Store your bag in a cool, shaded place. Wipe it clean often to keep it looking fresh.
What can I use to decorate my clear vinyl tote?
You can add patches, stickers, iron-on decals, or charms. Try colored trims or ribbons for extra flair. Removable fabric pouches add privacy and style.


