
If you want to know how to get vinyl to stick to canvas bag, you need to start with the right steps. Good prep, the right vinyl, and steady heat make all the difference. You do not need fancy tools or years of experience. Even if you are a beginner or a hobbyist, you can create strong, long-lasting designs that look great.
Tip: Take your time with each step, and you will see better results!
Best Vinyl for Canvas Tote Bags
Heat Transfer Vinyl vs. Iron-On Vinyl
When you want to decorate canvas tote bags, you might wonder about the difference between heat transfer vinyl and iron-on vinyl. You see both terms everywhere. They actually mean the same thing. People use “iron-on vinyl” and “heat transfer vinyl” to talk about vinyl that sticks to fabric when you use heat. You can use a regular iron or a heat press for both. If you want to make your own canvas tote bags, you will use iron-on vinyl for most projects.
Iron-on vinyl comes in many colors and finishes. You can find glitter, matte, and even holographic styles. You cut your design, place it on the bag, and use heat to stick it down. Iron-on vinyl works well because it bonds tightly to the fibers. You do not need special equipment. You can use a household iron. If you want a smoother finish, you can try a heat press. Both tools work for iron-on vinyl.
Tip: Always check the instructions on your iron-on vinyl package. Some brands need more heat or longer pressing time.
Choosing Sports Flex and Other Types
You want your design to last. Sports flex iron-on vinyl is a great choice. It stretches and moves with the fabric. If you use canvas tote bags for shopping or carrying books, sports flex iron-on vinyl will not crack or peel. You can also try other types of iron-on vinyl. Some brands make extra-thin iron-on vinyl for a softer feel. Others offer thicker iron-on vinyl for bold designs.
Here are some expert-recommended brands for iron-on vinyl on canvas tote bags:
- Vivid Flex Chemica
- Hotmark
- Firstmark
These brands stick well and last a long time. You can find them online or at craft stores. If you want to try new styles, look for iron-on vinyl with special finishes. You can mix and match colors for fun effects.
Why 100% Cotton Canvas Works Best
Canvas tote bags made from 100% cotton give you the best results. Cotton fibers grab the iron-on vinyl and hold it tight. You get a smooth surface for applying heat transfer designs. If you use bags with polyester or blends, the iron-on vinyl may not stick as well. Cotton canvas also handles heat better. You do not have to worry about melting or warping.
When you pick canvas tote bags, check the label for 100% cotton. You will see your iron-on vinyl designs look brighter and last longer. If you want to make gifts or sell your bags, cotton canvas is the safest choice.
Note: Pre-wash your canvas tote bags before you add iron-on vinyl. This removes any coating and helps the vinyl bond better.
You can create amazing designs with iron-on vinyl. Try different brands and styles. Use sports flex iron-on vinyl for busy bags. Pick 100% cotton canvas tote bags for the strongest hold. You will see your projects turn out great every time.
Preparing Canvas Bags for Vinyl
Cleaning and Air Drying
You want your vinyl to stick well, so you need a clean canvas bag. Dust, lint, or oils can stop the vinyl from bonding. Start by shaking out your bag to remove loose dirt. If you see stains or spots, wash the bag with mild soap and cool water. Use your hands or a soft cloth. Avoid harsh cleaners because they can leave residue.
After washing, let your bag air dry completely. Do not use a dryer. High heat can shrink the canvas or change its texture. Hang the bag on a hook or lay it flat in a clean spot. Make sure the bag feels dry to the touch before you move to the next step. If you rush, leftover moisture can cause the vinyl to peel later.
Tip: Use a lint roller to pick up any tiny fibers or pet hair before you add your design.
Pre-Pressing the Bag
Now, you need to get your bag ready for the vinyl. Pre-pressing means you use an iron or heat press on the bag before you add the vinyl. This step does two important things. First, it removes any hidden moisture in the fabric. Second, it smooths out wrinkles and creases.
When you pre-press, set your iron or heat press to medium heat. Press the area where you plan to put your design for about 5-10 seconds. Move the iron slowly and press down firmly. You want the surface to feel flat and warm.
Pre-pressing makes a big difference. Studies show that careful surface prep can boost adhesive strength by up to 45%. Your vinyl will stick better and last longer. You will notice fewer problems with peeling or lifting edges.
Note: Always let the bag cool for a few seconds after pre-pressing. This helps the vinyl lay flat when you position it.
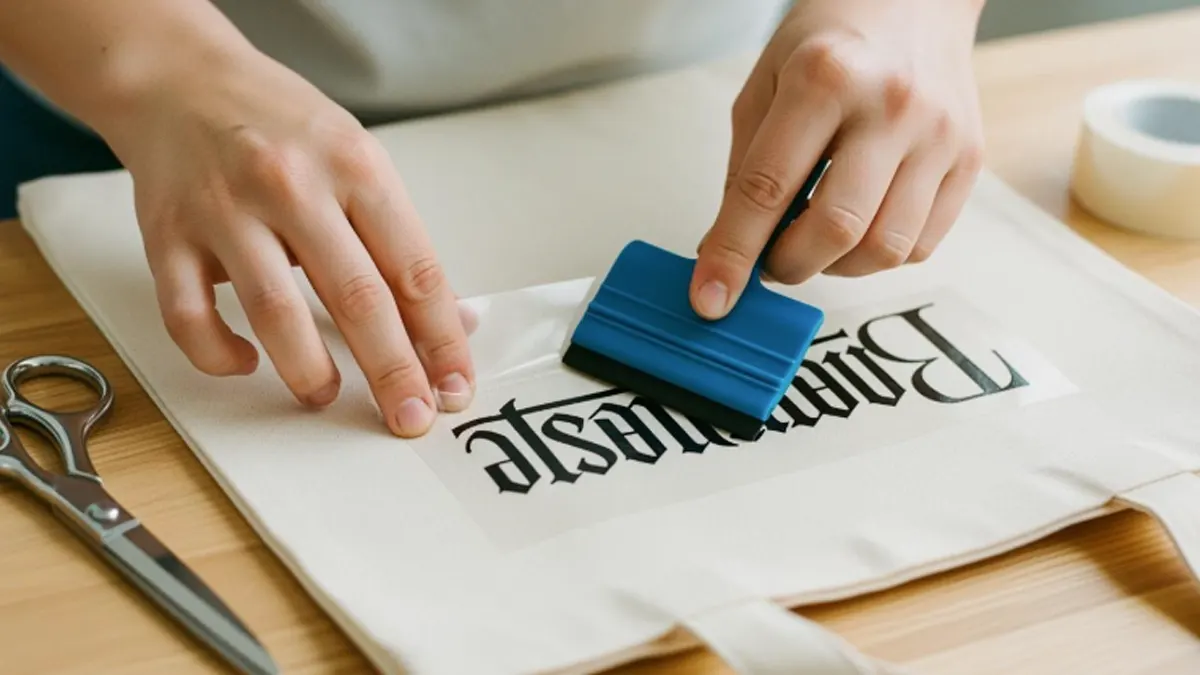
Positioning the Vinyl Design
You have a clean, smooth bag. Now, you need to place your vinyl design. Lay your bag on a hard, flat surface. Use a ruler or measuring tape to find the center if you want your design straight. You can fold the bag in half and press a light crease to mark the middle.
Peel the backing off your vinyl and set it on the bag, sticky side down. Adjust the placement until you like how it looks. If you want, use heat-resistant tape to hold the design in place. This keeps it from shifting when you add heat.
Tip: Step back and look at your bag from a distance. This helps you see if the design is straight and centered.
Take your time with these steps. Good prep leads to great results. Your vinyl will stick strong and look professional.
How to Use Iron-On Vinyl with Heat Press or Iron
Setting Up on Granite Countertop
You want a solid, heat-safe surface when you work with iron-on vinyl. A granite countertop works great for this. It stays cool and gives you a flat spot for your canvas tote bags. Place a thick towel or a heat mat on the granite. This protects your counter and helps spread the heat evenly. Lay your bag flat and smooth out any wrinkles. Make sure your iron-on vinyl design is ready to go.
Tip: Always keep your workspace clear. You do not want anything to melt or catch heat by accident.
Heat Press vs. Iron Techniques
You can use a heat press machine or a regular iron for iron-on vinyl. Both tools work well, but the steps are a little different. Here’s how to use iron-on vinyl with each method:
With a heat press machine:
- Plug in your heat press machine and set the temperature between 320°F and 350°F.
- Place your canvas tote bags on the press. Put your heat transfer vinyl design on the bag, shiny side up.
- Cover the design with a Teflon sheet or parchment paper.
- Lower the heat press machine and press down firmly for 15-20 seconds.
- Lift the press and let the bag cool for a few seconds.
- Peel off the carrier sheet slowly. If the iron-on vinyl does not stick, press again for a few seconds.
With an iron or easypress:
- Set your iron or easypress to the cotton setting (no steam).
- Place your canvas tote bags on a flat surface. Position your iron-on vinyl design where you want it.
- Cover the design with parchment paper or a Teflon sheet.
- Press down with the iron or easypress, using firm pressure. Hold for 15-20 seconds. Move the iron or easypress in small circles if needed.
- Let the bag cool, then peel the carrier sheet away. If the iron-on vinyl lifts, repeat the process.
Note: Use steady, even pressure with your iron or easypress. This helps the iron-on vinyl stick better.
Temperature and Time Settings
Getting the right temperature and time is key for iron-on vinyl. If you use a heat press machine, iron, or easypress, check this table for the best results:
| Temperature (°F) | Time (seconds) | Notes |
|---|---|---|
| 385 | 23 | Works great with Iron All for lights |
| 375 | 15 | Transferred great with JPSS, no dots |
| 350 | 15 | Perfect transfer with max pressure |
You can use these settings for most iron-on vinyl projects on canvas tote bags. Always check your vinyl package for special instructions. If you see any peeling, try pressing again with your iron, easypress, or heat press machine.
Tip: Test a small piece of iron-on vinyl on your bag before you start your full design. This helps you find the perfect settings for your tools.
Now you know how to use iron-on vinyl with a heat press machine, iron, or easypress. You can create bold, long-lasting designs on canvas tote bags with just a few simple steps.
How to Get Vinyl to Stick to Canvas Bag: Application Steps
You want your design to last on your canvas tote bags. Let’s walk through the best way to apply iron-on vinyl so you get strong adhesion and a professional look. Follow these steps and you’ll see how to get vinyl to stick to canvas bag every time.
Pressing Both Sides for Better Adhesion
When you use iron-on vinyl, you need heat and pressure. Pressing both sides of your canvas bag helps the heat transfer vinyl bond deeper into the fibers. Start by placing your canvas tote bags flat on your work surface. Put your iron-on vinyl design in position. Cover the design with parchment paper or a Teflon sheet. Use your heat press or iron to press the front side first. Apply firm pressure for 15-20 seconds at a temperature between 320°F and 350°F.
Flip your canvas bag over. Press the back side for another 10-15 seconds. This step makes sure the heat and pressure reach every part of the iron-on vinyl. You’ll notice the vinyl sticks better and lasts longer. Even if you use a regular iron, pressing both sides helps you avoid peeling and lifting.
Tip: Always let your canvas tote bags cool for a few seconds before you touch the design. This helps the iron-on vinyl set properly.
Using a Dry Washcloth for Extra Stick
Sometimes you want a little extra help with adhesion. Grab a clean, dry washcloth. Place it over your iron-on vinyl design before you press. The washcloth spreads the heat evenly and adds gentle pressure. This trick works well if your canvas bag has thick seams or textured areas.
Press down with your iron or heat press, moving slowly over the washcloth. The iron-on vinyl will melt into the canvas fibers. You get a smooth finish and fewer bubbles. If you see any edges lifting, press again with the washcloth for a few seconds. This method is simple, but it makes a big difference in how to get vinyl to stick to canvas bag.
Note: Make sure your washcloth is dry. Moisture can stop the iron-on vinyl from sticking.
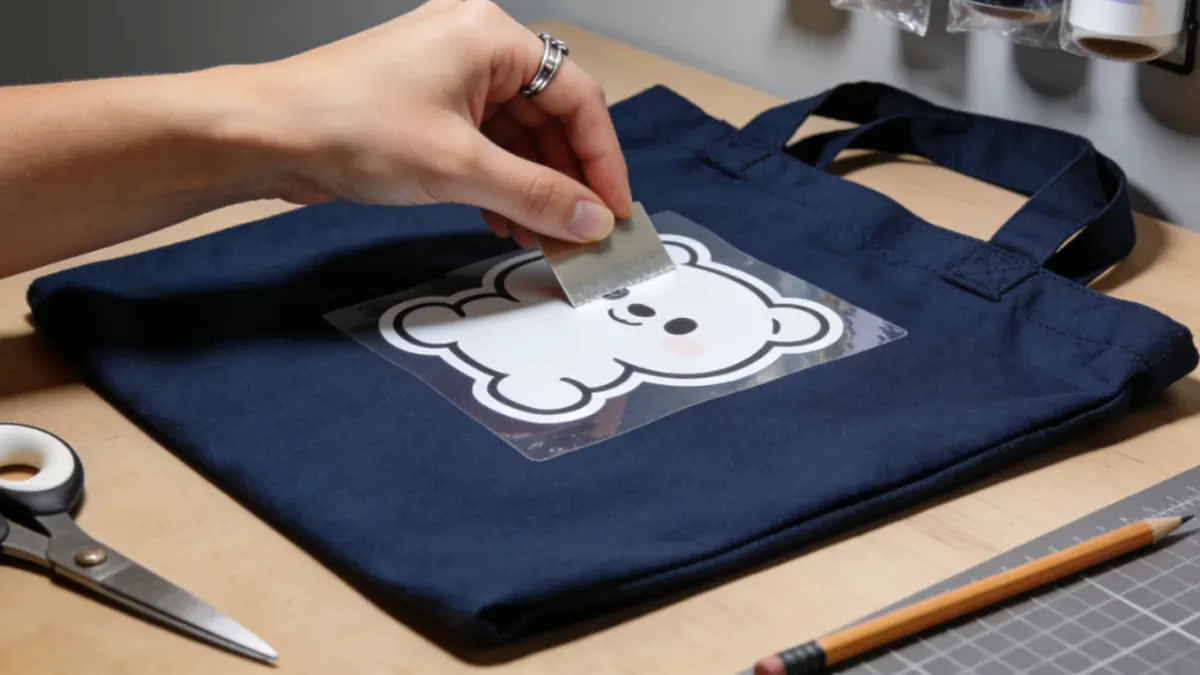
Peeling the Carrier Sheet
You’ve pressed your iron-on vinyl onto your canvas tote bags. Now it’s time for removing the carrier sheet. This step needs patience. Here’s how you do it:
- Let your canvas bag cool for a few seconds after pressing.
- Start peeling the carrier sheet from one corner. Go slowly and watch for any spots where the iron-on vinyl lifts.
- If the vinyl does not stick, lay the carrier sheet back down and press again for a few seconds.
- Always check the edges and corners. If you see peeling, use your iron or heat press to fix it.
You want the iron-on vinyl to stay flat and smooth. Peeling the carrier sheet at the right time helps you avoid wrinkles and bubbles. If you rush, you might pull up the design. Take your time and you’ll see how to get vinyl to stick to canvas bag with a strong bond.
Tip: If you use heat transfer vinyl with special finishes, check the package for peeling instructions. Some types need to cool longer before you peel.
Step-by-Step Guide for Applying Vinyl
Here’s a quick checklist for how to get vinyl to stick to canvas bag using iron-on vinyl:
- Set up your heat press or iron. Adjust the temperature between 320°F and 350°F. Set the pressing time to 15-20 seconds.
- Position your heat transfer vinyl design on the canvas bag. Make sure the shiny side is up and the adhesive side is down.
- Cover the design with parchment paper, Teflon sheet, or a dry washcloth.
- Press the front side of the canvas tote bags with firm pressure for the recommended time.
- Flip the bag and press the back side for 10-15 seconds.
- Let the bag cool for a few seconds.
- Peel the carrier sheet gently. If the iron-on vinyl does not stick, press again.
- Check for wrinkles, bubbles, or peeling. Adjust heat or pressing time if needed.
You now know how to get vinyl to stick to canvas bag with confidence. Iron-on vinyl works best when you follow each step. Press both sides, use a dry washcloth, and take your time with removing the carrier sheet. Your canvas tote bags will look great and last for years.
Troubleshooting Vinyl Application Issues
You might run into a few problems when working with iron-on vinyl on canvas bags. Don’t worry! You can fix most issues with some simple steps. Let’s look at troubleshooting common issues so your designs stay smooth and strong.
Vinyl Not Sticking or Peeling
If your iron-on vinyl isn’t sticking or starts to peel, you’re not alone. Many crafters see letters or shapes lifting at the corners after pressing with an iron or easypress. Here are some reasons this happens:
- The canvas bag might have sizing or starch that blocks the adhesive.
- You may need a different type of iron-on vinyl for your fabric.
- Sometimes, pressing for 20 seconds at 350 degrees works for some letters but not others.
- The vinyl brand or quality can affect how well it sticks.
Tip: Always check with your vinyl supplier if you’re unsure which iron-on vinyl works best for your canvas bags.
If you see peeling, try these fixes:
- Use flexible fabric glue or E6000 to stick down small areas.
- Touch up color gaps with fine-tipped acrylic leather paint pens.
- Replace iron-on vinyl letters with new ones using your iron or easypress.
- Use oil-based paint markers for tiny fixes.
- For big problems, ask a professional repair shop for help.
Fixing Wrinkles and Bubbles
Wrinkles and bubbles can make your iron-on vinyl look messy. You want a smooth finish, so try these tricks:
- Use an application tool to push air bubbles toward the edges. Press gently but firmly.
- Let your canvas bag sit in sunlight for a while. The heat softens the adhesive and helps small bubbles disappear.
- Take a weeding tool and poke the center of a bubble. Smooth the iron-on vinyl from the center out.
- Use a heat gun or hairdryer on low heat. Warm up the vinyl and press down on the bubbled spots.
Note: Always use your easypress or iron with care. Too much heat can damage the canvas or melt the iron-on vinyl.
Re-Pressing for Stronger Bond
Sometimes, your iron-on vinyl needs a second round of heat. Re-pressing helps restore the bond and keeps your design from peeling. Here’s how you do it:
- Set your iron or easypress to the same temperature as before.
- Place a protective sheet, like parchment paper, over the iron-on vinyl.
- Press down again with steady pressure.
- Let the bag cool before you check the edges.
Re-pressing works well for stubborn spots. You reactivate the adhesive and help the iron-on vinyl grip the canvas fibers. If you use an easypress, you get even heat and pressure, which makes the bond even stronger.
Tip: Always use a protective sheet when re-pressing. This keeps your iron-on vinyl safe and stops it from sticking to your iron or easypress.
Troubleshooting common issues with iron-on vinyl is part of the crafting process. With these tips, you can fix peeling, wrinkles, and bubbles. Your canvas tote bags will look neat and last longer.
Care Tips for Long-Lasting Results
Washing and Handling Canvas Tote Bags
You want your canvas tote bags to look fresh and keep your iron-on designs bright. Washing them the right way helps your designs last longer. Always turn your bag inside out before you wash it. This protects the iron-on from rubbing against other clothes. Use cold water and a gentle cycle if you use a washing machine. You can also wash your bag by hand. Just use mild soap and avoid scrubbing the iron-on area.
Never use bleach or strong chemicals. These can damage the iron-on and make colors fade. After washing, let your canvas tote bags air dry. Hang them up or lay them flat. Do not use a dryer. High heat can make the iron-on peel or crack. If you need to iron your bag, keep the iron away from the iron-on design. You can place a towel over the design and use low heat if you must.
Tip: Spot clean small stains with a damp cloth. This keeps your iron-on looking sharp without extra washing.
Handle your canvas tote bags with care. Try not to fold the iron-on design. If you carry heavy items, make sure the iron-on does not stretch or bend. You want your easypress projects to stay smooth and neat.
Storage and Adhesion Testing
Storing your canvas tote bags the right way keeps your iron-on designs safe. Here are some easy tips:
- Fold your tote bag neatly. Do not crease the iron-on area.
- Store your bag in a cool, dry place. Humidity can weaken the iron-on adhesive.
- Use a dust bag for extra protection. This keeps dirt and dust away from your iron-on.
- Fill your bag with soft items, like tissue paper, to help it keep its shape.
- Avoid direct sunlight. Sunlight can fade the iron-on colors and weaken the bond.
Before you use your canvas tote bags, test the adhesion of your iron-on design. Gently rub the edges of the iron-on with your finger. If you see any lifting, use your easypress or iron to press the area again. Place a piece of parchment paper over the design and apply heat for a few seconds. Let it cool and check the bond.
You can also use a table to keep track of your iron-on adhesion tests:
| Test Step | What to Do | Result |
|---|---|---|
| Edge Rub | Rub edges with finger | Sticks/Lifts |
| Light Stretch | Gently pull fabric near design | Stays/Flexes |
| Heat Re-Press | Use easypress or iron briefly | Improved bond |
Note: Always let your iron-on cool before you test adhesion. This helps the glue set and keeps your design strong.
If you follow these care tips, your canvas tote bags will stay bright and your iron-on designs will last. You can enjoy your easypress creations for years.
Conclusion
You can master iron-on vinyl on canvas tote bags with the right steps. Start by cleaning and flattening your bag, then set your heat press or iron to the recommended temperature. Press firmly and follow the timing for a strong bond. Try layering colors, using fun shapes, or personalizing tote bags with your favorite designs. Customizing canvas tote bags lets you show off your style. If you want bulk orders, you get cost savings, durability, and eco-friendly options. Reach out to us for custom canvas tote bags that fit your needs!
FAQ
Can I use regular vinyl instead of iron-on vinyl on canvas bags?
You need iron-on or heat transfer vinyl for canvas bags. Regular adhesive vinyl will not stick well or last long. Always choose vinyl made for fabric projects.
What temperature should I set my iron or heat press?
Set your iron or heat press between 320°F and 350°F. Check your vinyl’s instructions for the best results. Test a small area first if you feel unsure.
Do I need to wash my canvas bag before applying vinyl?
Yes, you should wash your canvas bag. This removes dust and oils that can block the vinyl from sticking. Let the bag air dry completely before you start.
Why does my vinyl keep peeling off after pressing?
Your vinyl might peel if you use low heat, skip pre-pressing, or rush the cooling step. Try pressing both sides and let the bag cool before peeling the carrier sheet.
Can I layer different colors of vinyl on my canvas tote?
You can layer vinyl for colorful designs. Press each layer separately and let it cool before adding the next. Use a Teflon sheet to protect your design.
How do I fix bubbles under my vinyl?
Use a weeding tool to poke the bubble, then press down gently. You can also use a heat gun on low to soften the vinyl and smooth it out.
Is it safe to put my canvas tote bag in the dryer?
Avoid the dryer. High heat can make the vinyl crack or peel. Air dry your bag to keep your design looking fresh.
What’s the best way to store my canvas tote with vinyl?
Fold your bag neatly and keep it in a cool, dry place. Use a dust bag for extra protection. Avoid direct sunlight to prevent fading.


