
You might think learning how to design a bag sounds tough, but you can totally do it. Grab a pencil or tablet, and start sketching your ideas. When you design a bag, you get to solve real problems for people. You will learn what users want and try out your ideas again and again. This process feels creative, hands-on, and super rewarding.
Key Takeaways
- Begin with a clear idea for your bag. Think about who will use the bag. Figure out what problems your bag will fix.
- Find out who your customers are. Learn what they like and need in a bag. Design a bag that fits those needs.
- Make clear goals for your design. Think about how the bag works and how it looks. Try to make your bag special.
- Draw your ideas for the bag. You can draw by hand or use a computer. This helps you see what your bag will look like.
- Make patterns for your bag. Make sure your patterns are correct. This helps stop problems when you make the bag.
- Pick the best materials for your bag. Choose fabrics and hardware that look good and last long.
- Make a prototype of your bag. Test your bag to see what needs to be better.
- Get ready to make many bags. Finish your tech pack and check for good quality. This helps your bag launch go well.
Bag Concept and Purpose
Before you start to design a bag, you need a clear bag concept. This step helps you figure out who will use your bag and why they need it. You want your bag to solve a problem or make life easier for someone. Let’s break down how you can shape your bag concept.
Define Target Market
You should know your audience. Who will buy your bag? What do they care about? You can look at different groups and see what matters most to them.
User Needs
Take a look at what people want from their bags. Some want style, others need space, and many care about durability. Here’s a quick table to help you see what different groups prefer:
| Demographic Group | Key Preferences |
|---|---|
| Gen-Z and Millennials | Designer bags, trendy shapes |
| Eco-Conscious Consumers | Sustainable materials |
| Urban Professionals | Functional bags for commuting |
| Students and Academics | Durability, space for books and supplies |
| Gender Preferences | Men: rugged styles; Women: elegant designs |
You might notice that students want sturdy bags, while professionals need something practical for daily use. Eco-conscious shoppers look for bags made from sustainable materials.
Market Trends
You can spot trends by watching what’s popular. Right now, mini bags and belt bags are making a comeback. Many people want gender-neutral designs. Sustainability is also a big deal, especially in the US and China. If you want your bag concept to stand out, pay attention to these trends.
Tip: Visit local stores or browse online shops. You’ll see which styles and features are hot right now.
Set Design Goals
Once you know your market, you can set goals for your bag. These goals guide your choices as you design a bag.
Functionality
Think about how your bag will work. Will it have lots of pockets? Is it easy to carry? Urban professionals need bags that hold laptops and chargers. Students want space for books. Eco-conscious buyers look for reusable bags. You should decide what features matter most for your audience.
- Pocket placement
- Durability
- Easy access
- Comfortable straps
Style
Style makes your bag unique. You can play with colors, shapes, and logos. Some people love bold prints, while others want classic looks. Printing techniques like screen or digital printing can add flair. You can choose materials that fit your style and budget. Sustainability matters too, so think about eco-friendly options.
Note: Leather bags appeal to many ages. Younger buyers like trendy designs. Older shoppers prefer timeless styles. Men often pick rugged looks, while women go for elegance.
When you focus on your bag concept, you set yourself up for success. You learn how to design a bag that people want and need. This step helps you create a design a bag that stands out in the market.
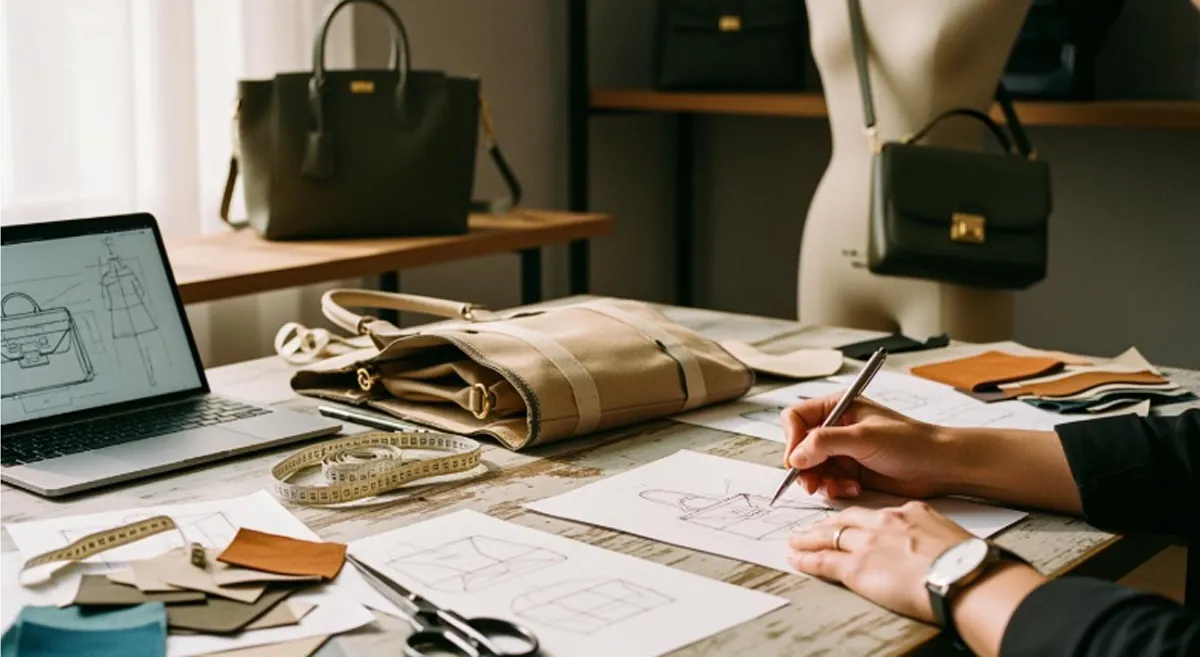
How to Design a Bag: Sketches and Visualization
You have your concept and goals. Now it’s time to bring your ideas to life. This is where you get creative and start to see your bag take shape. You will learn how to design a bag by sketching, refining features, and building inspiration boards. Let’s dive in!
Initial Bag Sketches
Sketching is the first step to turn your ideas into something real. You don’t need to be a professional artist. You just need to get your thoughts on paper or screen.
Hand-drawn
Grab your favorite sketchbook and start drawing. Many bag designers use smooth, heavyweight paper because it holds up well. Try different pencils for shading and details. Keep a soft eraser handy for quick fixes. Rulers and templates help you draw straight lines and neat shapes. Add color with markers or colored pencils to make your sketches pop.
- Use quality paper for durability.
- Try a set of pencils with different hardness.
- Keep erasers close for corrections.
- Use rulers for clean lines.
- Add color to show your style.
Practice sketching different bag shapes. Focus on getting the proportions right. Add details like zippers, handles, and pockets. You can start with random forms, add contour lines for a 3D look, and zoom in on special features. Keep doodling until you find a design you love.
Digital
If you like technology, digital sketching is a great choice. All you need is a tablet and stylus. You can sketch anywhere, anytime. Digital tools let you try new ideas fast. You don’t need to carry lots of supplies. You can store thousands of sketches on your device. It’s easy to take photos for reference and mix them into your designs.
- Quick setup and no mess.
- Unlimited creative options.
- Easy to carry your whole portfolio.
- Snap photos for inspiration.
Digital sketching gives you more freedom to experiment. You can undo mistakes with a tap. You can try different colors and textures without starting over. Many designers love the flexibility and speed.
Refine Features
Once you have some sketches, it’s time to focus on the details. This step helps you learn how to design a bag that stands out.
Compartments
Think about what your bag will hold. Will it have a laptop sleeve? Maybe a secret pocket for keys? Draw each compartment in your sketches. Show how they fit together. Make sure your design is practical and easy to use.
- Add pockets for phones, pens, or snacks.
- Plan for water bottle holders or card slots.
- Think about how users will reach each compartment.
Style Elements
Now, add the fun stuff. Style elements make your bag unique. Try different shapes for handles or straps. Add bold zippers or shiny buckles. Play with stitching patterns or logo placements. These small touches can turn a simple bag into a statement piece.
Tip: Mix classic and trendy elements to create a bag that feels fresh but timeless.
Inspiration Boards
Every designer needs inspiration. Building an inspiration board helps you see what you like and guides your choices. You can use a corkboard, a wall, or a digital app.
Colors
Pick colors that match your vision. You might love earthy tones, bright neons, or soft pastels. Look at nature, retro styles, or even your favorite foods for color ideas. Try putting color swatches next to your sketches to see what works best.
Textures
Textures add depth to your bag. You can find inspiration in animal prints, floral patterns, or even abstract art. Touch different fabrics and materials. Notice how they feel and look. Add photos or fabric samples to your board.
Here are some common sources of inspiration for bag designers:
- Nature designs
- Retro and vintage looks
- Food-inspired patterns
- Abstract art
- Animal and floral prints
- Inspirational quotes
- Special occasions
- Branded styles
Note: Your inspiration board is your playground. Mix and match until you find a style that feels right.
Learning how to design a bag is all about exploring and refining your ideas. Sketch by hand or go digital. Focus on features and style. Build an inspiration board that sparks your creativity. This process helps you create a bag that people will love and sets the stage for your prototype.
Technical Drawings and Patterns
You have your sketches and ideas ready. Now, you need to turn those ideas into technical drawings and patterns. This step helps you make sure your bag design can actually be made. You will create patterns and draw out all the details so nothing gets missed.
Create Bag Patterns
Patterns are like blueprints for your bag. They show the exact size and shape of every piece. You can make patterns by hand or use digital tools.
Paper
Many designers start with paper patterns. You can use sturdy paper or cardboard. Draw each part of your bag at full size. Cut out the shapes and check if they fit together. This hands-on method helps you spot problems early. You can tape pieces together to see how the bag will look in real life.
- Use rulers for straight lines.
- Mark seam allowances clearly.
- Label each piece so you don’t get confused.
Tip: If you make a mistake, just grab a new sheet and try again. Paper patterns are easy to adjust.
Digital
Digital patterns use software like Adobe Illustrator or CAD programs. You can draw precise shapes and make quick changes. Digital patterns save time and help you share your work with others. Many factories prefer digital files because they can use them for cutting machines.
- Zoom in for tiny details.
- Copy and paste shapes to save time.
- Export files in formats that manufacturers need.
Digital patterns also help you keep everything organized. You can store all your designs on your computer and print them when needed.
Draw Specifications
Specifications tell the factory exactly how to make your bag. These drawings include every measurement and detail.
Scale Accuracy
Draw your bag to scale. This means every part matches the real size. Use clear measurements for length, width, and depth. Accurate drawings help avoid mistakes during production.
- Double-check all numbers.
- Use a scale ruler if drawing by hand.
- Add a scale bar to your digital files.
Construction Details
Show how each part connects. Draw where seams, zippers, and pockets go. Mark the placement of straps and hardware. Include notes about materials and stitching.
Here’s what you should include:
| Detail | Why It Matters |
|---|---|
| Seam placement | Affects strength and look |
| Zipper location | Impacts function and style |
| Strap attachment | Ensures comfort and durability |
| Pocket layout | Improves usability |
You want your bag to last. Regular inspections of materials and parts help catch problems early. Strength testing of seams and load testing make sure your bag can handle daily use. Functional testing checks that zippers and straps work right. When you follow industry standards like ISO 9001 and ISO 14001, you show that you care about quality and the environment. Certifications from trusted groups build trust with your customers.
Note: Good technical drawings and patterns make the whole process smoother. They help you turn your ideas into a real, working bag.
Material Selection and Hardware
You have finished your design. Now you must pick the best materials and hardware. This step is very important. Good choices make your bag look nice and last longer. Your bag will also work the way you want.
Choose Bag Materials
There are many materials to pick from. Each one changes how your bag looks and feels. Some materials make bags strong. Others make them soft or easy to clean.
Fabrics
Fabrics give you lots of choices. You can use canvas, nylon, polyester, or cotton. Canvas is strong and good for daily use. Nylon and polyester keep water and stains away. These are great for outdoor bags. Cotton is soft and good for casual bags.
- Canvas: Strong and classic
- Nylon: Light and keeps water out
- Polyester: Easy to clean and cheap
- Cotton: Soft and comfy
Plastic bags are very common. By 2025, they will be over half the bag market. If you want your bag to be different, mix fabrics with other materials.
Leathers
Leather makes your bag feel fancy. You can use real leather for a luxury bag. Synthetic leather is cheaper but still looks nice. Real leather costs more but lasts a long time. Synthetic leather is less expensive and works for many styles.
- Real leather: Lasts long and looks fancy
- Synthetic leather: Cheaper and can look good
Think about who will use your bag. Some people want eco-friendly bags. Others like classic leather.
Select Hardware
Hardware helps your bag work and look good. You need to pick zippers, buckles, and other parts. These should match your bag’s style.
Zippers
Zippers keep your things safe inside the bag. They come in many sizes and styles. Good zippers make your bag look better. Strong metal zippers last longer.
Buckles
Buckles help you adjust straps and close pockets. Plastic buckles are light and good for small bags. Metal buckles are stronger. Fancy hardware can cost more money. Simple hardware is cheaper.
Here is a table about hardware:
| Hardware Component | Functionality | Durability Impact |
|---|---|---|
| D-Rings | Let you change strap length and add hooks. | Makes bags more useful and strong. |
| Swivel Hooks | Attach straps and stop twisting. | Makes bags easier to use and last longer. |
| Zippers | Close bags and come in many types. | Keep things safe and make bags last. |
Tip: Pick strong metals like stainless steel for hardware. This helps your bag last longer. Make sure the hardware fits your style and needs.
Source Suppliers
You need good suppliers for your materials and hardware. You can find them near you or online.
Local
Local suppliers let you see and touch materials first. You can get your order fast. Most businesses say good suppliers help them a lot. Working with local suppliers gives you better service.
Online
Online suppliers have many choices. You can check prices and read reviews. Many have quality certificates like ISO 9001. Always check their history and ask for references. Good suppliers have strong quality checks and deliver on time.
Here is a checklist for suppliers:
- Certifications like ISO 9001 or Fair Trade
- Good quality control
- Few defects or complaints
- Deliver on time
- Good risk plans
- Easy ordering with ERP
- Eco-friendly certificates
- Client references
Checking suppliers helps you avoid problems. The right supplier gives you better materials and support for your bag.
From Concept to Creation: Prototyping
You have your design ready. Now you get to see your bag come to life. Prototyping is where you turn your ideas into something you can touch and test. This step helps you move from concept to creation and get closer to a ready-to-manufacture prototype.
Assemble Prototype
You start by making the first version of your bag. This is your chance to check if your design works in real life.
Cutting
Cutting is the first hands-on step. You lay out your patterns on the fabric or leather. Use sharp scissors or a rotary cutter for clean edges. Make sure you follow your technical drawings closely. If you cut wrong, your pieces might not fit together. Double-check your measurements before you start. Some designers use chalk or washable markers to outline shapes. This helps you stay accurate.
Tip: Always cut a little outside the line. You can trim extra material, but you can’t add it back.
Sewing
Now you sew the pieces together. Use a sewing machine or hand-stitch for small parts. Start with the main body, then add pockets, straps, and other features. Choose strong thread that matches your material. Keep your stitches even and tight. This makes your bag last longer. If you make a mistake, don’t worry. You can take out stitches and try again. Prototyping is all about learning and improving.
- Sew slowly around curves.
- Backstitch at the start and end for strength.
- Check your seams for gaps or loose threads.
You might face some challenges during this stage. Sometimes, you run into budget problems because materials cost more than you expect. You may find that your design looks good on paper but doesn’t work with real materials. Time can also be tight, especially if you want to finish quickly. Don’t rush. Take your time to get each step right.
Construction Techniques
How you build your bag matters. Good construction techniques make your prototype strong and professional.
Interfacing
Interfacing gives your bag structure. It’s a special layer you add between the outer fabric and the lining. Use interfacing to make soft fabrics stiffer and stronger. This helps your bag keep its shape and stops it from sagging. You can choose from different types, like fusible or sew-in. Pick the one that works best for your material.
- Use stabilizers for extra support.
- Test a small piece first to see how it feels.
Finishing
Finishing touches make your bag look neat and last longer. Paint or coat the raw edges so they don’t fray. Attach hardware like zippers and buckles carefully. Make sure everything is secure. Add a lining to protect the inside and hide seams. Clean up any loose threads or marks. These small steps show you care about quality.
Here are some top construction techniques for a successful design:
- Precise stitching with the right thread.
- Secure hardware attachment.
- Edge painting for smooth, strong edges.
- Lining and interior construction for durability.
- Polishing and cleaning for a professional look.
Note: Good construction makes your bag feel like a production-ready model, not just a test piece.
Test and Refine
You need to test your prototype. This is where you find out what works and what doesn’t. Testing helps you fix problems before you move to full production.
Functionality
Try using your bag like a real customer. Put things inside. Open and close the zippers. Adjust the straps. See if the pockets are easy to reach. If something feels awkward, make a note. Sometimes, you find that a pocket is too small or a zipper is hard to use. Go back and change your design. This is called iteration. You test, get feedback, and improve your bag.
Common challenges during prototyping include unclear goals, which can lead to designs that don’t solve real problems. Sometimes, you run into technical issues, like materials that don’t work as planned. You might also face time or budget limits. Don’t let these stop you. Each test brings you closer to a successful design.
Comfort
Carry your bag around. Check if the straps dig into your shoulder. See if the weight feels balanced. Ask friends or family to try it too. Listen to their feedback. Comfort is just as important as looks. If your bag feels good to use, people will love it.
Here’s a table showing why prototypes sometimes fail:
| Reason for Failure | Description |
|---|---|
| Psychological Barriers | Fear of failure can stop you from trying new ideas. |
| Tool-Related Issues | Using the wrong tools can waste time and give poor results. |
| Usability and Design Flaws | Over-polished prototypes can hide real problems and block honest feedback. |
| Resource Constraints | Not enough time or money can lead to rushed or weak prototypes. |
| External Considerations | Ignoring what others have done can cause you to repeat old mistakes. |
Tip: Don’t be afraid to make changes. The best bags come from lots of testing and feedback.
Prototyping is a key part of design development. You learn by doing. You fix mistakes and make your bag better each time. When you finish, you have a ready-to-manufacture prototype that’s strong, comfortable, and looks great. This is how you turn your idea into a production-ready model.
Prepare for Manufacturing
You have a finished prototype. Now, you need to get ready for mass production. This stage helps you turn your design into a real product that people can buy. Let’s walk through the steps.
Finalize Bag Patterns
You want your patterns to be perfect before you start making lots of bags. Double-check every detail. Make sure your pieces fit together and match your design.
Tech Packs
A tech pack is like a recipe for your bag. It tells the factory exactly how to make it. You should include:
- Technical sketches from different angles
- Material details for fabrics and hardware
- Exact measurements for every part
- A bill of materials (BOM) with all components
- Step-by-step construction instructions
- A costing sheet for price estimates
Tip: A clear tech pack helps you avoid mistakes and saves time during production.
Specifications
You need to set clear specifications. Write down the size, color, and materials. Add notes about stitching, zippers, and hardware. Factories use these specs to check quality. They will look for strong seams and working zippers. Quality control happens at every step. You want your bag to match your vision.
OEM and ODM Options
You have two main ways to make your bag: OEM and ODM. Each one has pros and cons.
Customization
OEM (Original Equipment Manufacturer) lets you create a unique design. You control every detail. You can pick special materials, shapes, and features. This is great if you want your own brand style. It costs more and takes longer, but you get something special.
ODM (Original Design Manufacturer) uses ready-made designs. You can add your logo or change colors. This way is faster and cheaper. You get less control, but you can start selling sooner.
Here’s a quick look at the differences:
- OEM: Full control, unique product, higher cost, longer wait
- ODM: Fast, low cost, less control, easy to order
Bulk Production
When you order in bulk, you need to know the minimum order quantity (MOQ) and how long it takes. Check this table:
| Type | Minimum Order Quantities (MOQs) | Lead Times |
|---|---|---|
| ODM | Lower MOQs due to standardized designs | Shorter lead times as designs are pre-developed |
| OEM | Higher MOQs required for custom development | Longer lead times due to custom sampling and approvals |
You should plan your material orders early. Make sure you have enough fabric and hardware. Set your quality standards and talk with your factory about checks. Good planning helps you avoid delays and problems.
Remember: Quality control is key. Inspectors will check every bag for strong seams, working zippers, and the right materials.
Now you are ready to move from design to production. Careful planning makes your launch smooth and successful.
Conclusion
You have learned how to design a bag from start to finish. Begin your own bag project and keep making it better with feedback. When you listen to users, you can make a bag people really like. Coach’s Tabby bag sold twice as much because they listened to buyers. Try these ideas as you work on your bag:
| Strategy | Description |
|---|---|
| User Testing | Get feedback from users about how the bag works and what they like. |
| Effective Collaboration | Talk with your team about what you learn. |
| Thoughtful Feedback Incorporation | Make small changes so users do not get confused. |
| Validation with Additional Testing | Use A/B testing to see if your changes are good. |
If you need help, we can design custom bags, do OEM/ODM, and help you make your ideas real!
FAQ
How do I start designing a bag if I have no experience?
You can begin with simple sketches. Use paper or a tablet. Look at bags you like and try drawing their shapes. Practice helps you get better.
What materials work best for beginner bag makers?
Canvas and cotton are easy to cut and sew. These fabrics are strong and forgiving. You can find them at most craft stores.
Can I design a bag without expensive software?
Yes! You can sketch by hand or use free apps like Sketchbook. Many designers start with pencil and paper before moving to digital tools.
How do I know if my bag design is comfortable?
Test your prototype. Carry it around with your daily items. Ask friends to try it. Listen to their feedback about straps and weight.
What is a tech pack, and do I need one?
A tech pack is a guide for factories. It shows your bag’s details, materials, and instructions. You need one if you want to manufacture your bag.
How can I find reliable suppliers for materials?
Check reviews online. Visit local shops to see materials in person. Ask for samples before you buy in bulk. Good suppliers answer questions quickly.
What should I do if my prototype fails?
Don’t worry! Look at what went wrong. Change your design and try again. Every mistake teaches you something new.
Can I customize my bag design for my brand?
Absolutely! You can choose colors, add logos, and pick special features. Many manufacturers offer custom design services for brands.


