Ready to give your gear a fresh look? You can learn how to decorate a nylon drawstring bag and make it stand out. Heat transfers let you create bold designs that last. You don’t need fancy skills or expensive tools. Grab your favorite colors and start experimenting. Even if you’re new to crafts, you’ll find this process easy and fun. Let your creativity shine—your bag will never look boring again!
Key Takeaways
- Pick a nylon bag that fits your project. Make sure the surface is smooth. Do not choose bags with rough textures. Smooth bags help designs stick better.
- Use heat transfer vinyl (HTV) made for nylon. Easyweed Extra and G-Flex Nylon HTV are good choices. These options make your designs bright and last longer.
- Clean your bag well before starting. Remove all dirt and oils from the surface. This helps the vinyl stick better to the bag.
- Plan your design using templates. Templates help you size and place your design right. This makes your bag look neat and professional.
- Set your heat press to a low temperature. Keep it between 285°F and 305°F. This stops the nylon from melting. Always use a Teflon sheet to protect your bag.
- You can layer transfers to improve your design. Let each layer cool down before adding the next one. This keeps the finish smooth and nice.
- Wash your decorated bag gently. Let it air dry instead of using a dryer. This keeps your design bright and fresh.
- Try different colors and decorations to make your bag special. You can mix glitter vinyl or faux leather for extra style.
How to decorate a nylon drawstring bag: Materials
Nylon bag selection
You want your project to start with the right bag. Not all nylon is the same, so picking the best type matters. Some nylon bags work better with heat transfers. Here are a few options you might see:
- Xtra vinyl bags handle heat transfers well and give you a smooth surface.
- Thermoflex bags can work, but some crafters prefer other choices.
- Stahl’s fashion film bags offer variety if you want something different.
Look for drawstring bags with a flat, even surface. Avoid bags with heavy textures or coatings. These can make it tough for your design to stick. If you want your personalized bag to last, choose a sturdy nylon that feels smooth to the touch.
Tip: Strong thread in the drawstring helps keep the bag in shape during heat pressing. Weak thread can melt or snap, so check before you start.
Heat transfer vinyl (HTV) options
Picking the right heat transfer vinyl is key. Some HTV types work better on nylon than others. You want your design to pop and stay put. Here’s a quick look at popular choices:
| Heat Transfer Vinyl Option | Benefits |
|---|---|
| Easyweed Extra HTV | Sticks to nylon, keeps EasyWeed’s easy use |
| SportFlex Iron-On | Great for tech fabrics like nylon |
| CAD-CUT GORILLA GRIP II | Semi-matte, lightweight, ideal for nylon |
| Happy Crafters HTV | Made for rigid materials, easy to wash, quick to apply |
| G-Flex Nylon HTV | Designed for nylon, sticks well to hydrophobic textiles |
| Nylon Heat Transfer Vinyl Premium Plus | Low heat needed, perfect for heat-sensitive nylon |
You can also try faux leather or glitter iron-on for extra sparkle. Tutorials often show how these materials add texture and shine. If you want your bag to stand out, mix and match different HTV styles.
Tools and supplies
You don’t need a lot of fancy equipment for this project. Here’s what you’ll need:
- Iron-on vinyl in your favorite color
- Cricut machine (Cricut Joy, Explore, or Maker)
- Cricut EasyPress for smooth heat application
- Cricut EasyPress Mat to protect your workspace
- Cricut Heat App or Heat Guide for perfect settings
- Weeding tool to clean up your design
Many tutorials recommend using a Cricut machine to create sharp, custom designs. You can cut shapes, letters, or logos with ease. The weeding tool helps you remove extra vinyl before pressing. Make sure your drawstring is out of the way when you use heat. This keeps it from melting and helps your design look neat.
With the right materials, you’re ready to learn how to decorate a nylon drawstring bag. You’ll find that tutorials make each step simple. Your personalized bag will look amazing and last a long time.
Bag preparation
Cleaning nylon
You want your nylon drawstring bag clean before you start decorating. Dirt and oils can mess with how your design sticks. Here’s a simple way to get your bag ready:
- Empty your bag. Take out everything inside. Shake the bag to get rid of crumbs or dust.
- Brush off loose dirt. Use a soft-bristle brush or a dry cloth. Sweep away any dust or tiny pieces left behind.
- Spot test first. Pick a hidden corner of your bag. Dab a little cleaning product there. Wait a few minutes. Make sure the color stays the same and the nylon doesn’t change texture.
- Hand wash the surface. Mix a few drops of mild dish soap or baby shampoo with lukewarm water. Dip a clean cloth in the mix. Wipe the area where you plan to add your design. Move in gentle circles.
- Target stubborn stains. If you see sticky glue or ink, grab a soft toothbrush. Dip it in the soapy water. Scrub the spot lightly. For tough ink stains, use a tiny bit of rubbing alcohol on a cotton swab. Don’t rub too hard.
- Rinse wisely. Wet another clean cloth with plain water. Wipe the area to remove any soap or cleaning agent. You don’t want soap to dry on the nylon.
- Let it air dry. Lay your bag flat on a clean towel. Put it in a spot with good airflow, but keep it out of direct sunlight. Sun can fade nylon or make it brittle.
Tip: Always let your bag dry completely before you move to the next step. Damp nylon can ruin your heat transfer.
Removing wrinkles
Wrinkles can mess up your design and make it look uneven. You want a smooth surface for the best results. Here’s how you can handle wrinkles:
- Lay your bag flat on a table or ironing board.
- Use a warm (not hot) iron or a Cricut EasyPress. Press gently over the wrinkled areas for a few seconds.
- Don’t leave the heat in one spot for too long. Nylon melts easily.
- If you’re worried about melting, place a thin cloth or parchment paper between the iron and the bag.
Note: Always check the care label on your bag. Some nylon bags need extra care with heat.
Prepping for adhesion
You want your design to stick well and last a long time. Prepping the nylon surface helps the vinyl bond better.
If you see water droplets bead up on your bag, that means it’s water-repellent. You should use special vinyl made for nylon. These vinyls have a hotmelt adhesive that works with tricky surfaces.
Here’s a quick checklist for prepping:
- Lay your bag flat. Make sure there are no drawstrings, buttons, or zippers in the way.
- Preheat the nylon for up to 3 seconds. This helps remove any leftover moisture.
- Position your design and cover it with parchment paper or a Teflon sheet.
- Press again for about 10 seconds to secure the vinyl.
Always test your transfer on a sample piece of nylon first. Some coated bags don’t work well with heat transfers.
Now your bag is clean, smooth, and ready for your creative touch!
Design choice & placement
Vibrant design selection
You want your bag to stand out, so pick colors that catch the eye. Bright shades and metallic finishes work best for nylon drawstring bags. You can use bold colors like red, yellow, green, pink, and orange. Metallic gold and silver add a cool shine. Multi-color designs look playful and fun. Check out this table for ideas:
| Color Name | Type |
|---|---|
| Bright Red | Bold |
| Bright Yellow | Bold |
| Bright Green | Bold |
| Bright Pink | Bold |
| Bright Orange | Bold |
| Gold Metal | Metallic |
| Silver Metal | Metallic |
| Multi Color | Multi-color |
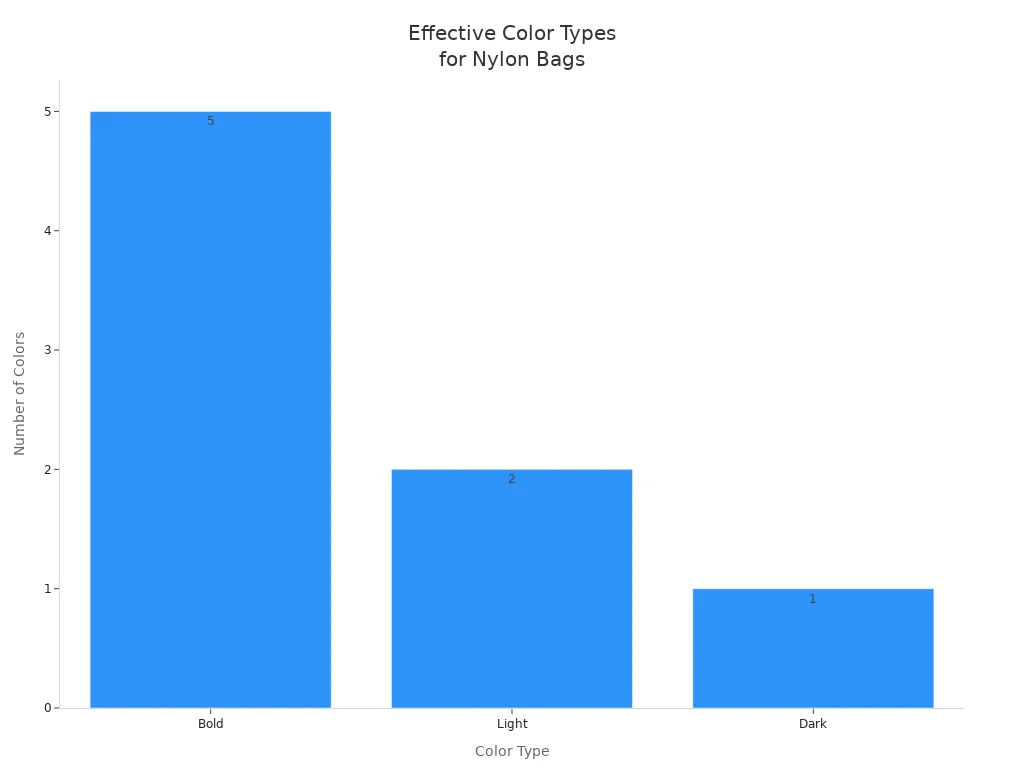
You can also try blue shades for a fresh look. Tutorials often show how mixing bold and light colors makes your project pop. Here’s another table with more color options:
| Color Name | Type |
|---|---|
| Bright Blue | Bold |
| Medium Yellow | Bold |
| Dark Blue | Dark |
| Light Green | Light |
| Light Blue | Light |
| Bright Orange | Bold |
| Bright Pink | Bold |
| Bright Red | Bold |
Want to see which colors get used most? Take a look at this chart. It shows how often people pick bold, light, and dark colors for nylon drawstring bags.
If you want a personalized backpack, choose colors that match your style or brand. Tutorials can help you mix colors for a unique look.
Sizing and positioning
Getting the size and placement right makes your design look professional. You want your project to fit the bag and grab attention. Here’s a table to help you pick the best size for your design:
| Bag Size | Dimensions (Width x Height) | Typical Applications | Advantages |
|---|---|---|---|
| Small | 4″ x 6″ | Jewelry, cosmetics, small gift packaging | High value for luxury items, cost-efficient for bulk orders. |
| Medium | 10″ x 12″ | Shoes, apparel, promotional giveaways | Visible space for logos, versatile for retail and events. |
| Large | 16″ x 20″ | Gym gear, travel kits, trade show merchandise | Ample room for bulky items, maintains portability. |
Place your design in the center for a classic look. You can also try the bottom corner or top edge for something different. Tutorials often show how to measure and mark the spot before you press the vinyl. If you want your personalized project to look neat, double-check the placement before you start.
Using templates
Templates make your diy project easier and more accurate. You can use them to plan your design and make sure everything lines up. Here’s how templates help:
| Benefit | Description |
|---|---|
| Enhances Creativity | Templates let you change and add to your design, so you can try new ideas. |
| Ensures Precision in Manufacturing | Patterns help you cut fabric pieces the right way, so every bag looks the same. |
| Facilitates Communication | Pre-made designs make it easy to talk with suppliers or brands, saving time and effort. |
- Templates let you scale your design for different bag sizes.
- You can change the shape or add features without messing up the structure.
- Try different materials, like waterproof nylon or fancy linings, for special projects.
In factories, templates keep every bag looking sharp. They help place logos in the same spot and make sure seams stay strong. If you want your personalized bag to look perfect, templates are your best friend. Tutorials often include printable templates you can use at home.
Now you know how to decorate a nylon drawstring bag with vibrant colors, smart sizing, and easy templates. Your project will look amazing and feel truly personalized!
Applying heat transfers
Heat press settings for nylon
Getting the right heat press settings is the secret to a vibrant, long-lasting design on your nylon bag. Nylon is sensitive to heat, so you need to be careful. Most tutorials suggest using a lower temperature than you would for cotton or polyester. Set your heat press to around 285°F to 305°F. Always check the recommended press settings from your vinyl manufacturer before you start your project.
You want to keep the press time short—usually 8 to 12 seconds works best. If you leave the heat on too long, the nylon can melt or warp. Use medium pressure to help the vinyl stick without damaging the fabric. Place a Teflon sheet or parchment paper over your design before pressing. This protects the nylon and keeps the heat even.
Avoiding scorch marks
Scorch marks can ruin your project, but you can prevent them with a few simple steps:
- Never set your heat press above 310°F for nylon.
- Always use a Teflon sheet or pillow to shield the fabric from direct heat.
- Make sure the drawstring is out of the way before you start heat pressing. You can tuck it to the side or cover it with a grip flex pad.
- Press for the shortest time needed to activate the adhesive.
Tip: If you see any discoloration or shiny spots after pressing, lower your temperature and try again on a test piece. Tutorials often recommend testing on scrap nylon first.
Pressure and timing
Pressure and timing play a huge role in how well your design bonds to the nylon. Nylon resists standard adhesives, so you need specialized transfers and the right amount of pressure. Here’s what you should know:
- Use medium, even pressure to make sure the vinyl sticks to every part of the bag.
- Too little pressure means the transfer won’t activate fully. Too much pressure can flatten the design or damage the nylon.
- Always follow the timing instructions from your vinyl supplier. Most recommend 8 to 12 seconds for nylon.
Heat press vs. iron
You might wonder if you can use an iron instead of a heat press. Both tools work, but a heat press gives you more control over temperature and pressure. Here’s a quick comparison:
| Tool | Pros | Cons |
|---|---|---|
| Heat Press | Even heat, precise pressure, best for large projects | Costs more, takes up space |
| Iron | Easy to find, good for small areas | Uneven heat, hard to control pressure |
If you use an iron, set it to the lowest setting that still activates the vinyl. Press down firmly and move slowly over the design. Always use a Teflon sheet to protect the nylon. Tutorials show that a heat press is the best choice for consistent results, especially if you want your project to look professional.
Peeling and finishing
Peeling the carrier sheet at the right time is key for a strong, clean design. For nylon, you usually need a cold peel. Wait until the bag cools down before you remove the sheet. Peeling too early or too late can cause the vinyl to lift or wrinkle.
Here’s a simple step-by-step guide:
- Let the bag cool completely after pressing.
- Slowly peel back the carrier sheet. If the vinyl lifts, press again for a few seconds.
- Check the edges of your design. If you see any loose spots, cover with the Teflon sheet and press again.
- Once the design is set, admire your work! Your project should look smooth and vibrant.
Note: Not all nylon bags work with every type of vinyl. Always test your design on a sample before you start your main project.
You now know how to apply heat transfers to nylon bags with confidence. Keep your drawstring safe, use the right heat press settings, and follow these steps for a flawless finish. Your design will pop and last for many adventures!
Troubleshooting
Preventing melting
Nylon bags can melt if you use too much heat during decoration. Nylon has a low melting point, so you need to protect it when you apply your design. If you notice the fabric getting shiny or sticky, you might be using too much heat. You can avoid this problem by using a teflon pillow or placing a terry cloth towel over the drawstrings. These barriers shield the nylon from direct heat. Adjust the temperature and shorten the time you press the design. Most tutorials recommend keeping the heat below 310°F. Always check your settings before you start. If you want to be extra safe, test your process on a scrap piece of nylon first. This way, you can see how the material reacts without risking your main project.
Tip: Move the drawstrings out of the way before you press. This keeps them from melting and helps your design look neat.
Fixing poor adhesion
Sometimes your design does not stick well to the nylon bag. You might see edges lifting or parts of the vinyl peeling off. This usually happens if the surface was not clean or if you used the wrong type of vinyl. You can fix poor adhesion by reheating the area. Place a Teflon sheet over the design and press again for a few seconds. Make sure you use medium pressure. If the vinyl still does not stick, check if you are using nylon-specific heat transfer vinyl. Regular vinyl may not bond well with nylon. Tutorials often suggest cleaning the bag again and trying a different vinyl if you keep having trouble. You can also try increasing the pressure slightly, but do not use too much or you might damage the bag.
| Problem | Solution | Extra Tip |
|---|---|---|
| Edges lifting | Reheat and press again | Use a Teflon sheet |
| Vinyl peeling | Switch to nylon-specific vinyl | Clean the surface thoroughly |
| Weak bond | Increase pressure slightly | Test on a scrap piece first |
Correcting misalignment
You might place your design crooked or off-center. This can happen if the transfer shifts while you press. You do not have to start over. Try these steps to fix misalignment:
- Re-press the transfer if the design is only a little off. Sometimes a second press can help set the vinyl in the right spot.
- Use heat-resistant tape to hold the transfer in place before you press. This keeps the design from moving.
- Practice your technique. The more you work with heat transfers, the easier it gets to line up your designs.
Most tutorials show how to use tape and careful measuring to avoid mistakes. If you want perfect placement, take your time and double-check before you press. You can always test your method on a practice bag first.
Note: If you cannot fix the misalignment, you can add extra embellishments or patches to cover the mistake. This turns an error into a creative detail!
Finishing touches & care
Layering transfers
You can make your nylon bag look even cooler by layering different transfers. Start with a base color or shape. Let it cool after you press the first layer. Place the next part of your design on top and press again. Always let each layer cool before adding another. This keeps your design smooth and helps the vinyl stick better. If you want extra pop, try mixing matte and glitter vinyl. Faux leather patches also add texture and style. You can use templates to plan where each layer goes. This way, your design stays sharp and doesn’t overlap by mistake.
Tip: Always check that each layer is fully stuck before you add the next. If you rush, the vinyl might peel or wrinkle.
Adding embellishments
Want your bag to stand out? Add embellishments after you finish your main design. You can use glitter vinyl, faux leather shapes, or even iron-on patches. Sequins and rhinestones give your bag sparkle. Try fabric paint for extra color. Use a glue gun for things that don’t stick with heat. Place embellishments away from the drawstring so they don’t get pulled off. Mix different textures to make your bag unique. You can even add a keychain or charm to the side for a fun touch.
| Embellishment Type | How to Use It | Best Placement |
|---|---|---|
| Glitter Vinyl | Layer and press | Center or corners |
| Faux Leather Patch | Iron or glue | Bottom edge |
| Rhinestones | Glue after pressing | Around the design |
| Fabric Paint | Draw or stencil | Borders or accents |
| Keychain/Charm | Attach to loop | Near drawstring |
Note: Always let glue and paint dry before you use your bag. This keeps your design looking fresh.
Washing and storing
Taking care of your decorated nylon bag helps your design stay bright and last longer. Follow these steps when you clean and store your bag:
- Turn your bag inside out before washing. This protects the design and catches dirt inside the lining.
- Wash by hand or use a gentle cycle in cold water. Hot water can damage the vinyl and fabric.
- Use a mild detergent made for synthetic fabrics. Avoid bleach or harsh chemicals.
- Fasten any zippers and secure the drawstring before you wash. This keeps the bag’s shape and stops tangling.
- Skip the dryer. Hang your bag up to air dry. Heat from the dryer can crack the vinyl or make the nylon stiff.
- Don’t soak your bag for more than 15 minutes. Long soaking can cause colors to fade.
- Store your bag in a cool, dry place. Keep it away from direct sunlight and damp spots to prevent fading and mildew.
- Clean your bag often to stop dirt from building up.
- Don’t overfill your bag. Too much weight can stretch the fabric and damage the design.
- Spot clean small stains with a soft cloth and gentle soap.
- Air dry your bag completely before you put it away.
Keeping your bag clean and storing it right means your design will stay vibrant for a long time.
You can enjoy your decorated nylon drawstring bag every day. With the right finishing touches and care, your design will always pop!
Conclusion
You have learned how to decorate a nylon drawstring bag. You can try new materials and designs each time. This helps you make a bag that is special and different. Custom-decorated bags are good for gifts, branding, or everyday use. People like these bags for many reasons:
- You can use them for gym, school, or events.
- It is easy to add logos or colors.
- The bags are light and easy to carry.
- They do not cost much if you buy a lot.
- Some choices are good for the environment.
Ready to build your own nylon drawstring bags? We’re the manufacturer, offering full customization and OEM/ODM—sizes, colors, 210D/420D/recycled nylon, printing (silkscreen/heat transfer/embroidery), reflective trims, and waterproof linings. Get factory-direct pricing, fast sampling, and reliable lead times. Contact us for a custom quote today.
FAQ
Can I decorate any nylon bag with heat transfers?
You can decorate most nylon bags, but some have coatings that block adhesion. Always test a small area first. If the vinyl peels off or the fabric changes color, pick another bag.
What type of vinyl works best on nylon?
Nylon-specific HTV works best. Look for brands like Easyweed Extra or SportFlex Iron-On. Regular vinyl may not stick well or could peel off after washing.
Do I need a heat press, or can I use an iron?
You can use an iron for small designs. A heat press gives you better control and more even results. If you want a professional look, try using a heat press.
How do I keep my design from melting?
Set your heat press or iron to a low temperature. Use a Teflon sheet or parchment paper to protect the nylon. Always check the vinyl instructions for the right settings.
Can I wash my decorated bag in the washing machine?
You can wash your bag on a gentle cycle with cold water. Turn it inside out first. Skip the dryer and let it air dry to keep your design looking fresh.
What should I do if my vinyl starts peeling?
Press the area again with a Teflon sheet. Use medium pressure and low heat. If it keeps peeling, switch to nylon-specific vinyl or clean the surface before reapplying.
Can I add extra decorations like patches or rhinestones?
You can add patches, rhinestones, or charms after pressing your main design. Use fabric glue or sew them on. Place them away from the drawstring so they don’t get pulled off.