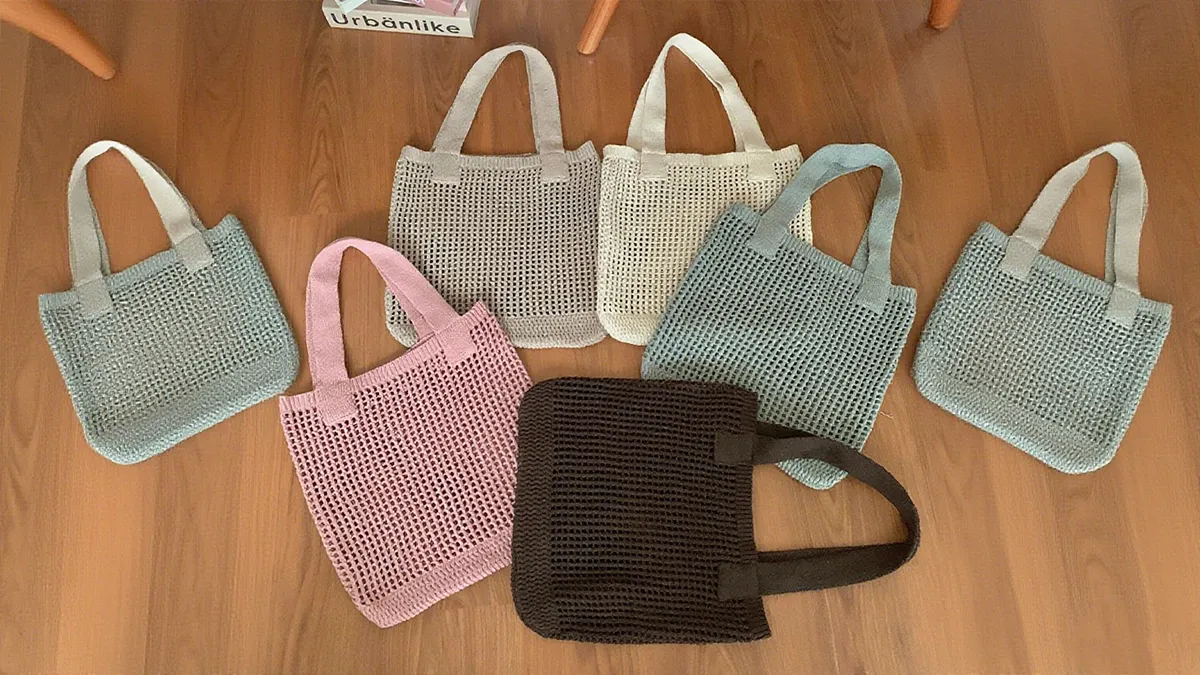
Crocheting a tote bag is one of the best beginner projects you can try. Unlike complicated clothing or amigurumi, a tote bag is simple, practical, and rewarding. You get to create something functional that you can actually use every day, whether it is for groceries, books, beach trips, or as a casual handbag.
In this guide, we will go step by step, from choosing your tools and materials to finishing touches. I will also explain shaping options, basic stitches, pattern walkthroughs, and ways to customize your bag so it looks exactly how you want. Even if you have never picked up a hook before, by the end of this tutorial, you will know how to crochet a tote bag.

Tools and Materials
Before you start, gather everything you need. Using the right tools will make your project easier and more enjoyable.

- Crochet Hooks – For beginners, a size H/8 (5mm) hook works well with medium weight yarn. If you are using thick cotton, you might want a slightly larger hook.
- Yarn – Cotton yarn is ideal for tote bags because it is sturdy and holds shape. Acrylic or cotton-acrylic blends also work if you want softer texture. Avoid fuzzy or novelty yarns that make counting stitches difficult.
- Measuring Tape – Essential for checking your gauge and ensuring your bag comes out the right size.
- Scissors – Sharp scissors make cutting yarn clean and easy.
- Stitch Markers – Optional, but very helpful for keeping track of the beginning of rounds or pattern repeats.
- Optional Lining – If you want extra durability or a professional look, you can line your crochet tote with fabric. A simple cotton lining is easy to sew in after your bag is complete.
Having everything prepared before you start helps you focus on learning the stitches and pattern without stopping to look for materials.
Basic Crochet Stitches
Even if you are completely new to crochet, these basic stitches are enough to make a tote bag.

- Chain (ch) – This is the foundation of most crochet projects. Chains create the base of your stitches and determine the width of your bag.
- Single Crochet (sc) – A tight, dense stitch that works well for tote bags. It gives structure and durability.
- Double Crochet (dc) – Taller and looser than single crochet, perfect if you want a more flexible, open texture.
Practice each stitch a few times on a small swatch before you start your bag. Once you are comfortable, you will feel confident counting stitches and working in rows or rounds.
Pattern Walkthrough
Here is a step by step method to crochet a basic tote bag.
Step 1: The Base
- Start with a chain that is as wide as you want the base of your bag. For a medium tote, 30–35 chains is usually good.
- Work a row of single crochet (sc) in each chain.
- Continue working rows of sc until the base reaches the desired length. For a standard bag, around 10–12 inches is common.
If you want a rounded base, you can work in a rectangle with shorter sides gradually decreasing or use an oval pattern. Both shapes work; flat rectangle bases are easier for beginners.
Step 2: The Sides
- Once the base is complete, start working in rounds or rows along the edges to form the sides.
- Use single crochet for structure or double crochet for flexibility.
- Keep counting stitches carefully to avoid accidental increases or decreases.
As your bag grows, check the width and height against your intended size. Remember, a tote bag should be roomy but not floppy.
Step 3: The Handles
- Decide whether you want crocheted handles integrated into the sides or separate straps sewn later.
- For integrated handles, skip a set number of stitches at the top edge and chain across for the opening, then continue crocheting around the rest of the bag.
- For separate straps, crochet long rectangles or chains, then attach securely to the top of the bag.
Handles should be strong enough to carry weight, so using a denser stitch like single crochet is recommended.
Shaping Options
One of the fun things about crocheting your own tote bag is that you can choose the shape.
- Flat Bottom – Gives a structured bag that stands on its own. Great for groceries or books. To achieve a flat bottom, you can sew a small lining or use a boxed corner technique similar to sewing tote bags.
- Rounded Base – Softer and more casual. Works well for beach bags or light everyday use. It gives a more relaxed look but does not stand up as well.
Try both styles to see which one you prefer. As a beginner, flat bottoms are usually easier to crochet and finish neatly.
Finishing
Finishing is what makes your crochet tote bag look polished.
- Weaving in Ends – Every time you finish a section or change color, use a yarn needle to weave in the loose ends. This prevents unraveling and gives a clean look.
- Blocking – Especially with cotton yarn, blocking helps your bag hold its shape. Wet the bag lightly, shape it to the intended size, and let it dry flat.
- Optional Lining – If you want a professional touch, sew in a cotton lining. This adds durability and helps the bag hold heavier items.
A well-finished bag looks neat, lasts longer, and makes you proud of your first project.
Customizing Your Tote
Crochet tote bags are highly customizable. You can:
- Change colors or use multiple yarns for stripes or patterns.
- Add embellishments like tassels, buttons, or patches.
- Adjust size to make small handbags, medium everyday totes, or large market bags.
- Experiment with stitch patterns, such as waffle stitch or shell stitch, to give texture.
Customization is where you can let your creativity shine. Even simple color changes can make your tote bag unique and fun to carry.
Final Thoughts
Crocheting a tote bag is not just a project; it is a way to learn new skills while creating something useful. Start simple, practice your stitches, and gradually experiment with shapes, sizes, and colors. Every bag you make will improve your skills and give you more confidence.
If you want to skip the DIY or need high-quality tote bags for your shop, events, or business, we can help. We are a professional tote bag manufacturer with experience in producing all types of bags, including crochet-inspired designs, lined totes, and custom options.
Contact us today to bring your tote bag ideas to life or order in bulk for your brand.
FAQ
Is a tote bag good for crochet beginners?
Yes, it is one of the easiest projects. The shape is simple, and basic stitches like single crochet and chain are enough to make a functional bag. You can also experiment with size and handles as your skills grow.
How long does it take to crochet a tote bag?
It depends on size and stitch density. A small bag can be finished in a few hours, while larger bags might take a few days. Working a little each day is enough to complete it comfortably.
Can I make a lined crochet tote bag?
Absolutely. Adding a fabric lining is a great way to increase durability and make the bag more structured. You can hand sew or machine stitch the lining inside the completed crochet bag.
What yarn is best for a sturdy tote bag?
Cotton is the most recommended because it is strong, durable, and holds shape well. Blends with acrylic can be softer and lighter, but cotton gives a professional feel.
Can I make a flat bottom crochet tote bag?
Yes. Either by adding a lining with a sewn-in flat base or using a boxed corner technique, you can create a flat bottom that helps the bag stand upright.
How do I crochet handles that do not stretch?
Use tighter stitches like single crochet and consider doubling the yarn or making two layers. Reinforcing with fabric or lining inside the handle also helps prevent stretching.


