
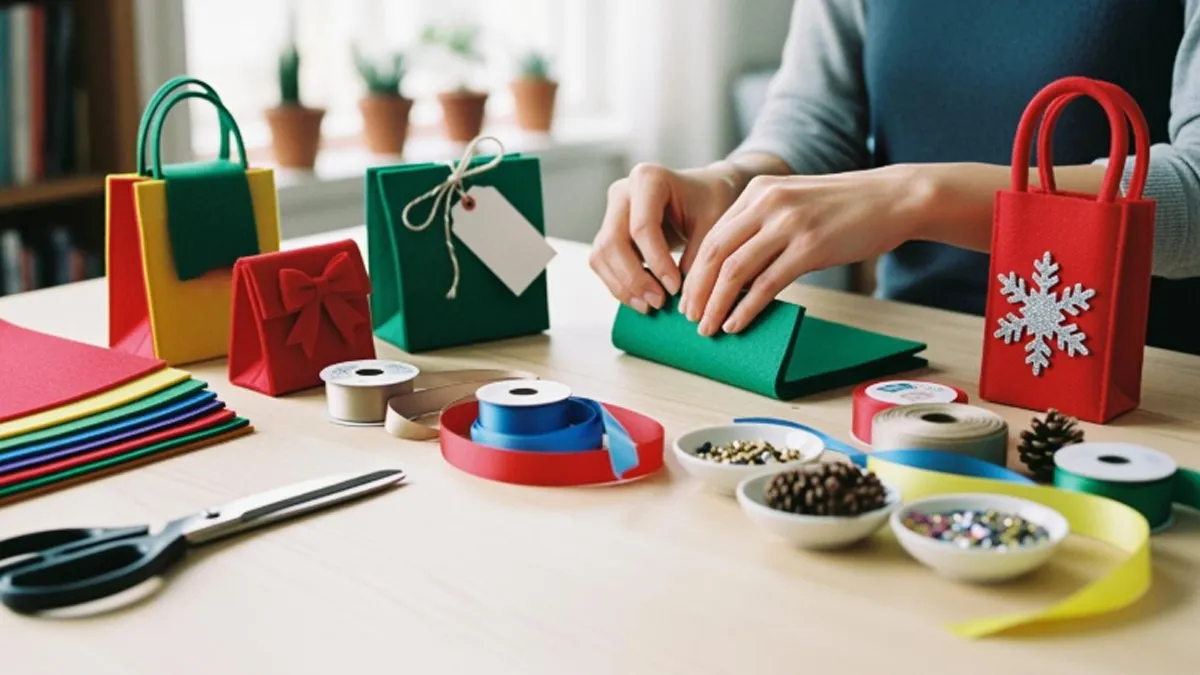
You can make diy felt gift bags at home with just a few simple steps. Grab some felt, pick your favorite template, and choose between a no-sew or sewn method. You get to personalize handmade felt bags for any event, like birthdays, weddings, or holidays. This diy project works for anyone, whether you are a beginner or love making handmade crafts. Try adding your own style to diy gift bags and see how easy it is to create something special.
Key Takeaways
- Pick the best felt for your project. Wool felt feels fancy, but polyester costs less.
- Use templates to make cutting easier. Templates help your bags look the same size and shape.
- Try both no-sew and sewn ways. No-sew is easy for beginners. Sewing makes bags stronger.
- Be creative with how you decorate. Add buttons, ribbons, or fabric paint to make your bags special.
- Clean your workspace before you begin. A neat area helps you work better and feel less stressed.
- Try making bags in cool shapes. Heart, star, or animal shapes make your gifts more fun.
- Think about the event when you design your bags. Pick colors and decorations for birthdays, holidays, or weddings.
- Keep practicing to get better. Start with easy designs. Try harder ones as you get more confident.
Materials and Tools

Felt Types
You have lots of choices when picking felt for your gift bags. Each type brings something special to your project. Here are the most popular options:
- Wool felt feels soft and warm. You might choose this if you want a luxury look or care about eco-friendly materials.
- Polyester felt costs less and feels light. Many people use it for shopping bags or promotional gifts.
- Blended felt mixes wool and polyester. This type gives you style and durability, perfect for mid-range bags.
- Needle felt works well for crafts. You can use it for small bags or unique designs.
If you want your bag made with felt to stand out, try mixing different types or colors. You can find felt sheets in craft stores or online. Some templates even suggest which felt works best for their design.
Cutting Tools
Getting clean edges makes your bag look neat and professional. You need the right tools for cutting felt. Here’s a quick guide:
| Cutting Tool | Description |
|---|---|
| Pinking Shears | Create a zigzag edge, great for decorative cuts. |
| Rotary Cutter | Cut straight lines with precision, especially when you use a cutting mat. |
| Embroidery Scissors | Help you snip fine details and work on intricate designs. |
You can also use fabric cutters or craft knives for advanced techniques. If you want a bag made with felt that has a fun edge, pinking or scallop shears add a playful touch.
Adhesives & Sewing
You don’t always need to sew your felt gift bag. Many adhesives work well for no-sew projects. Here are some top choices:
- Tacky glue is safe for kids and dries clear. It stays flexible but takes a while to dry.
- Hot glue dries fast and holds strong. Be careful, though—high heat can melt felt, and it’s not kid-friendly.
- Permanent glue gives the strongest hold and dries quickly. It has a strong smell, so use it in a well-ventilated area.
- Fabric glue bonds felt quickly and securely. Sometimes it soaks through, so test it first.
Avoid regular craft glue or glue sticks. They don’t stick well to felt. If you want extra durability, sewing is always a good option. You can use embroidery floss for a decorative touch or stick to regular thread for a simple finish. Some people even use brads or buttons instead of glue or stitches.
Tip: You can find high-quality felt bag templates online. The Felt Garden Tote Template is a favorite. It comes with clear instructions and lets you customize your bag for any occasion.
Gather your materials before you start. This helps you stay organized and makes the process smoother.
Decorations
Now comes the fun part—decorating your felt gift bags! You get to show off your creativity and make each bag feel special. Decorations can turn a simple felt pouch into a one-of-a-kind gift. You can go as simple or as fancy as you want. Here are some ideas and materials you might want to try:
Popular Decoration Materials
- Buttons: Sew or glue on colorful buttons for a playful look. You can use big or small ones, mix shapes, or even spell out initials.
- Ribbons: Tie a ribbon around the top or use it as a handle. Satin, grosgrain, or even twine all work well.
- Embroidery Floss: Stitch simple designs, borders, or even names. Embroidery adds a handmade touch that stands out.
- Beads & Sequins: Glue or sew on beads and sequins for sparkle. These work great for holiday or party bags.
- Iron-On Patches: Add instant flair with patches. You can find patches in almost any theme—flowers, animals, letters, or holiday icons.
- Stickers & Felt Shapes: Use felt stickers or cut out your own shapes. Hearts, stars, and flowers are easy to make and glue on.
- Pom-Poms & Tassels: Attach pom-poms or tassels to the drawstring or corners. These add a fun, boho vibe.
- Fabric Paint or Markers: Draw or write directly on the felt. Personalize with doodles, messages, or patterns.
Tip: Mix and match decorations to create a bag that matches the occasion. For example, use red and green for Christmas, or pastel colors for a baby shower.
Where to Find Decorations
You can find most decorations at craft stores, dollar stores, or online. Many stores sell themed packs for holidays or special events. If you want to save money, check your home for leftover ribbons, buttons, or beads from old projects.
Creative Decoration Ideas
| Occasion | Decoration Ideas |
|---|---|
| Birthday | Bright buttons, felt balloons, glitter glue |
| Wedding | White lace, pearls, gold ribbon |
| Christmas | Red pom-poms, green felt trees, jingle bells |
| Baby Shower | Pastel bows, animal patches, soft stickers |
| Halloween | Orange felt pumpkins, black cats, googly eyes |
You can also let kids help with decorating. Give them safe materials like stickers, felt shapes, or fabric markers. They will love making their own designs!
Decorating your felt gift bag is your chance to get creative. Try new ideas, mix colors, and don’t worry about making it perfect. The best part is seeing the smile when someone receives your handmade bag.
Prepare Materials
Choose Felt
Picking the right felt makes your gift bag project shine. You want something that looks good and lasts. Felt stands out because it resists fraying, so you can sew it or glue it without worrying about messy edges. It also feels soft and gives your bag a cozy, retro look. This style works great for holiday or seasonal bags and adds a special charm.
When you choose felt, think about these things:
- How thick do you want your bag? Thicker felt holds its shape better.
- What colors fit your theme? Bright colors pop for birthdays, while soft shades work for baby showers.
- Do you want a smooth or fuzzy finish? Each type gives a different feel.
- Will you sew or glue your bag? Some felt types work better for sewing.
You can find felt in craft stores or online. Try to pick a few colors so you have options for decorating.
Measure & Cut
Now it’s time to get your felt ready. Start by deciding how big you want your bag. Use a ruler or a template to mark out the size on your felt sheet. If you want a small pouch, a 6×9 inch rectangle works well. For a larger bag, try 9×12 inches.
Here’s a simple table to help you pick a size:
| Bag Type | Felt Size (inches) |
|---|---|
| Small Pouch | 6 x 9 |
| Medium Bag | 8 x 10 |
| Large Tote | 9 x 12 |
Cut along your lines with sharp scissors or a rotary cutter. Clean edges make your bag look neat. If you want a fun edge, try pinking shears for a zigzag pattern.
Tip: Save your felt scraps! You can use them for decorations or small projects later.
Organize Workspace
A tidy workspace helps you work faster and keeps your project stress-free. Start by sorting your felt by color. Use clear tubs or boxes so you can see what you have. Keep your scissors, glue, and thread in one spot. If you use embroidery floss, put each color in a numbered bag. This way, you grab what you need without searching.
Don’t throw away leftover felt pieces. Put all scraps in a special container. You might need them for adding shapes or fixing mistakes. When everything has a place, you spend less time looking for tools and more time creating.
Note: A clean and organized space makes crafting more fun and helps you finish your felt gift bag with a smile.
How to Make Felt Gift Bags
Fold & Cut Method
You want a simple way to make diy felt gift bags? Try the fold and cut method. This technique works great if you want a quick project with neat edges. You don’t need fancy tools or sewing skills. Here’s a step-by-step tutorial to guide you:
- Gather your supplies. You need heavy weight felt, sharp scissors, a straight edge, a printed pattern, and a marker.
- Print your pattern. Choose a template that matches the size you want. You can find free patterns online for diy felt gift bags.
- Trace the pattern onto the felt. Use the marker on the back side so lines won’t show on the finished bag.
- Cut out the shape. Work slowly and use a cutting mat to protect your table.
- Fold up your bag. Overlap the rounded tabs and thread the square tab through the slots. Your bag will take shape right away.
- Enjoy your creation. You can flatten the bag for easy storage or decorate it for any occasion.
Tip: Always use heavy weight felt. Thin felt won’t hold its shape and your bag might look floppy.
Common mistakes can happen if you rush. Don’t forget to protect your workspace when cutting. If you trace on the front, lines may show. Take your time and you’ll get a clean finish.
No-Sew Option
If you don’t want to sew, you can still make diy felt gift bags that look great. The no-sew option uses glue or staples. This method is perfect for beginners or kids. Here’s a full tutorial with easy instructions:
- Start with a piece of felt, about 17 x 11 inches.
- Fold the felt in half along the long side.
- Glue, staple, or hand sew down one side and across the bottom. If you use glue, let it dry before moving on.
- Make pillow case corners. Match the side seam to the bottom seam and sew or glue across the point, about 1 1/2 inches from the tip.
- Turn the bag right side out.
- Punch holes around the top edge, about 1 inch down and 1 inch apart. You need about 16 holes.
- Weave a chain or ribbon through the holes.
- Tie a bow with ribbon and secure it with a twist tie through slits in the felt.
No-sew bags are quick and easy. They work well for party favors or small gifts. If you want extra strength, staples hold better than glue. Sewn bags last longer, but glue is fine for light use.
Note: If you want to see each step, search for a video tutorial online. Watching someone make a bag helps you learn faster.
Sewn Option
Do you want your diy felt gift bags to last longer? Try the sewn option. Sewing gives your bag extra strength and a polished look. You don’t need a fancy machine. Hand sewing works too. Here’s how to make felt gift bags with stitches that look professional:
- Use a reverse-pattern foot and plain seam with a stitch length of 3. This makes strong seams.
- Cut two pieces for handles, each 4 cm wide and 50 cm long. Mark 7 cm from each end, then fold and stitch.
- Attach the handles by marking 5 cm from the top edge and 10 cm from the sides. Sew them securely to the bag.
- Choose embroidery floss for a decorative touch or regular thread for a simple finish.
Sewing takes a little practice. Your stitches affect how strong and neat your bag looks. If you want a clean edge, use a straight stitch. For a fun look, try a blanket stitch around the top.
Tip: If you’re new to sewing, start with a small bag. Practice your stitches before making a larger tote.
Sewn diy felt gift bags hold up well and look beautiful. You can add pockets, handles, or decorations. If you want more help, look for a tutorial with step-by-step photos.
You now know how to make felt gift bags using three easy methods. Pick the one that fits your style and skill level. Each technique lets you create a unique bag for any occasion.
Using Templates
Templates make your felt gift bag project much easier. You do not have to guess the size or shape every time. You just trace, cut, and assemble. If you want all your bags to look the same, templates are your best friend.
Why Use Templates?
- Templates give you a set shape and size for every bag. You do not have to measure each time.
- You can make many bags quickly. This helps a lot if you need party favors or gifts for a group.
- Templates help you avoid mistakes. You get clean lines and even sides every time.
- You can try new designs without starting from scratch.
Tip: If you want to save time, print your template on thick paper or cardboard. This makes tracing easier and keeps your lines straight.
How to Use a Template for Felt Gift Bags
- Pick a template that matches your style. You can find free templates online or make your own with paper and a ruler.
- Print or draw the template. Cut it out carefully.
- Place the template on your felt sheet. Hold it steady or pin it down.
- Trace around the template with a fabric marker or chalk. Use light lines so they do not show on your finished bag.
- Cut along the traced lines with sharp scissors or a rotary cutter. Take your time for smooth edges.
- Follow the folding and assembly steps from your template. Some templates show where to glue or sew.
Where to Find Templates
You can find felt bag templates on craft blogs, Pinterest, and websites like Etsy. Many templates come with step-by-step guides or even video tutorials. If you like to watch and learn, search for “felt gift bag template tutorial” on YouTube. Seeing someone else make a bag can help you understand each step.
Template Tips for a Pro Finish
- Use a template for every bag if you want them to match.
- Store your favorite templates in a folder. You can reuse them for birthdays, holidays, or any event.
- Try different shapes. Some templates make square bags, others make pouches or totes.
- If you want to add decorations, look for templates with space for names or designs.
Note: Templates are not just for beginners. Even expert crafters use them to save time and get perfect results.
Using templates turns a tricky project into a fun and easy craft. You get neat, professional-looking bags every time. Try a few templates and see which ones you like best. You might even design your own!
DIY Felt Gift Bags Customization
Color & Pattern Ideas
You get to choose any color you like for your felt gift bags. Bright colors make your bag stand out at birthday parties. Soft colors work well for baby showers or spring events. You can mix colors to create stripes or blocks. Try using two shades for a fun look. If you want something bold, pick neon or metallic felt.
Patterns add personality to your diy project. You can cut shapes like hearts, stars, or circles and glue them on. Polka dots look playful. Stripes feel classic. You might even try animal prints or zigzag edges. If you want a simple design, use one color and add a border with fabric paint or markers.
Tip: Lay out your colors and patterns before you glue or sew. This helps you see what works best.
Add Names or Messages
Personalizing your felt gift bag makes it extra special. You can add names, initials, or short messages. Use fabric markers to write directly on the felt. If you want a raised look, cut out letters from another color of felt and glue them on. Embroidery floss lets you stitch names or words for a handmade touch.
Here are some easy ways to add messages:
- Write with fabric markers or paint pens.
- Cut out felt letters and glue them in place.
- Stitch names using embroidery floss.
- Attach letter beads for a playful style.
You can add a message like “Happy Birthday,” “Congrats,” or “Thank You.” This makes your gift feel personal and thoughtful.
Themed Designs
You can match your felt gift bag to any holiday or special occasion. Themed designs make your bag unique and fun. For example, you might use red and green for Christmas or orange and black for Halloween. Graduation bags can show school colors or symbols. You can also create bags for weddings, baby showers, or anniversaries.
Check out this table for themed design ideas:
| Theme | Description |
|---|---|
| Graduation | A themed gift set that reflects the graduate’s interests and achievements. |
| Holidays | Custom designs that celebrate specific holidays, enhancing the festive spirit. |
| Special Occasions | Personalized options that cater to the unique tastes of the recipient. |
You can decorate with felt shapes, ribbons, or patches that fit the theme. For a holiday bag, add felt snowflakes or pumpkins. For a graduation, use felt stars or diplomas. If you want a wedding bag, try lace, pearls, or soft pastel colors.
Note: Themed designs help your diy felt gift bags stand out and show you care about the occasion.
Unique Shapes
You do not have to stick with just rectangles or squares when you make felt gift bags. You can try all kinds of unique shapes to make your gifts stand out. Shaped bags add a fun twist and show off your creativity. People love getting a gift in a bag that looks like something special!
Popular Unique Shapes for Felt Gift Bags:
- Hearts: Perfect for Valentine’s Day, anniversaries, or just to show someone you care. Cut two large heart shapes, glue or sew around the edges, and leave the top open.
- Stars: Great for birthdays, graduations, or holiday parties. Use a star template, trace it onto your felt, and cut out two matching stars.
- Animals: Try making a bunny, bear, or cat-shaped bag. Add felt ears, eyes, and a nose for extra charm.
- Flowers: A flower-shaped bag works well for spring events or Mother’s Day. Use bright colors and layer petals for a 3D effect.
- Holiday Icons: Make bags shaped like pumpkins for Halloween, trees for Christmas, or eggs for Easter.
Tip: Use cookie cutters or print shapes from the internet as templates. This helps you get even, neat outlines every time.
How to Make a Unique Shape Felt Bag:
- Pick your shape and find or draw a template.
- Trace the shape onto two pieces of felt.
- Cut out both pieces carefully.
- Decorate the front piece before you assemble the bag. Add eyes, patterns, or extra felt pieces.
- Glue or sew around the edges, leaving an opening at the top.
- Add a handle or ribbon if you want to carry the bag.
You can also mix shapes. For example, make a round bag and add felt petals to turn it into a flower. Try a rectangle with animal ears for a cute twist.
| Shape | Best For | Decoration Ideas |
|---|---|---|
| Heart | Valentine’s, Love | Glitter, lace, buttons |
| Star | Parties, Holidays | Sequins, gold thread |
| Bunny | Easter, Kids | Pom-pom tail, felt eyes |
| Pumpkin | Halloween | Black felt face, leaves |
| Flower | Spring, Mother’s | Layered petals, beads |
Note: Unique shapes may take a little more time, but the results are worth it. Your friends and family will remember your creative gift bag long after the gift is gone.
Don’t be afraid to experiment. Try new shapes and see what you like best. You might even invent a new favorite! Unique shapes turn a simple felt bag into a mini work of art. Have fun and let your imagination lead the way.
DIY Felt Gift Pouch Ideas
Small Pouch Styles
You can make so many different small pouch styles with felt. These pouches are handy for organizing little things or giving gifts in a creative way. Some people like to sew their pouches by hand, while others prefer a simple DIY approach. You might use these pouches for craft supplies, personal items, or even baby essentials. Take a look at this table to see which pouch style fits your needs:
| Pouch Style | Typical Uses |
|---|---|
| Hand-sewn felt pouches | Craft supplies, personal items |
| DIY felt pouches | Diapers, wipes, calling cards |
You can pick a style that matches your skill level. If you want a quick project, try a basic rectangle pouch. If you feel creative, experiment with shapes like circles or triangles. These pouches make great party favors or small gifts for friends.
Drawstring Closures
Drawstring closures make your diy felt gift pouch easy to use. You just pull the string to open or close the pouch. Kids love them because they can open and close the pouch without help. You get flexibility, too. You can adjust how tight the pouch closes, so your items stay safe inside.
Tip: Drawstring bags work well for storing jewelry, coins, or small toys. You can use them for travel or everyday organization.
Here are some reasons why drawstring closures are a smart choice:
- Drawstring bags are intuitive to use, making them easy to open and close quickly.
- You can adjust the tightness of the closure based on your needs, providing versatility for different situations.
When you make a drawstring pouch, you need the right material for the string. Here are some good options:
- Cotton: Soft and lightweight, allowing drawstrings to glide smoothly for easy opening and closing.
- Synthetic materials: May have more friction, but high-quality options ensure effective drawstring functionality.
You can match the color of the drawstring to your pouch or pick a bold color for contrast. Try adding beads or knots at the ends for a fun touch.
Embellishments
Decorating your felt pouch is the best part. You can turn a simple pouch into something special with just a few extras. Ribbons and bows always look classic and make any gift feel fancy. If you want to add personality, try miniature charms or personalized stickers. These little details show you care and make your pouch unique.
- Ribbons and bows are classic embellishments that can elevate any gift.
- Miniature charms and personalized stickers add a whimsical or personal touch.
- Decorative pins can enhance the overall aesthetic and reflect the recipient’s personality.
You can mix and match embellishments to fit the occasion. For a birthday, add a bright ribbon and a fun sticker. For a holiday, use themed charms or pins. If you want your pouch to stand out, try layering different decorations. Your diy felt gift pouch will look amazing and make your gift extra memorable.
Tips & Troubleshooting
Common Mistakes
You might run into a few bumps when making felt gift bags. Don’t worry—everyone makes mistakes, especially when you try something new. Here are some common problems and how you can fix them:
- Uneven Edges: If your cuts look jagged, use sharper scissors or a rotary cutter. Always cut slowly and follow your template.
- Glue Bleed-Through: Sometimes glue soaks through the felt and leaves marks. Test your glue on a scrap piece first. Use just enough glue to hold the felt together.
- Crooked Seams: If your seams don’t line up, pin or clip the felt before you sew or glue. Double-check your edges before you start.
- Loose Decorations: Buttons, beads, or patches might fall off if you don’t secure them well. Sew them on or use a strong fabric glue.
- Bag Won’t Hold Shape: Thin felt can make your bag floppy. Choose thicker felt for sturdy bags.
Tip: If you make a mistake, you can often fix it by adding a decoration or trimming the edge. Mistakes sometimes lead to new ideas!
Professional Finish
You want your felt gift bag to look polished and neat. Here are some tricks to help you get that professional touch:
| Technique | How It Helps |
|---|---|
| Use Templates | Keeps shapes and sizes consistent |
| Press Seams | Makes edges crisp and flat |
| Trim Threads | Removes loose ends for a clean look |
| Match Colors | Gives your bag a stylish feel |
| Add Lining | Makes the inside look finished |
Try pressing your seams with a warm iron (use a cloth between the iron and felt). Trim any stray threads or glue spots. Pick colors that go well together. If you want to get fancy, add a lining inside your bag. This hides stitches and glue, making your diy project look store-bought.
Note: Small details make a big difference. Take your time and check your work as you go.
Beginner Tips
Starting with felt gift bags is easy, even if you’ve never made one before. Here are some tips to help you feel confident:
- Read all instructions before you start. Gather your materials so you don’t have to stop and search.
- Practice on scrap felt. Try cutting, gluing, or sewing before you work on your real bag.
- Use simple shapes at first. Rectangles and squares are easier than stars or animals.
- Watch a video tutorial if you get stuck. Seeing someone else make a bag helps you learn faster.
- Ask for help if you need it. Friends or family might enjoy crafting with you.
Tip: Don’t stress about perfection. Handmade bags have charm because they show your effort and creativity.
You can make beautiful felt gift bags with a little patience and practice. Each bag gets easier, and you’ll find your own style as you go.
Creative Uses
Gift Occasions
You can use felt gift bags for almost any event. These bags work well for birthdays, weddings, and even corporate gatherings. You get to pick designs that match the occasion. For a birthday, you might choose bright colors and playful shapes. Weddings call for elegant styles, maybe with lace or pearls. If you need something for a business event, try navy, gold, or silver for a classy look. Holidays are perfect for themed bags. You can make a bag with snowflakes for winter or pumpkins for fall.
Here’s a table to help you match your diy felt gift bag to the right event:
| Occasion | Design Choices |
|---|---|
| Birthdays | Colorful and playful designs |
| Weddings | Elegant and sophisticated designs |
| Corporate Events | Sophisticated colors like navy, gold, or silver |
| Holidays | Varied designs based on the holiday theme |
You can fill these bags with small holiday gifts, treats, or keepsakes. People love getting something handmade that fits the celebration. You get to show your creativity and make every gift feel special.
Storage
Felt gift bags are not just for giving presents. You can use them to organize your things at home or school. These bags keep your desk tidy and help you find small items fast. You might store craft supplies, jewelry, or even snacks. Some people use felt pouches for coins, keys, or headphones. You can make a bag with a drawstring to keep everything safe inside.
Tip: Use different colors for each type of item. You will know what’s inside without opening every bag.
If you want great handmade gift ideas, try making a set of felt bags for someone who loves to organize. You can decorate each bag with a label or a fun shape. These bags last a long time and look cute on any shelf.
Party Favors
You can turn felt gift bags into party favors that guests will remember. These bags work for tea parties, baking parties, or any fun event. You might fill them with felt food sets, like cookies or cupcakes. For a vintage tea party, pack felt cookies in a small tin. You can split a felt food set so each guest gets a piece. Kids love these creative favors, and adults enjoy the handmade touch.
- Felt food sets for tea parties
- Felt food sets for baking parties
- Felt cookies packed in a tea tin for vintage tea parties
- Splitting a felt food set among guests
You can match the bag design to your party theme. For a holiday party, use festive colors and shapes. For a birthday, add a name or a special message. These diy bags make every guest feel welcome and add a personal touch to your celebration.
Conclusion
Making diy felt gift bags at home is simple and fun. You can pick different shapes, colors, and decorations for any event. These bags look nice and are good for the planet, too:
- Reusable felt gift bags use earth-friendly materials and last a long time.
- You make less trash because you can use them over and over.
- Each bag is a useful, handmade present for someone.
If you want to buy a lot of diy felt gift bags or need special designs, we can help you. Take a look at what we offer:
| Service Type | Details |
|---|---|
| Customization Options | Choose felt thickness, color, and how it closes (snap button or drawstring) |
| Logo Printing | Pick screen printing, hot stamping, or embroidery for your logo |
| Minimum Order Quantities | You can order from 500 up to 50,000 bags |
| Order Process | Ask us, get a price, design, we make them, then deliver |
You can design your own bags, or let our experienced manufacturing team create the perfect bags for your brand. We specialize in custom design, wholesale, OEM, and ODM services.
FAQ
How do I keep felt gift bags from fraying?
You do not need to worry about fraying. Felt does not unravel like other fabrics. You can cut it into any shape, and the edges stay neat. If you want extra smoothness, trim the edges with sharp scissors.
Can I wash felt gift bags?
You can spot clean felt bags with a damp cloth. Avoid soaking them in water. Felt may lose its shape if it gets too wet. For stains, gently dab with mild soap and water.
What glue works best for no-sew felt bags?
Tacky glue or fabric glue works great for felt. Hot glue also holds well but can get messy. Always test your glue on a scrap piece first to see how it dries.
How do I make my felt bag sturdier?
Use thicker felt for a strong bag. You can also add a lining or double up the felt layers. Sewing the edges instead of gluing gives extra strength.
Where can I find templates for felt gift bags?
You can find free templates on craft blogs, Pinterest, and YouTube. Many websites offer printable patterns. Try searching for “felt gift bag template” to get started.
Can kids help make felt gift bags?
Yes! Kids love making felt bags. Choose the no-sew method for safety. Let them decorate with stickers, felt shapes, or fabric markers. Always supervise when using scissors or glue.
What can I put inside a felt gift bag?
You can fill felt bags with candy, jewelry, small toys, or gift cards. They also work for party favors, holiday treats, or handmade crafts. The possibilities are endless!
How do I add a drawstring to my felt pouch?
Punch holes near the top edge of your pouch. Thread a ribbon or cord through the holes. Tie the ends together. Now you have an easy drawstring closure!


