
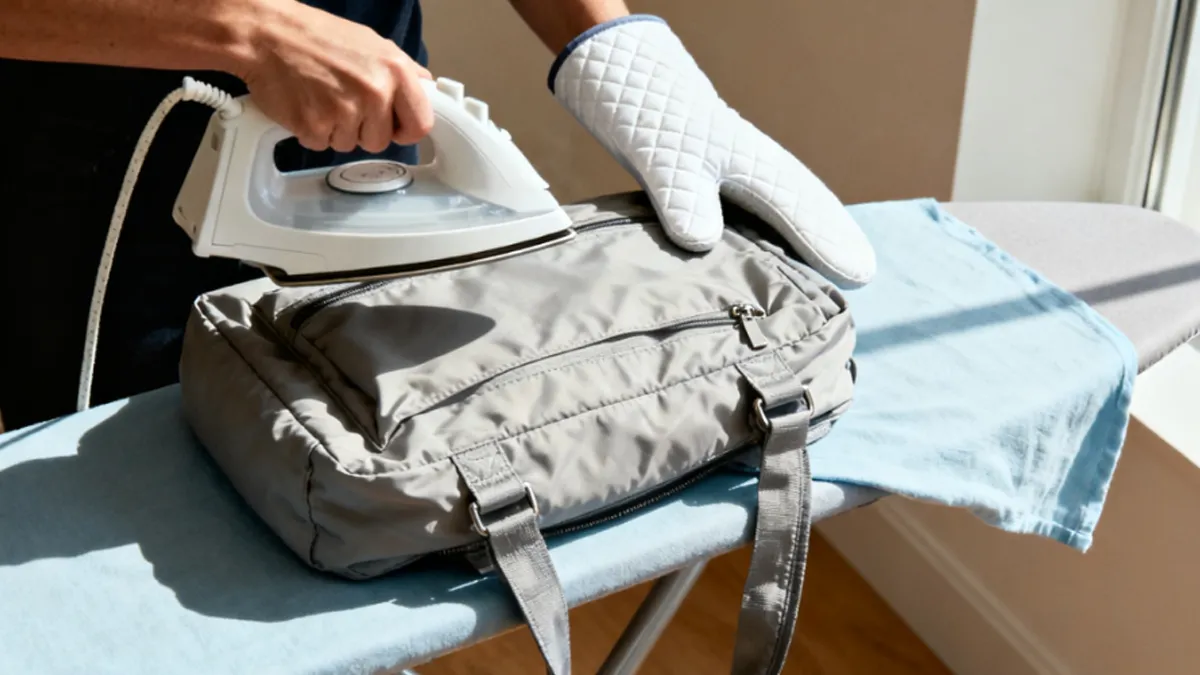
So, can you iron on nylon bags? Yes, but you must be very careful. Nylon can melt or change shape if it gets too hot. Look at the main risks before you begin:
| Risk Type | Description |
|---|---|
| Melting or scorching of fabric | Nylon melts easily because it has a low melting point. Too much heat can ruin it forever. |
| Possible shrinkage or deformation | High heat can make nylon shrink. This can change the shape of your bag or clothes. |
| Risk of toxic fumes emission | Too much heat can make nylon give off bad gases. Breathing these gases can hurt your lungs and health. |
If you hurry or skip steps, you could ruin your bag. You might also breathe in harmful fumes. Always take your time and use safe methods.
Key Takeaways
- You can iron nylon bags, but you must be careful. If you are not careful, the fabric can melt or change shape.
- Use the lowest heat setting on your iron. The best temperature is between 230-275°F. This helps keep the nylon safe.
- Always use a pressing cloth or parchment paper. It goes between the iron and the nylon. This stops the iron from touching the nylon directly.
- Clean the spot before you put on a patch. Make sure the area is dry. This helps the patch stick better.
- Try the iron on a hidden part of the bag first. This lets you see if anything bad happens before you start.
- If the patch does not stick, check the heat. Use a pressing cloth. You can press for a longer time, but do not make the iron hotter.
- You can use fabric glue or sewing instead. These ways do not use heat, so there is no risk of damage.
- Let the bag cool after ironing. This helps the glue set and keeps the patch in place.
Can You Iron on Nylon Bags
Heat Sensitivity
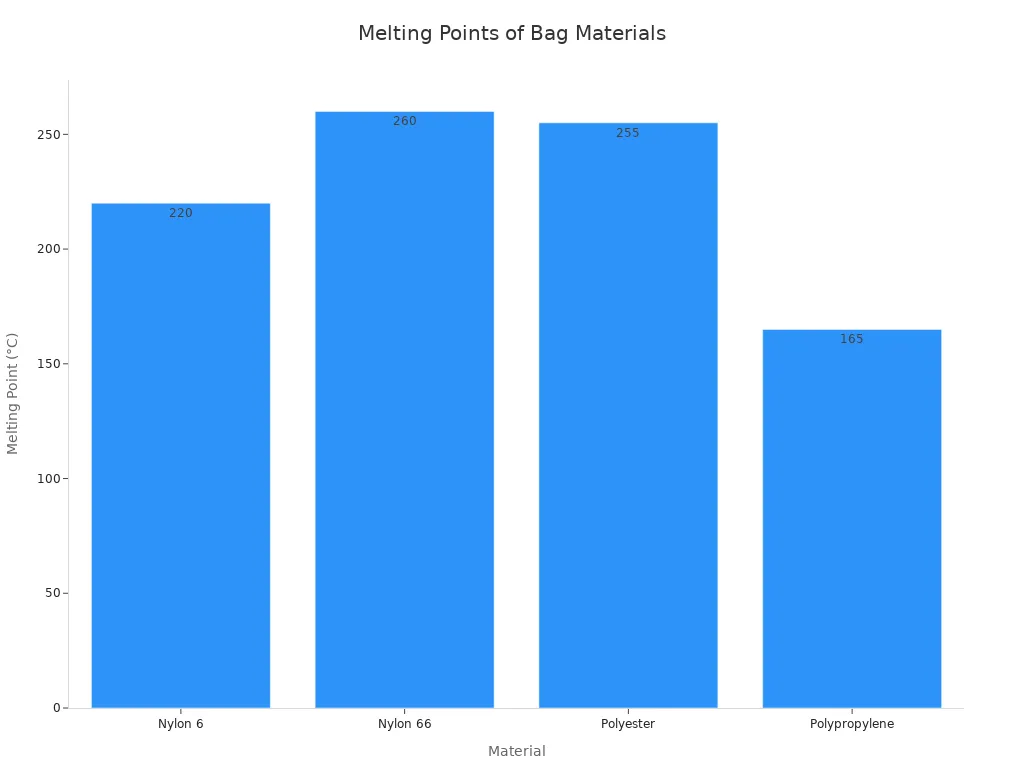
You might wonder, can you iron on nylon bags without ruining them? Nylon is very sensitive to heat. If you use too much heat, the fabric can melt or warp. Nylon has a lower melting point than many other bag materials. Take a look at this table to see how nylon compares:
| Material | Melting Point |
|---|---|
| Nylon 6 | 220°C |
| Nylon 66 | 260°C |
| Polyester | 250-260°C |
| Polypropylene | 160-170°C |
Nylon starts to change when you apply heat. At first, the fabric gets a little stronger and more flexible. If you keep heating it, the strength drops and the material becomes brittle. Here’s a quick look at what happens:
| Property | Effect of Heat | Explanation |
|---|---|---|
| Strength | Slight increase at moderate heat, then decreases | Bonds get flexible, then unstable |
| Flexibility | Increases | Chains move more, nylon gets softer |
| Durability | Decreases over time | Heat weakens structure, nylon gets brittle |
If you want to iron on a patch, you need to remember these changes. Nylon can handle a little heat, but not much.
Main Risks
Can you iron on nylon bags safely? You need to know the risks before you start. Nylon can melt, shrink, or change color if you use the wrong method. Here are the main problems people face:
- Inconsistent film thickness makes some spots heat up faster.
- Too much heat or pressing time causes wrinkling.
- Not enough cooling after ironing leads to shrinkage and warping.
- Poor heat resistance on the surface can make the bag curl outward.
- Nylon film can shrink too much and curl in an S-shape.
If you want your patch to look good, you must avoid these mistakes. Always check the bag’s surface and thickness before you start.
When Ironing Is Possible
So, can you iron on nylon bags at home? Yes, but you need special considerations for nylon. You should use the lowest heat setting on your iron. Most manufacturers recommend a temperature between 110-135°C (230-275°F). Always test the heat on a hidden part of the bag first.
Here are some tips to help you:
Tip: Always use a pressing cloth or parchment paper between the iron and the nylon. This barrier protects the fabric from direct heat.
- Set your iron to “cool” or the lowest setting.
- Place a pressing cloth over the spot where you want the patch.
- Press gently for a short time, then check the result.
- Let the bag cool before you touch the patch.
Nylon bags are best suited to iron-on patches if you follow these steps. If you rush or use high heat, you could damage the bag. Take your time and check your work often. You can iron on nylon bags, but you must use care and the right tools.
Materials and Tools
Essentials
Before you start adding patches to your nylon bag, you need to gather the right materials and tools. You want to make sure you have everything ready so you can work safely and get the best results. For ironing patches onto nylon, you need a dry iron. Steam can hurt the fabric, so always use the dry setting. You also need a pressing cloth. This can be a thin cotton cloth or even parchment paper. The pressing cloth keeps your bag safe from direct heat. You should also use a hard, flat surface like an ironing board. This helps spread the heat evenly and keeps your patch in place. Don’t forget your patches! Choose the ones that fit your style and the size of your bag.
Here’s a quick checklist for your project:
- Dry iron (no steam)
- Pressing cloth (thin cotton or parchment paper)
- Ironing board or flat surface
- Patches for nylon
- Clean nylon bag
When you have all these items, you’re ready to start. Having the right tools makes it much easier to attach patches without damaging your bag.
Choosing Patches or Vinyl
Not all patches work well on nylon. Some patches stick better and last longer. You want to pick patches made for nylon or similar materials. If you use the wrong patch, it might peel off or not stick at all. Some people also use vinyl designs instead of patches, but you need to make sure the vinyl is safe for nylon.
Check out this table to see which patches work best for nylon bags:
| Patch Type | Suitable Materials |
|---|---|
| Type A | Nylon, canvas, most fabrics, rubber, neoprene, most plastics, fiberglass, stainless steel, aluminum, polyethylene, polypropylene, polyurethane, non-oil leathers, sunbrella |
Type A patches are a great choice for nylon bags. They stick well and hold up over time. When you shop for patches, look for ones that say they work on nylon. If you want to use vinyl, make sure it is safe for heat and nylon surfaces.
You can find patches in many shapes, colors, and designs. Pick patches that show your style. You can even mix patches and vinyl for a cool look. Just make sure every patch you use is made for nylon.
Protective Barriers
Protective barriers are very important when you iron patches onto nylon. These barriers keep your bag safe from too much heat. If you skip this step, your patch could melt or your bag could get ruined.
Here are some of the best protective barriers you can use:
- Ironing blankets give you thick, heat-resistant padding.
- Magnetic ironing mats stick to metal surfaces and keep your bag steady.
- Thick white cotton towels work well and don’t transfer dye.
- Heat-resistant natural fabrics like cotton, linen, wool, or canvas are safe choices.
Stay away from delicate or synthetic materials like silk or polyester. They can melt and stick to your bag or patch. Always put your barrier between the iron and your patch. This step helps your patches stick without hurting your nylon bag.
When you use the right materials, patches, and barriers, you can add patches to your nylon bag safely. Take your time, follow each step, and your patches will look great and last a long time.
How to Iron on Patches
Prep the Bag
You want your iron on patches to stick well and look great. The first step in the process is to prep the bag. Start by making sure the area where you plan to attach patches is clean. Dirt or dust can stop the patch from sticking. Use a damp cloth to clean the spot. Let it dry before you move on. If you see any wrinkles or creases, iron them out using a low iron temperature. A smooth surface helps the patch bond better and makes the process easier.
Here’s a step-by-step process for prepping your nylon bag:
- Clean the area where you want to place the patch. Remove all dirt and debris.
- Dry the spot completely. Moisture can mess up the iron-on process.
- Iron out any wrinkles with a cool iron. You want a flat, clean and dry surface.
- Lay the bag flat on your ironing board. Make sure the area is easy to reach.
A clean and dry surface is key for attaching patches. If you skip this step, your patch might peel off later. Take your time and check the bag before you start the next part of the process.
Set Iron Temperature
Setting the right iron temperature is super important in the step-by-step process. Nylon can melt if you use too much heat. You want to keep your iron on the lowest setting. Most irons have a “synthetic” or “nylon” option. If yours doesn’t, just use the coolest setting you can find.
Here are some tips for setting the iron temperature:
- Always use low heat when working with nylon.
- Never use steam. Keep the iron dry.
- If you’re not sure, test the iron on a hidden part of the bag first.
- If you use adhesive for iron on patches, make sure it’s made for nylon and works at low temperature.
You want to avoid damage during the process. If you see the fabric changing color or getting shiny, stop right away. The step-by-step process works best when you keep the iron temperature low and check your progress often.
Use a Pressing Cloth
You need a pressing cloth for the iron-on patches process. This step protects your nylon bag from direct heat. Place a thin cotton cloth or parchment paper between the iron and the patch. The pressing cloth acts as a shield. It spreads the heat evenly and keeps the nylon safe. You don’t want the iron to touch the bag directly. That can melt or scorch the fabric.
Using a pressing cloth or parchment paper is a smart move. It helps you avoid water stains and keeps the patch looking neat. The process is simple. Lay the pressing cloth over the patch, then press down with the iron. Hold it for a short time, then check the patch. If you need more heat, add a few seconds. Always watch for signs of overheating during the step-by-step process.
The pressing cloth is one of the best methods for attaching patches to nylon. It makes the patch application method safer and more reliable. If you want your iron on patches to last, don’t skip this step in the process.
Iron on a Patch
Now you’re ready for the main part of the process—iron on a patch to your nylon bag. This step is where you see your design come to life. You want to make sure you follow each step closely so your iron on patches stick well and look great.
Start by placing your patch exactly where you want it. Make sure it sits flat and lines up with the edges. If you’re attaching patches with a special shape, double-check the placement before you begin. Lay your pressing cloth or parchment paper over the patch. This barrier keeps your nylon safe from direct heat.
Set your dry iron to medium heat. You don’t want it too hot, because nylon can melt. Hold the iron firmly and press down on the patch. Use even pressure and move the iron in a gentle circular motion. Keep pressing for about 30 to 45 seconds. This time helps the adhesive activate without overheating the nylon. If you want extra strength, flip the bag over and apply heat from the back for another 30 seconds. This step helps the patch bond better to the nylon.
Here’s a quick checklist for the process:
- Place the patch on the nylon bag.
- Cover with a pressing cloth or parchment paper.
- Set the iron to medium heat (no steam).
- Press down for 30 to 45 seconds.
- Flip the bag and press the back for 30 seconds.
Tip: Always start with less time. You can add a few seconds if the patch doesn’t stick. Watch for signs of overheating, like melting or color changes.
If you’re attaching patches with thick edges or special adhesives, check the instructions on the package. Some iron on patches need a little more time, but you should never rush the process. If you see the patch lifting, add a few seconds and press again. Keep checking the patch as you go. You want it to stick firmly without damaging the nylon.
Iron on patches work best when you use gentle pressure and keep the iron moving. Don’t leave the iron in one spot for too long. If you do, you might scorch the fabric or ruin the patch. The process takes a little patience, but you’ll get great results if you follow these steps.
Cool Down
After you finish ironing on a patch, let your nylon bag cool down. This part of the process is just as important as pressing. Cooling gives the adhesive time to solidify and form a strong bond. If you touch the patch too soon, you might mess up the adhesion. The patch could peel off or shift out of place.
Set your bag aside and let it rest for at least five minutes. Don’t rush this step. The process works best when you let the patch cool naturally. If you want to check the patch, wait until the bag feels cool to the touch. Gently press the edges to see if they stick. If you notice any lifting, you can repeat the process and add a few seconds of heat.
Note: Cooling is crucial for attaching patches to nylon. It helps the adhesive set and keeps your iron on patches looking neat and secure.
When you finish the process, your iron on patches should look smooth and feel secure. If you follow each step, you’ll get a strong bond that lasts. Iron on patches give your nylon bag a custom look, and the process is easy if you take your time.
Avoiding Damage
Test First
You want your patches to look perfect on your nylon bag, right? The first thing you should do is test before you start ironing. Grab a small patch and try it on a hidden part of your bag. This step helps you see how the fabric reacts to heat and pressure. If the patch sticks well and the nylon stays smooth, you can move on to the main area. If you notice any problems, you can adjust your method. Testing first is one of the most important things to take care of while ironing. You avoid surprises and keep your bag safe.
Here’s a quick way to test:
- Place a small patch on a hidden spot.
- Cover with a pressing cloth.
- Set your iron to the lowest temperature.
- Press for 20 seconds.
- Let it cool and check the patch.
If the patch looks good and the nylon feels normal, you’re ready for the real thing. If you see any damage, try lowering the temperature or using a thicker pressing cloth.
Watch Heat and Pressure
Heat and pressure can make or break your patch project. You need to watch both closely when you iron patches onto nylon. Too much heat can melt the fabric, and too much pressure can leave marks or make the patch look uneven. One of the best things to take care of while ironing is to use tools that protect your bag.
- Use a Teflon pillow to spread heat evenly and keep the iron from touching the nylon directly.
- Tuck drawstrings and extra bag material under the pillow. This trick helps you avoid pressing on sensitive spots.
- Pick a pillow that’s just bigger than your patch. You get better protection and a smoother finish.
Keep your iron on a low temperature. Press gently and don’t rush. If you use different sized pillows, you can match the pillow to the patch size. This step helps you get even results and keeps your patches looking sharp.
Tip: Always check the patch after pressing. If it lifts or looks wrinkled, add a few seconds of heat. Never leave the iron in one spot for too long.
Signs of Damage
You want to catch problems early when you iron patches onto nylon. Watch for signs of damage so you can stop before things get worse. Nylon is sensitive to heat, and it can melt or scorch if you’re not careful. You might see changes in the fabric’s texture or color. These signs mean you need to adjust your method.
Look for these early warning signs:
- Discoloration or fading around the patch
- Stiffness or rough texture where you pressed
- Loss of shape or warping near the patch edges
- Shiny spots or burn marks under the patch
If you spot any of these, stop right away. Let the bag cool and check the patch. Sometimes you can fix small problems by lowering the temperature or using a thicker barrier. Nylon can change forever if you use too much heat, so always watch for these signs.
Note: Nylon can melt or scorch quickly. Permanent changes in texture and appearance can happen if you ignore the warning signs. Always check your patches and patch area after each step.
When you pay attention to testing, heat, pressure, and damage signs, you keep your patches looking great. You protect your nylon bag and make sure every patch sticks the way you want.
Troubleshooting Iron on Patches
Patch Not Sticking
Sometimes, you press down with your iron and the patch just will not stay on your nylon bag. This can feel frustrating, but you can fix it. Here are some common reasons why patches do not stick:
- Nylon is a synthetic fabric. It does not always handle the heat needed for attaching patches.
- Some nylon bags have waterproof or water-resistant coatings. These coatings can stop the adhesive from bonding.
- Delicate nylon can get damaged by high heat, which means the patch glue does not melt and stick well.
If you notice your patch lifting at the edges, try these steps:
- Check if your iron is hot enough, but not too hot. Use the lowest setting that works for nylon.
- Always use a pressing cloth. This helps the heat reach the patch without hurting the bag.
- Press longer, but do not add more heat. Sometimes, patches need a little more time.
- If your bag has a coating, you might need to use fabric glue instead of heat.
Tip: Always test a small patch first before attaching patches to the main part of your bag.
Melting or Warping
You might see your nylon bag start to melt or change shape while you are attaching patches. This happens when the iron gets too hot or you press for too long. Melting can ruin both the patch and the bag.
Look for these signs:
- The patch area feels sticky or looks shiny.
- The bag loses its shape or gets wavy.
- The patch shrinks or curls at the edges.
If you see any of these, stop right away. Let the bag cool down. Next time, lower the heat and use a thicker pressing cloth. Always move the iron gently and never leave it in one spot. This keeps your patches looking neat and your bag safe.
Fixing Mistakes
Mistakes can happen when you are attaching patches. Maybe the patch is crooked, or you see bubbles under it. Do not worry. You can fix most problems with a few simple tricks.
- If the patch is not straight, reheat it with the pressing cloth and gently peel it off. Place it again and press.
- For bubbles, poke a small hole with a pin, cover with the pressing cloth, and press again.
- If the patch will not stick at all, try fabric glue or sew the patch on for extra hold.
Note: Always let your bag cool before you try to fix or move a patch. This helps the glue set and keeps your patches in place.
Troubleshooting helps you get the best results when attaching patches to nylon bags. With a little patience, you can make every patch look just right.
Alternatives to Ironing
Ironing is not the only way to attach a patch to your nylon bag. Sometimes, you want to avoid heat because nylon can melt or warp. You have other options that work well and keep your bag safe. Let’s look at three popular methods: adhesive vinyl, fabric glue, and sewing.
Adhesive Vinyl
Adhesive vinyl is a great choice if you want to add patches without using an iron. You can find vinyl patches that stick right onto your nylon bag. Just peel off the backing and press the patch onto the spot you want. This method is quick and easy. You do not need any special tools. You can even use your hands to smooth out the patch.
Adhesive vinyl patches come in many shapes and colors. You can pick a patch that matches your style. These patches work well for light use. If you want to change the look of your bag often, this is a good option. Just remember, adhesive vinyl patches may not last as long as other methods if you use your bag every day.
Tip: Clean the area before you stick on the patch. This helps the adhesive hold better.
Fabric Glue
Fabric glue is another safe way to attach patches to nylon bags. You do not need heat, so you avoid the risk of melting your bag. When you use fabric glue, you get a strong bond that keeps your patch in place.
Here are some tips for picking the right glue for your patches:
- Choose a low-temperature, flexible adhesive made for nylon or synthetic fabrics.
- Do not use a hot iron with glue. This can melt the nylon.
- Test the glue on a hidden part of your bag first. Make sure it works well with your patch and fabric.
To use fabric glue, put a thin layer on the back of your patch. Press the patch onto the bag and hold it for a few seconds. Let the glue dry for several hours. You get a neat look and your patches stay put.
Sewing
Sewing is the best way to make sure your patch stays on your nylon bag for a long time. You use a needle and thread to attach the patch. This method takes more time and skill, but it gives you the strongest hold. If you use your bag a lot or carry heavy things, sewing is a smart choice.
Here’s a quick look at how sewing compares to ironing:
| Method | Advantages | Disadvantages |
|---|---|---|
| Iron-On | Quick and hassle-free application | Less durable, may not withstand heavy use |
| Sew-On | Superior durability, suitable for frequent wear | Requires more time and skill for application |
Sewing works well for all types of patches. You can use it for big or small patches. If you want your patch to last, grab a needle and thread. You can even sew around the edges of an iron-on patch to make it extra strong.
Note: If you are new to sewing, ask a friend or family member for help. Practice on an old bag before you sew patches on your favorite one.
You have many ways to add patches to your nylon bag. Try adhesive vinyl for quick changes, fabric glue for a strong hold without heat, or sewing for the best durability. Pick the method that fits your needs and style. Your bag will look great with every patch you add!
Custom Nylon Bags
OEM/ODM Services
Do you want a nylon backpack that is different from others? You can get one made just for you with OEM and ODM services. These services let you design your own bag. You can pick the size, color, and type of zipper. Many companies offer these choices, so you can make a bag that fits what you want.
Here’s a quick look at what you can change:
| Customization Category | Description |
|---|---|
| Materials | You can pick nylon, polyester, canvas, or other special materials. |
| Color | You can choose any color and match it with Pantone colors. |
| Imprint Methods | You can use screen printing, digital printing, or embroidery. |
| Accessories | You can pick zippers, straps, and other hardware you like. |
| Branding | You can add silicone patches or woven labels for your brand. |
| Packaging | You can choose polybags, drawstring bags, or boxes for packaging. |
You can get a nylon backpack in your favorite color or with your logo. Maybe you want special pockets for school stuff or a strong zipper for trips. You can even add your own patch or label. These services help you get a bag that matches your style and what you need.
Tip: If you want to put an iron-on patch on your backpack, ask which fabric and imprint method works best for your design.
INITI Bag
If you want a nylon backpack that looks cool and is strong, INITI Bag is a good choice. They make custom nylon bags with features that make them special. You can pick from many options, so your bag fits your life.
See what makes INITI Bag stand out:
| Feature | Description |
|---|---|
| Premium Nylon Material | The bags are tough, water-resistant, and last a long time. |
| Functional Design | They have zipper closures, lots of pockets, and neat stitching. |
| Eco-Friendly Options | The bags are reusable and help cut down on waste. |
| Wide Applications | You can use them for makeup, travel, as totes, or for giveaways. |
| Customization Options | You can add your logo, pick colors, add features, or get special packaging. |
You can use your nylon backpack for school, trips, or as a gift. INITI Bag lets you add your logo, pick your favorite color, and choose extra things like more pockets or eco-friendly fabric. Their bags work for many things, like carrying books or packing for a trip.
If you want a bag that shows who you are, INITI Bag makes it simple. You can go to their website to see all the ways to make your nylon backpack special. Their team helps you choose the best options, so your bag lasts and looks good.
Note: INITI Bag’s custom nylon backpacks are great if you want to add patches or make a special look for your group or event.
You can put patches or vinyl on your nylon bag if you use low heat and a pressing cloth. If you are not sure, you can try other ways. Sewing makes patches stay on tightly. Fabric glue that bends works well for nylon. You can also use fun ideas to decorate without heat.
INITI Bag lets you design your own bag with OEM/ODM services. Here are some choices you can pick:
| Customization Aspect | Details |
|---|---|
| Size | You can choose any size |
| Material | Many materials to pick |
| Color | Solid, printed, or mixed |
| Branding | Embroidery, silk screen printing, heat transfer, or metal plates |
You get to decide how your bag looks and what features it has.
FAQ
Can you use a regular iron on nylon bags?
Yes, you can use a regular iron. Set it to the lowest heat. Always use a pressing cloth or parchment paper. Never let the iron touch the nylon directly. This keeps your bag safe from melting.
How do you know if the patch is secure?
Let the patch cool. Gently tug at the edges. If it lifts, press again for a few seconds. Always check for smooth edges and no bubbles. A secure patch feels flat and sticks well.
What should you do if the nylon starts to melt?
Stop ironing right away. Let the bag cool. Check the damage. If the spot is small, you might cover it with a patch. For big melted spots, you may need a new bag.
Can you wash a nylon bag with iron-on patches?
Yes, you can wash it. Turn the bag inside out. Use cold water and gentle soap. Air dry the bag. Avoid hot water and dryers. This helps patches stay on longer.
What kind of patches work best on nylon?
Look for patches labeled “for nylon” or “Type A.” These patches stick better and last longer. Avoid thick or heavy patches. Thin, flexible patches work best for nylon bags.
Is it safe to iron vinyl designs onto nylon?
You can iron vinyl onto nylon, but use low heat. Always use a pressing cloth. Test on a hidden spot first. Some vinyl may not stick well or could melt, so check the instructions.
Can you remove an iron-on patch from nylon?
Yes, you can remove it. Reheat the patch with a pressing cloth. Gently peel it off while warm. If glue remains, use a little rubbing alcohol to clean the spot.
Do you need special glue for nylon patches?
Yes, use fabric glue made for nylon or synthetic fabrics. Regular glue may not stick well. Always test the glue on a hidden area first.


