You want to know how to make a tennis bag at home? You can do it with just a few steps and some basic sewing skills. Start by gathering your materials and picking a design that fits your style. If you follow clear instructions, you will see how to make a tennis bag that holds everything you need. Many people wonder how to make a tennis bag strong, stylish, and practical. You can look for free PDF instructions and sew along videos online. With a little patience, you will learn how to make a tennis bag that stands out from any store-bought tennis tote bag. Try it and see how to make a tennis bag your own!
Key Takeaways
- Collect important materials like tough fabrics and zippers so your tennis bag will last and look good.
- Pick a design that works for you, like a backpack, tote, or duffel bag, to make playing tennis better.
- Use the right sewing tools, such as sharp scissors and pins, to make sewing simpler and more fun.
- Add pockets and sections to keep your things neat and easy to find during matches.
- Make seams stronger and use good closures so your bag can handle many games.
- Make your bag special with decorations like patches or embroidery to show your style.
- Follow cleaning and care tips to keep your tennis bag clean and help it last longer.
- Go slowly with each step, and ask for help or check online guides if you need it.
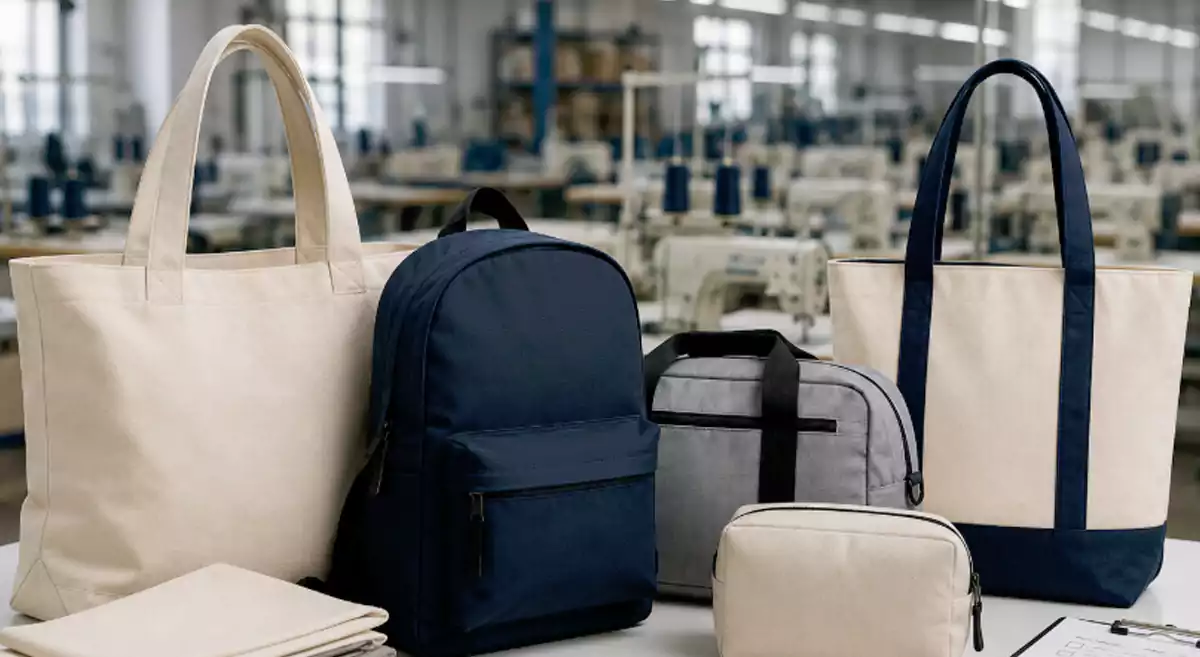
How to Make a Tennis Bag: Materials & Tools
Before you start making your tennis bag, you need to gather the right materials and tools. Picking the best supplies will help your bag last longer and look great. Let’s break down what you need for each part of your project.
Essential Fabrics & Lining
You want your tennis bag to be strong and stylish. Many people use home decor weight cotton for the outside of the bag. This fabric comes in many colors and patterns, so you can show off your style. For extra strength, you can also use fabrics like ballistic nylon or polyester. These materials resist tears and abrasions, so your bag can handle rough use. If you want to protect your gear from rain, look for water-resistant fabrics.
For the inside lining, fleece works well. It feels soft and helps cushion your rackets and other items. Some people add a layer of interfacing between the outer fabric and the lining. This gives the bag more shape and support. If you want a sturdy bottom, try using a stiff plastic place-mat. Cut it to fit and slide it into the base of your bag for extra strength.
Tip: Choose fabrics that are easy to clean. Tennis bags can get dirty fast, so you’ll want something you can wipe down or toss in the wash.
Hardware & Accessories
A good tennis bag needs more than just fabric. You’ll want to add hardware and accessories to make it useful. Here are some items you might want to include:
- Zippers for the main compartment and pockets
- D-rings or swivel hooks for adjustable straps
- Webbing for strong handles
- Velcro or magnetic snaps for easy closures
- Clover Wonder Clips to hold thick layers together while you sew
You also need to think about what you’ll carry in your bag. Most players pack:
- Multiple rackets (two or three)
- Extra sets of strings
- Overgrips and vibration dampeners
- Tennis balls
- Water bottles and electrolyte drinks
- Snacks, towels, sweatbands, hats, and sunscreen
Adding special pockets for these items will keep your bag organized and ready for the court.
Sewing Tools & Notions
Having the right tools makes your sewing project much easier. Here’s a list of what you should have on hand:
- Needles: sharp pointed, blunt pointed, and curved for different tasks
- Scissors and a rotary cutter for cutting fabric
- Pins and quilting clips to hold pieces together
- Tape measure for checking sizes
- Seam ripper for fixing mistakes
- Thimble and thread snips for comfort and quick trimming
If you use sturdy tools and take your time, you’ll find sewing your tennis bag much more enjoyable. Remember, a little patience goes a long way!
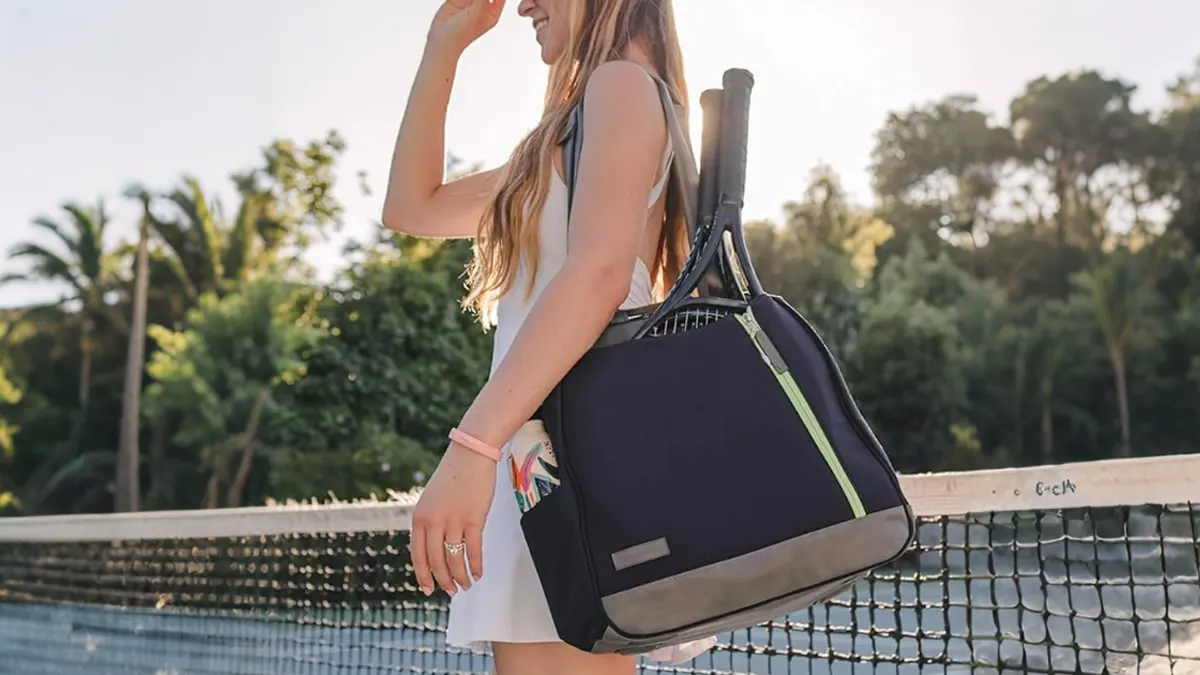
DIY Tennis Bag Design Choices
Size & Shape Options
When you start your diy tennis bag project, you get to pick the size and shape that fits your needs. Players like different styles for different reasons. Here are some popular choices:
- Backpacks: These work well for commuting. You get comfortable straps and handy compartments. They protect your gear but may not shield your racquets as much as other styles.
- Tote Bags: These look stylish and give you quick access to your stuff. You can fit one or two racquets inside. They don’t always have special pockets, but they’re easy to carry.
- Duffel Bags: These offer lots of space. You can pack several racquets and extra gear. They might not organize your equipment as neatly, but you won’t run out of room.
- 3-Racquet Bags: These simple bags suit beginners. You get space for accessories and easy carrying.
- Versatile Backpacks: Many players like these for their padded sections. You can carry racquets and other items safely.
Think about how many racquets you want to carry. If you play often, you might want a bigger bag. If you just need something for practice, a smaller style works fine.
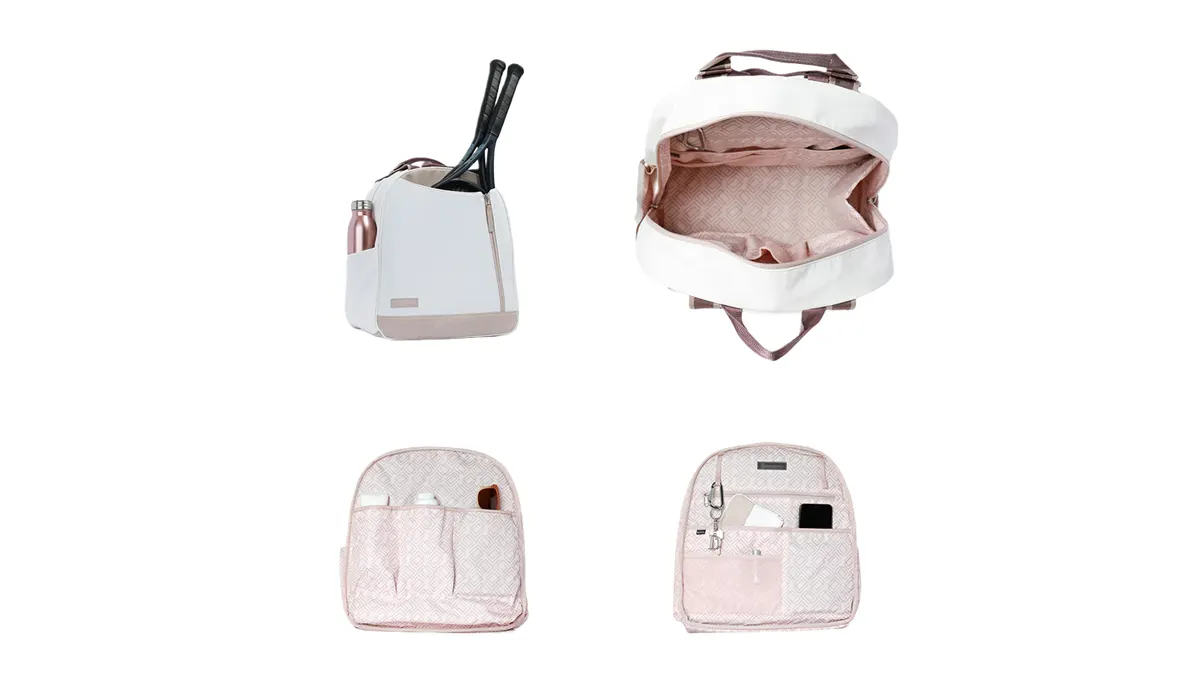
Features: Pockets & Straps
You can customize your diy tennis bag with features that make your life easier. Players often ask for special pockets and adjustable straps. Here’s a quick look at what you can add:
| Feature | Description |
|---|---|
| Racket compartments | Three large sections for your racquets |
| Wet pocket | A spot for sweaty clothes or wet towels |
| Outer pockets | Two big pockets for balls and accessories |
| Adjustable straps | Padded backpack straps you can change |
| Grab handles | Handles on the top and ends for easy lifting |
You can also pick colors and add your own logo. Some bags let you choose from eight base colors and fifteen pocket colors. You get to decide if you want a handle on top, a side handle, or deluxe backpack straps. If you need to carry a lot, look for a bag that fits up to six racquets.
Tip: Make a list of what you want to carry. This helps you decide which pockets and straps to add to your diy tennis bag.
Finding Patterns & Tutorials
You don’t have to design your bag from scratch. Many free patterns and tutorials are available online. Search for a tennis bag tutorial that matches your skill level. You can find step-by-step guides, sew along videos, and printable PDF patterns. These resources show you how to cut fabric, sew seams, and add features.
If you want to customize your bag, look for a tutorial that explains how to change pocket sizes or add extra straps. You can watch videos to see each step in action. This makes your diy project easier and more fun.
Note: Try different tutorials until you find one that fits your style. You can mix ideas from several guides to create a tennis bag that’s truly your own.
Pattern Preparation
Measuring & Drawing
You want your tennis bag to fit your gear perfectly. Start by grabbing your measuring tape, a ruler, and some large sheets of paper. If you have old newspaper or craft paper, that works great. Lay your tennis racket on the paper. Trace around it, leaving at least 2 inches of space all the way around. This extra space gives your bag room for seams and padding.
Next, decide how deep you want your bag. Most tennis bags need about 4 to 6 inches of depth. Use your ruler to draw straight lines for the sides and bottom. If you want pockets or special compartments, sketch those shapes on the paper too. You can use a different color marker for each part. This helps you see where everything will go.
Tip: Write labels on each piece you draw. Mark which part is the front, back, side, or pocket. This makes it easier when you start cutting.
If you want a more professional look, search online for a sewing pattern. Many websites offer free downloads. You can print these patterns and tape the pieces together. This saves time and helps you get the right shape.
Cutting Pattern Pieces
Now you have your pattern drawn and ready. Grab your scissors and cut out each paper piece. Lay the paper pieces on your fabric. Pin them down or use pattern weights to keep them from moving. Make sure the fabric is smooth and flat before you start cutting.
Use tailor’s chalk or a washable marker to trace around each pattern piece on the fabric. Mark any important points, like where the zipper will go or where the straps attach. Double-check that you have all the pieces you need: front, back, sides, bottom, pockets, and straps.
Cut the fabric slowly and carefully. Sharp fabric scissors work best. If your bag needs extra strength, cut out interfacing or fleece lining using the same pattern pieces. Stack the fabric and lining together so you don’t lose any parts.
Note: Keep all your pattern pieces in a folder or envelope. You might want to make another tennis bag later!
You finished the pattern preparation. Now you’re ready to start sewing your custom tennis bag!
Cutting Fabric & Interfacing
Laying Out Patterns
You have your pattern pieces ready. Now it’s time to lay them out on your fabric and interfacing. Start by spreading your fabric on a large, flat surface. Smooth out any wrinkles with your hands. Place the pattern pieces on the fabric, making sure you follow the grain line. This helps your tennis bag keep its shape and look neat.
If you use interfacing or stabilizers, lay those out next to your fabric. You want to match each fabric piece with the right type of support. For most tennis bags, you need extra structure. You can use different types of interfacing and stabilizers:
- Interfacings: These fabric layers reinforce and stabilize your bag, especially if you use lighter fabrics.
- Stabilizers: These come in fusible or sew-in types. They add more structure and are usually heavier than regular interfacing.
- Foam stabilizers: These work great for bag-making. They give your bag shape without making it stiff.
Some popular choices include By Annie’s Soft and Stable for a soft but sturdy feel, Vilene H250 (also called Pellon 809 Décor Bond) for firm support, and Decovil light for a leathery finish. Pick the one that matches your style and needs.
Tip: Always check that your interfacing and stabilizer pieces fit your fabric pieces before you start cutting. This saves you time and avoids mistakes.
Cutting Techniques
Cutting fabric and interfacing takes patience. Use sharp fabric scissors or a rotary cutter for clean edges. Hold your pattern pieces in place with pins, pattern weights, or Clover Wonder Clips. If you work with thick layers, clips make the job easier.
Start by cutting the main fabric pieces. Follow the outline of your pattern closely. Move slowly and keep your hand steady. Next, cut the interfacing and stabilizer pieces. If you use fusible interfacing, make sure the adhesive side faces the right way. For foam stabilizers, cut them just a bit smaller than your fabric pieces. This helps reduce bulk in the seams.
Here’s a quick checklist for cutting:
| Step | What to Do |
|---|---|
| 1. Smooth fabric | Remove wrinkles and lay flat |
| 2. Place patterns | Align with grain line |
| 3. Pin or clip | Secure patterns to fabric |
| 4. Cut fabric | Use sharp scissors or rotary cutter |
| 5. Cut interfacing | Match each fabric piece |
| 6. Trim stabilizer | Cut slightly smaller for seams |
Note: Always double-check your pieces before moving on. Missing a piece can slow down your project.
Marking Key Points
Marking is a small step, but it makes sewing much easier. Use tailor’s chalk, a washable marker, or fabric pens to mark important spots. You want to highlight places for zippers, strap attachments, pocket placements, and seam allowances.
Go through each pattern piece and mark the key points. If you have multiple layers, mark both the fabric and the interfacing. This keeps everything lined up when you sew. Write small notes or symbols if you need reminders. For example, use a star for zipper spots or a circle for strap placement.
Quick tip: Test your marking tool on a scrap piece first. Some markers don’t wash out easily.
Once you finish marking, you’re ready to start assembling your tennis bag. Careful cutting and marking help your bag look professional and last longer.
Sewing the Bag Body
Assembling Panels
You have your fabric pieces ready. Now, you can start putting your tennis bag together. Lay out the front, back, sides, and bottom panels on your work surface. Check that each piece matches up with the others. If you see any uneven edges, trim them before you begin sewing.
Start by joining the side panels to the main body. Pin or clip the edges together. Make sure the right sides of the fabric face each other. Sew along the edges with a straight stitch. Keep your stitches even and close to the edge. This helps your bag look neat and strong.
After you attach the sides, add the bottom panel. Line up the corners carefully. Use pins or clips to hold everything in place. Sew slowly around the corners. Take your time so you do not miss any spots. If your bag has pockets or extra compartments, sew those in before you close up the sides.
Tip: Use a longer stitch length when sewing thick layers. This keeps your machine from getting stuck.
Reinforcing Seams
You want your tennis bag to last a long time. Strong seams make a big difference. After you sew each panel, go back and reinforce the seams. You can do this by sewing another line of stitches right next to the first one. This is called double-stitching.
For extra strength, try a zigzag stitch along the raw edges. This stops the fabric from fraying. If you have a serger, you can use it to finish the seams. Some people like to cover the seams with bias tape. This gives your bag a clean look inside and out.
Here’s a quick table to help you choose the best way to reinforce your seams:
| Method | When to Use | Benefit |
|---|---|---|
| Double-stitching | All main seams | Extra strength |
| Zigzag stitch | Raw edges | Prevents fraying |
| Bias tape | Exposed seams inside bag | Neat, finished look |
| Serger | Heavy-duty fabrics | Professional finish |
Check each seam as you go. If you see any loose threads, trim them right away. This keeps your tennis bag looking tidy.
Attaching Lining
The lining makes your tennis bag look finished and protects your gear. You want the lining to stay smooth and not bunch up. Lay the lining pieces flat on your work surface. If you use a stiff material for the bottom, glue the flat parts of the lining to it. This keeps the lining from moving around.
When you attach the lining, do not just sew or glue the edges. If you leave the center loose, the lining can bunch up or shift. Keep the fabric slightly folded during production. This helps prevent crinkles and keeps everything neat.
Here are some tips for attaching the lining:
- Glue the flat parts of the lining to a rigid base, like cardboard or a plastic insert.
- Keep the lining slightly folded as you work to avoid wrinkles.
- Sew the lining to the main bag body, making sure to catch both the edges and some points in the center.
- Avoid leaving the center of the lining loose.
Note: Take your time with this step. A smooth lining makes your tennis bag look professional and helps it last longer.
Once you finish attaching the lining, turn your bag right side out. Check all the seams and corners. Your tennis bag is starting to take shape! If you see any puckers or loose spots, fix them now before moving on to the next steps.
Adding Pockets & Compartments
Interior Pockets
You want your tennis bag to keep everything in its place. Interior pockets help you stay organized. You can add small pockets for overgrips. These pockets keep them clean and dry, so you always have a fresh grip ready. Some players like a mesh pocket for tennis balls. This pocket lets the balls breathe and keeps their bounce. You can also sew in a pocket for vibration dampeners. You will not lose them at the bottom of your bag.
Try adding a zippered pocket for your keys or phone. This pocket keeps your valuables safe while you play. You can use soft fabric for these pockets. Soft fabric protects your gear from scratches. If you carry racket maintenance tools, a separate pocket helps you find them fast.
Tip: Use different colors or labels for each pocket. You will find what you need in seconds.
Exterior Pockets
Exterior pockets give you quick access to your gear. You can add a large pocket on the side for water bottles. This pocket keeps your drink upright and easy to grab. Some players like a wet pocket for sweaty clothes or towels. This pocket uses waterproof fabric to stop leaks.
You might want a pocket with a flap for snacks or sunscreen. This pocket keeps small items from falling out. You can also add a pocket with a zipper for your wallet. If you ride your bike to the court, a deep pocket for your phone keeps it safe.
Here are some useful exterior pockets you can add:
- Isolated pocket for overgrips
- Accessible section for vibration dampeners
- Mesh bag for tennis balls
- Distinct compartment for racket maintenance tools
You can mix and match these pockets to fit your needs.
Secure Attachments
You want your pockets to stay strong. Use double stitching on all pocket seams. This makes the pockets last longer. You can use Velcro, snaps, or zippers to close the pockets. These closures keep your things from falling out.
If you add heavy items, reinforce the pocket corners. You can sew extra fabric at the stress points. Some people use rivets for extra strength. Always check that your pockets open and close easily. You want to grab your gear fast during a match.
Quick tip: Test each pocket before you finish your bag. Put your gear inside and shake the bag. If nothing falls out, your pockets are ready for action.
Straps, Handles & Finishing
Making Straps
You want your tennis bag to feel comfortable on your shoulder. The right straps make a big difference. Start by choosing strong materials. Many people pick nylon webbing because it is tough and water-repellent. This fabric keeps your bag safe from rain and sweat. You can also use canvas or polyester for a classic look.
For extra comfort, add padding to your straps. Foam or quilt batting works well. Cut a strip of padding the same size as your strap. Place it inside the fabric before you sew. Adjustable straps help you carry your bag at the perfect height. Look for sliders or buckles to make your straps longer or shorter.
Here are some tips for making great straps:
- Use water-repellent fabrics like nylon.
- Add foam or batting for padding.
- Make straps adjustable with sliders or buckles.
- Double-stitch the ends for strength.
Tip: Try your strap on before you finish sewing. Make sure it feels good on your shoulder.
Attaching Handles
Handles give you another way to carry your tennis bag. You can sew short handles to the top or sides. Many people use webbing or thick fabric for handles. Fold the fabric in half and sew along the edge for a neat finish. Attach the handles with strong stitches. Sew a box with an X in the middle for extra hold.
If you want a padded grip, wrap a small piece of fabric around the center of the handle. Add a bit of foam inside. Sew the ends closed. This makes the handle soft and easy to grab.
A quick checklist for attaching handles:
- Place handles evenly on both sides.
- Use a box and X stitch for strength.
- Add padding for comfort.
- Test the handles by lifting the bag.
Zippers & Closures
Zippers keep your gear safe inside your tennis bag. Choose a sturdy zipper that matches your bag’s color. Nylon coil zippers work well for sports bags. Place the zipper between the main panels before you sew them together. Pin or clip the zipper in place. Sew slowly to keep the zipper straight.
You can also add Velcro or magnetic snaps for quick pockets. These closures help you grab things fast. For extra security, use a double zipper. This lets you open your bag from either end.
Here’s a table to help you pick closures:
| Closure Type | Best For | Pros |
|---|---|---|
| Zipper | Main compartment | Secure, easy to use |
| Velcro | Small pockets | Quick access |
| Magnetic snap | Flap pockets | Simple, stylish |
| Double zipper | Large bags | Opens both ways |
Note: Always test your closures before finishing your bag. Open and close each one a few times to make sure they work smoothly.
With the right straps, handles, and closures, your tennis bag will be easy to carry and keep your gear safe. Take your time with these steps. Good sewing here means your bag will last for many matches.
Decorative Touches
Now comes the fun part! You get to add your own style to your tennis bag. Decorative touches make your bag stand out and show off your personality. You can keep it simple or go all out. The choice is yours.
Here are some easy ways to decorate your tennis bag:
- Iron-on patches: Pick patches that show your favorite sports, animals, or even your initials. Place them on the front or side of your bag. Follow the instructions on the patch to attach it with an iron.
- Embroidery: Use embroidery floss to stitch your name or a cool design. You can do this by hand or with a sewing machine that has embroidery features.
- Fabric paint or markers: Draw patterns, write your name, or add fun shapes. Make sure the paint or markers work on your fabric.
- Ribbon or trim: Sew colorful ribbon or trim along the edges or pockets. This adds a pop of color and makes your bag look unique.
- Keychains and charms: Clip a tennis ball keychain or a lucky charm to your zipper pull. This makes your bag easy to spot.
Tip: Test your decorations on a scrap piece of fabric first. This helps you see how they look and keeps your main bag safe from mistakes.
You can also use a table to plan your decorations:
| Decoration Type | Where to Add It | Supplies Needed |
|---|---|---|
| Iron-on Patch | Front, side, pocket | Patch, iron |
| Embroidery | Anywhere on bag | Needle, floss, hoop |
| Fabric Paint | Large panels, pockets | Paint, brush/marker |
| Ribbon/Trim | Edges, straps, pockets | Ribbon, sewing needle |
| Keychain/Charm | Zipper pull, handle | Keychain, split ring |
Let your creativity shine. Your tennis bag should feel like yours!
Final Assembly & Inspection
You are almost done! Now you need to put all the pieces together and check your work. This step makes sure your tennis bag is strong and ready for action.
Follow these steps for final assembly:
- Turn the bag right side out. Make sure all corners and seams look neat.
- Attach straps and handles. Double-check that they feel secure. Tug on them gently to test the strength.
- Install zippers and closures. Open and close each one a few times. Make sure nothing sticks or snags.
- Insert the bag bottom. Slide in your stiff plastic or cardboard base. This helps your bag keep its shape.
- Sew up the final opening. Use a ladder stitch or topstitch to close any gaps left from turning the bag.
Now it is time for inspection. Look over your bag carefully:
- Check all seams for loose threads.
- Make sure pockets are attached tightly.
- Test every strap, handle, and closure.
- Look for any puckers or wrinkles in the lining.
Note: If you find any problems, fix them now. A little extra time makes your bag last longer.
Give your tennis bag a gentle shake. If everything stays in place, you did a great job! Your custom tennis bag is ready for the court. Show it off with pride!
DIY Tennis Bag Care Tips
Cleaning & Maintenance
You want your tennis bag to look fresh and last a long time. Cleaning it is easy if you follow a few simple steps. First, empty your bag and shake out any dirt or crumbs. This helps you start with a clean surface. Next, use a soft brush to remove loose dirt from the outside. For most bags made of cotton, nylon, or polyester, a damp cloth with mild soap works best. Gently wipe the exterior and avoid harsh chemicals that can damage the fabric.
If you see tough spots, use the damp cloth and a little more soap. For the inside, vacuum out any loose dirt. Then, spot clean with a damp cloth. If your bag smells musty, sprinkle a bit of baking soda inside and let it sit for a few hours before wiping it out. This helps remove odors and keeps your bag smelling fresh.
Tip: Always air-dry your bag in a well-ventilated area. Open all the pockets and let moisture escape. Never use a tumble dryer or put your bag near a heater.
Storage
Storing your tennis bag the right way keeps it in good shape. Pick a cool, dry place away from sunlight. Sunlight can fade the colors and weaken the fabric. Make sure your bag is empty or only lightly packed. This helps it keep its shape and prevents creases.
You can hang your bag from a hook or place it on a shelf. Hanging works well because it stops folds and keeps the bag looking new. If your bag gets wet, open all the compartments and let it air out before storing. This stops mold and keeps your gear safe.
Here’s a quick checklist for storage:
- Store in a cool, dry place away from direct sunlight.
- Hang from a hook or place on a shelf.
- Keep the bag empty or lightly packed.
- Air-dry before storing if damp.
- Avoid sharp objects that could poke holes inside.
Minor Repairs
Sometimes your tennis bag needs a little fix. You can handle most small repairs at home. If you notice loose seams or linings, grab a needle and strong thread. Reseam the area with a few simple stitches. For small tears or holes, use fabric tape for a quick fix. If you want a permanent solution, try a fabric or leather repair kit.
If your bag has leather straps that break, cut away the damaged part. Make small holes for new rivets and use strong glue to reattach the strap. These quick repairs help your bag last longer and save you money.
Note: Check your bag often for loose threads or small holes. Fixing them early keeps your tennis bag looking great and ready for your next match!
Conclusion
You now know how to make a tennis bag from beginning to end. If you take your time and use your imagination, you can sew a bag that matches what you like and need. Anyone can do this project! If you want a bag that is extra unique, you can look at custom bags made by experts. Here are some types and services you can pick from:
| Type of Bag | Best For |
|---|---|
| Backpack | Walking or biking to the court |
| Duffel | Carrying extra gear |
| Racquet Bag | Competitive players |
| Tote | Casual players |
Need help or want a custom tennis bag made just for you? As a trusted bag manufacturer, we offer personalized designs and expert guidance. Contact us today to bring your perfect bag to life!
FAQ
How long does it take to make a tennis bag?
You can finish your tennis bag in a weekend. If you sew often, you might finish faster. Take your time with each step. Enjoy the project and don’t rush.
What fabric works best for a tennis bag?
Home decor cotton, nylon, or polyester all work well. Pick a fabric that feels sturdy and easy to clean. Water-resistant fabric helps protect your gear from rain.
Can I make a tennis bag without a sewing machine?
Yes! You can sew by hand. Use strong thread and small stitches. It takes longer, but you still get a great result. Hand sewing works best for small bags.
How do I add extra pockets?
You can sew extra pockets inside or outside your bag. Try mesh for balls or zippered pockets for keys. Plan pocket placement before you start sewing.
Tip: Use different colors for each pocket. You will find things faster during a match.
What if I make a mistake while sewing?
Don’t worry! Use a seam ripper to remove stitches. Fix the area and sew again. Mistakes happen to everyone. They help you learn and improve your skills.
How do I keep my tennis bag looking new?
- Wipe the outside with a damp cloth.
- Air-dry after cleaning.
- Store in a cool, dry place.
- Check for loose threads and fix them quickly.
| Task | How Often |
|---|---|
| Clean outside | Weekly |
| Air-dry | After use |
| Repair seams | As needed |
Can I customize my tennis bag design?
Absolutely! You can pick colors, add patches, or change the shape. This project lets you show your style. Try new ideas and make your bag unique.