Ready to create something awesome for your bike? You’re about to learn how to make a frame bag from scratch—even if you’ve never sewn before. You’ll find every material, tool, and instruction you need right here. Grab your supplies, trust the process, and get excited. You’ve got this!

Key Takeaways
- Get all the materials and tools you need first. This helps you save time and makes things easier.
- Pick a strong fabric so your bag lasts longer. Cordura and X-Pac are good choices because they are tough and resist water.
- Measure your bike frame carefully. This makes sure your frame bag fits well and looks nice.
- Make a template using your measurements. Use cardboard or acrylic to get the right shape.
- Put in a good zipper to keep your things safe and dry. Try the zipper before you sew it on.
- Use strong straps to attach your bag to the bike. Place the straps evenly so the bag does not move when you ride.
- Add pockets and waterproofing to your frame bag. This makes the bag more useful and keeps your things safe.
- Clean and take care of your frame bag often. Good care helps your bag last longer and look nice.
Materials and Tools for Frame Bag
You need to get your materials and tools first. This helps you work faster and makes things easier. Let’s look at what you need.
Essential Materials
Your frame bag should last a long time. Picking the right fabric is important. Here are some popular choices for strong bags:
| Material | Properties | Suitability for Bags |
|---|---|---|
| Dyneema | Very strong, man-made fiber, costs a lot | Great choice because it is tough |
| X-pac | Has layers, light, keeps water out, hard to tear | Good pick, not as tough as Dyneema |
| Cordura | Hard to rip, strong, lasts long | Top fabric, works really well |
You can use any of these fabrics for your bag. Many people like Cordura because it is strong and easy to buy. X-pac is light and keeps water out, so it is good for bike trips. Dyneema is super tough but costs more money.
You also need:
- Nylon webbing for straps
- Hook-and-loop tape (like Velcro)
- A strong zipper (try to get one that keeps water out)
- Lining fabric (optional, makes the bag stronger)
- Thread (polyester or nylon is best)
Tools Needed
You do not need fancy tools to make a frame bag. A few simple things will help you do a good job:
- Sewing machine (a basic one is fine)
- Sharp needle (size 90/14 or 100/16 for thick fabric)
- Good thread
- Scissors or rotary cutter
- Ruler or measuring tape
- Chalk or fabric marker for marking
- Pins or clips to hold fabric
A sewing machine helps you sew faster and makes strong seams. Always use a sharp needle and strong thread if you want your bag to last.
Optional Extras
The Essentials Frame Bag bolts to the bottom of the MMR’s top tube. It has one extra strap on the seat tube for more support. There are two zippers so you can open it in different places. You can flip it to use as a bigger top tube bag.
Every custom framebag has a hydration port. This lets you use more than one hose. A velcro divider can be taken out. It splits the bag in half to help you organize things.
The front part is wider so you can pack more. There is a drain port to let water out fast. You can pick from many colors to match your bike.
The Banjo Brothers’ Top Tube Bag has a clear top so you can see inside. It has shiny piping to help people see you. This makes it useful and nice to look at.
You can add these extras to make your bag special or more useful. Try a hydration port for long rides. Add more pockets for snacks. Use shiny strips for safety. Custom features make your bag great for bikepacking.
Making the Template
Before you start cutting fabric, you need a template that matches your bike’s frame. This step makes sure your bag fits perfectly and looks professional. Let’s walk through the process together.
Measuring the Bike Frame
Grab your measuring tape and get ready to measure your bike. You want your frame bag to fit snugly, so accuracy matters. Here’s a simple way to measure your bike for this project:
- Measure the top tube from the head tube to the seat tube.
- Measure the down tube from the bottom bracket to the head tube.
- Measure the seat tube from the bottom bracket to the top tube.
- Measure the inside width at the widest point.
- Measure the inside height at the tallest point.
Write down each number. Double-check your work. These five measurements help you make a template that matches your bike’s shape. If you want to get even more precise, you can measure extra points along the tubes. This helps you avoid surprises later.
Tip: Take your time with this step. Good measurements make the rest of the tutorial much easier.
Creating the Template
Now you’ll turn those numbers into a real template. You have a few choices for template materials. Some people use cardboard because it’s cheap and easy to cut. Others like picture frame matting board for its strength. If you plan to make more bags in the future, try acrylic for a reusable template.
| Material | Description |
|---|---|
| Acrylic | Great for frequent use; can be laser cut for perfect lines. |
| Picture frame matting board | Strong, affordable, and easy to shape. |
| Cardboard | Simple to find and cut; perfect for your first try. |
| X-Pac | Durable fabric, good for advanced templates. |
| Cordura | Tough fabric, often used for outdoor gear. |
Lay your chosen material flat. Use your measurements to draw the triangle that matches your bike’s frame. Cut out the shape with scissors or a utility knife. Hold the template up to your bike and check the fit. If it doesn’t match, adjust the lines and trim again.
Note: Cardboard works well for your first template. You can always switch to something stronger once you’re happy with the shape.
Adjusting for Fit
You want your frame bag to fit without bulging or rubbing your knees while you ride. After making the template, test it on your bike. Look for any spots where the template sticks out or leaves gaps.
Here are some ways to make sure your template fits just right:
| Adjustment Technique | Why It Matters |
|---|---|
| Trim edges | Removes extra material so the bag won’t bulge. |
| Add structure | Keeps the bag from ballooning out and hitting your legs. |
| Check for knee rub | Makes sure the bag stays out of your way when pedaling. |
| Test with cardboard | Lets you make changes easily before cutting fabric. |
If you want a super-precise fit, you can use tools like BikeCAD or print out your template to scale. This helps you see how the bag will look on your bike. Some riders even add a semi-rigid frame inside the bag for more support, especially for bikepacking adventures.
Pro Tip: Don’t rush this part. A well-fitted template makes the sewing process smoother and gives you a bag you’ll love to use.
You’ve finished making the template. You’re now ready to move on to cutting fabric and building your custom frame bag!
Cutting Fabric for Bicycle Frame Bag
Choosing Fabric
You’ve got your template ready, so now it’s time to pick the right fabric for your frame bag. This step matters a lot. The fabric you choose will decide how long your bag lasts and how well it stands up to weather and rough rides. Midweight fabrics work best for most riders. They give you a great mix of strength, weight, and style.
Here are some top choices for frame bags:
- X-Pac® VX21: This fabric is medium weight, tough, and waterproof. It holds its shape and resists scrapes, which is perfect for bikepacking.
- ECOPAK™: Similar to X-Pac®, it keeps water out and feels sturdy.
- CORDURA®: This classic fabric is strong and reliable. It’s a good pick for spots that get a lot of wear.
You can also look for 600D ripstop fabric with a TPE coating. This type keeps your gear dry and adds extra life to your bag. If you want even more protection, use water-resistant zippers. These small details help your frame bag last through many adventures.
Tip: Choose a color you like! Your bag can match your bike or stand out on the trail.
Cutting Panels
Lay your fabric flat on a clean surface. Place your template on top and trace around it with a chalk pencil or fabric marker. Make sure you flip the template to get a mirror image for the other side. This step helps both sides match up perfectly.
Add about half an inch all around the edge for seam allowance. This extra space gives you room to sew the panels together without making the bag too small. For most frame bags, a width of 4 to 8 cm works well. If you want a slimmer bag, go closer to 4 cm. For more space, try 8 cm.
- Add 0.5″ around the whole template for seams.
- Double your seam allowance when figuring out the total width.
- Use sharp scissors or a rotary cutter for clean edges.
Take your time with this part of the process. Clean cuts make sewing easier and help your bag look professional.
Cutting Side Strips
Side strips connect the two main panels and give your bag its depth. Measure the length of your template’s perimeter to know how long your strips should be. Most riders use a width of 1 inch plus seam allowance. That means you’ll cut strips about 2 inches wide if you use a 0.5-inch seam.
Here’s a simple way to cut side strips:
- Use your template as a stencil. Trace the shape onto your fabric.
- Mark a line for the zipper’s center if you plan to add one.
- Measure ½ inch out from the edge in several spots to create a buffer for seams.
- Use a yardstick to keep your lines straight, especially for long strips.
- Cut along the outer line with sharp scissors.
Note: Clean, even strips make the next steps in this tutorial much easier. Don’t rush—precision pays off!
Now you’re ready to move on to installing the zipper and assembling your frame bag. You’re making great progress!
Installing Zipper and Side Panels
Selecting Zipper
Picking the right zipper makes your frame bag easy to use and keeps your gear safe. You want a zipper that stands up to rough rides and bad weather. Here are some top choices for outdoor bags:
- YKK zippers work well because they last a long time and rarely break.
- Sizes #5 and #10 are popular. They open and close smoothly, even when you pack your bag full.
- Nylon zippers handle rain and mud better than metal ones. Metal zippers look cool but can rust if you ride in wet places.
If you plan to use your zippered frame bag for bikepacking or bike packing trips, a water-resistant zipper helps keep your stuff dry. Think about how often you open your bag. If you grab snacks or tools a lot, a bigger zipper makes life easier.
Tip: Try the zipper before you sew it in. Make sure it slides without sticking.
Attaching Zipper
You want your zipper to work smoothly every time. A good attachment keeps out water and stops snags. Here’s a simple tutorial for attaching your zipper:
- Place the zipper face down on the edge of your side strip.
- Pin or clip it in place so it doesn’t move.
- Sew along the edge, keeping your stitches straight.
- Fold the fabric back and topstitch close to the zipper teeth. This step helps the zipper lay flat.
To keep your zipper working well, follow these best practices:
- Avoid getting sand or dirt in the teeth. This keeps the zipper from wearing out.
- Use a silicone lubricant to help the slider move smoothly.
- Pull the slider straight, not at an angle, to prevent snags.
- Store your frame bag with the zipper closed. This keeps the teeth lined up.
- Check the seal before each ride. Make sure all teeth are locked together.
If you ride near the ocean or in muddy places, rinse the zipper with fresh water and let it dry before storing your bag. A clean zipper lasts longer and keeps your gear safe.
Sewing Side Panels
Now you’re ready to join the side strips to the main panels. This step gives your frame bag its shape and strength. You want the seams to hold up on every ride.
- Start by sewing the middle gusset strip to one side panel. Begin with the side that doesn’t have the zipper. This makes adjustments easier.
- Line up the marks on your gusset with the seam allowance on the side panel. Keep everything straight as you sew.
- Use backstitching at the start and end of each seam. This locks the stitches so they don’t come loose.
- For corners, make small relief cuts in the seam allowance. This helps the fabric bend without bunching up.
- If your sewing machine can’t reach tight corners, switch to hand sewing for better control.
Note: Take your time with this part of the process. Careful sewing makes your project look professional and helps your frame bag last through many bikepacking adventures.
You’ve now installed the zipper and sewn the side panels. Your frame bag is starting to look real!
Making and Attaching Straps
You’re almost done with your frame bag! Now it’s time to make and attach the straps. Good straps keep your bag secure and stop it from sliding around while you ride. Let’s look at your options and how to get the best fit for your bike.
Types of Straps
You have a few choices for straps. Most people use Velcro because it’s easy to adjust and holds tight. You can open and close Velcro straps quickly, even with gloves on. Many riders trust strong Velcro strips to keep their bags in place on rough trails. Some custom frame bags use only Velcro for this reason.
Other options include laces or bolts. Laces can look cool, but they take longer to tie and untie. Bolts give a super solid hold, but you need special mounts on your bike. Some riders like Voilé Straps. These rubbery straps are gentle on your frame and work well for long trips. If you want to protect your bike’s paint, Voilé Straps might be a good pick.
Tip: If you worry about scratches, you can wrap tape around your bike frame where the straps will sit. This helps keep your bike looking new.
Positioning Straps
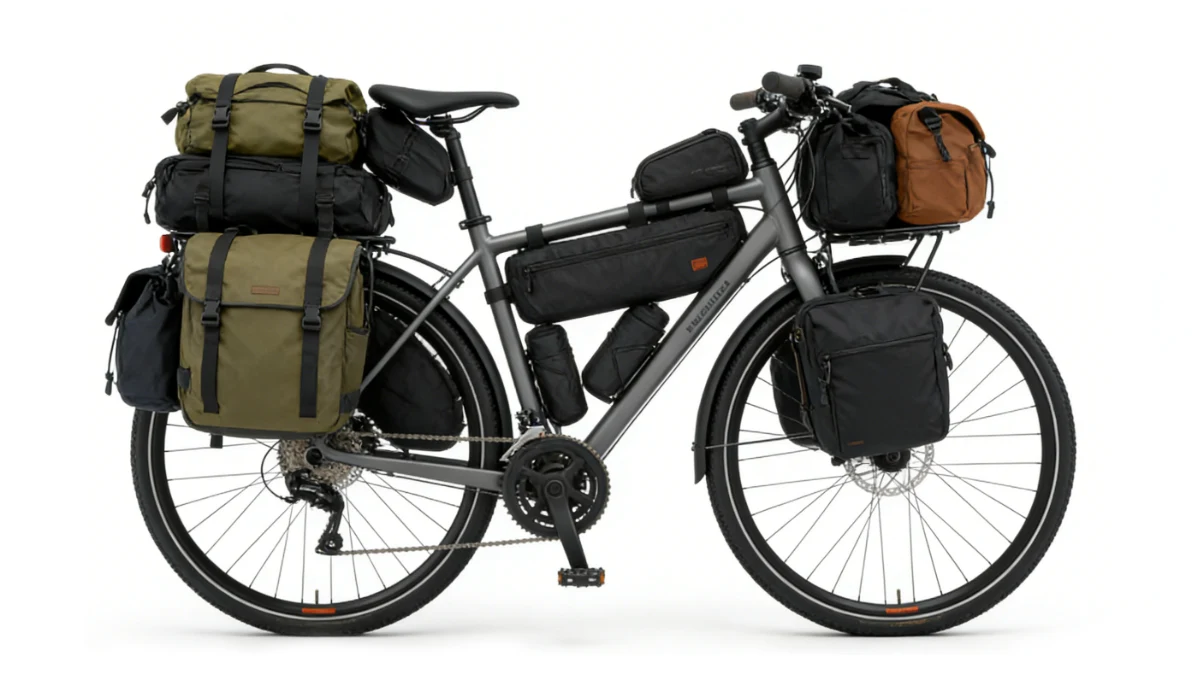
Where you put your straps matters a lot. You want your bag to stay steady, even when you ride fast or hit bumps. Most frame bags use three to five straps. Place one near the front of the top tube, one in the middle, and one near the seat tube. If your bag is big, add more straps for extra support.
Try to space your straps out evenly. This spreads the weight and keeps the bag from sagging. Put straps on both the top and down tubes for the best hold. Make sure the straps line up with strong parts of your bike frame. If you plan to go bikepacking or bike packing, double-check that the straps don’t block your water bottle cages.
Note: Tighten each strap so it’s snug, but not too tight. You want the bag to stay put without squishing your bike frame.
Securing Straps
Now you’re ready to attach the bag. Start by threading each strap through the loops or slots on your bag. Pull the strap around the tube and fasten it. For Velcro, press the hook and loop sides together until they stick. For Voilé Straps, stretch the strap and hook it in place.
Check each strap. Make sure there’s no slack, but don’t overtighten. If you cinch the straps too much, you could damage your frame or make it hard to remove the bag. Try riding a short distance and see if the bag moves. If it does, adjust the straps until everything feels solid.
Some riders tape the outside of their frame for long trips. This stops the straps from rubbing and keeps your paint safe. You can also experiment with how tight you make each strap. Go with the loosest setting that still holds the bag steady. This helps your bag last longer and keeps your bike in good shape.
You’ve finished the process of making and attaching straps. Your frame bag is now ready for adventure!
How to Make a Frame Bag: Assembly
You’re almost done learning how to make a frame bag. This part brings everything together. You’ll see your hard work pay off as you assemble your bicycle frame bag. Let’s walk through the final steps so your bike frame bag fits perfectly and stays strong on every ride.
Aligning Panels
Getting your panels lined up is key. If you want your frame bag to look neat and last a long time, you need to pay attention here. Try these alignment techniques:
- Match the center seam of the cap to the center mark on your frame. This keeps everything balanced.
- Adjust your sewing machine’s presser foot for thick fabric. This helps you sew straight and keeps the panels from shifting.
- Run a quick trace along the edges before you start stitching. This checks tension and placement so you don’t end up with crooked seams.
- Pair the right panels together. Control the sweatband and pick a good stabilizer. This gives you a clean look and stops the fabric from stretching out.
Tip: Lay out all your pieces before sewing. Double-check the fit by holding the panels against your bike. If something looks off, fix it now. You’ll save time later.
Sewing Seams
Now you get to sew the panels together. This step makes your frame bag strong enough for bikepacking and bike packing trips. You want seams that hold up to bumps, rain, and heavy gear. Here are two seam types that work best:
- Flat fell seam: This seam is super tough. It works great for straight edges and gives your bag a clean finish. You’ll see this seam on jeans and outdoor gear.
- French seam: This one adds extra strength. You insert a stiffener and glue the seam before sewing. It works for bags with lots of shapes and keeps everything tight.
Start by pinning or clipping your panels together. Sew slowly and keep your stitches straight. Use backstitching at the ends to lock the thread. If you hit a curve, go slow and guide the fabric with your fingers. For extra strength, sew a second line next to the first seam.
Note: Strong seams mean your frame bag won’t fall apart on the trail. Take your time and check your work as you go.
Mounting on Bike
You’ve finished sewing. Now you get to mount your frame bag on your bike. You have a few ways to do this. Each method has its own pros and cons. Here’s a quick look:
| Mounting Method | Pros | Cons |
|---|---|---|
| Hook and Loop | Easy to Install and Remove Affordable Minimal Frame Wear | Aesthetics: Can detract from bike appearance Less Secure: Allows some movement over rough terrain |
| Bolt-on | Sleek Appearance Highly Secure: Stays firmly in place Minimal Frame Wear | Installation Time: Takes longer to install Frame Compatibility: Requires specific bolt mounts Moderate Cost: Priced in the middle range |
| Lace-up | Unique Look: Offers a classic aesthetic Perfect Fit: Provides a snug, customized fit Most Secure: Ensures the bag stays attached during aggressive riding | Most Expensive: Intricate design makes it costly Potential Frame Wear: Tight laces can wear on the frame Limited Bike Frame Compatibility: Only works with specific frames |
Pick the method that works best for your bike and your style. Most riders use hook and loop straps because they’re quick and easy. If you want a cleaner look, try bolt-on mounts. Lace-up designs look cool and hold tight, but they cost more and need special frames.
Tip: After you mount your frame bag, take a short ride. Check if the bag moves or rubs against your legs. Adjust the straps or bolts until everything feels solid.
You’ve learned how to make a frame bag from start to finish. Your new bicycle frame bag is ready for adventure. Whether you’re heading out for bikepacking or just want a cool bike frame bag for daily rides, you built it yourself!
Finishing and Customizing Frame Bag
You’ve built your frame bag, but the final touches make it truly yours. Let’s walk through how you can trim, seal, add pockets, and waterproof your bag for the best results.
Trimming and Sealing
Clean edges and sealed seams help your bag last longer and keep water out. You want to stop fraying and block leaks before they start. Here’s a quick guide to popular techniques:
| Technique | Material/Description | Application Details |
|---|---|---|
| Heat-Bonded Tape | Thermoplastic polyurethane (TPU) tape | Place tape over interior stitch lines, heat press at 120 °C for 10–15 seconds. |
| Liquid Sealant | Brush-on polyurethane or silicone | Brush a 2 mm bead along seam, let cure 24 hours at 20 °C. |
| Laminated Protective Flap | Bonded waterproof laminate | Overlays zipper to block direct rain impact. |
| Zipper Seal Tape | Butyl rubber tape, 1 mm thick | Wrap along zipper edges, press firmly. |
You can use heat-bonded tape for a strong seal on the inside seams. Liquid sealant works well for tricky corners. Laminated flaps and zipper seal tape help keep rain out of your gear. Take your time with these steps. A well-sealed bag means fewer worries on wet rides.
Tip: Trim any loose threads before sealing. This keeps the bag looking neat and stops fraying.
Adding Pockets
Pockets make your frame bag more useful. You can organize your gear and find things fast. Here are some pocket ideas you might like:
- Add a small pocket for keys, snacks, or a multi-tool.
- Try upper and lower compartments for better organization.
- Use side pockets for items that get lost easily, like tire levers or cash.
- Include a zippered flat pocket for essentials such as your wallet.
- If you want more order, add dividers or extra compartments.
Custom pockets help you pack smarter for bikepacking trips. You can sew them inside or outside the bag. Zippered pockets keep things safe, while open pockets let you grab items quickly.
Note: Plan your pocket layout before sewing. Think about what you reach for most during a ride.
Waterproofing Tips
You want your frame bag to handle rain and puddles. Waterproofing helps keep your gear dry, even on muddy trails. Here are some easy methods:
- Rub wax into the fabric for thinner materials. Warm the wax and fabric to help it soak in.
- Brush liquid wax onto thicker fabrics. Heat it gently so the wax absorbs well.
- Re-wax your bag in warm weather for the best results.
- Use the right wax for your fabric type.
- Apply more than one coat if you need extra protection.
Waterproofing is simple but makes a big difference. You can repeat the process as needed, especially if you ride in wet places. A dry bag means happy gear and a better bikepacking experience.
Pro Tip: Test your waterproofing by spraying water on the bag. If it beads up, you did it right!
Caring for Your Frame Bag
Taking care of your frame bag keeps it looking good and working well for years. You don’t need fancy tools or special skills. Just a little attention goes a long way. Let’s break down how you can clean, repair, and store your bag so it’s always ready for your next ride.
Cleaning
Your frame bag picks up dirt, dust, and sometimes mud. Regular cleaning helps it last longer and keeps your gear safe. Here’s a simple way to clean any frame bag, no matter what material you use:
- Empty your bag and shake out any loose dirt or crumbs.
- Use a soft brush or cloth to brush off dried mud and dust.
- Fill a bucket with lukewarm water and add a little mild soap.
- Hand wash the bag gently. Scrub any stubborn spots with your brush.
- Rinse the bag with clean water. Make sure you remove all the soap.
- Hang the bag in a shaded spot to air dry. Don’t use a dryer or direct sun.
- Once dry, treat the zippers with a little zipper lubricant.
- Store your bag with the zippers open to keep them from sticking.
Tip: Never use bleach or harsh cleaners. These can damage the fabric and shorten the life of your bag.
Repairs
Sometimes your bag gets a tear or the zipper sticks. Don’t worry—you can fix most problems at home. Small holes or rips can be patched with gear repair tape or a needle and thread. For bigger tears, sew a patch on both sides of the fabric for extra strength. If your zipper jams, clean out any dirt and add a drop of zipper lubricant. Replace broken buckles or Velcro with new ones from a craft or outdoor store.
If you’re not sure how to fix something, ask a local bike shop for help. They see these problems all the time.
Storage
Storing your frame bag the right way keeps it in good shape. When you’re not using it, stuff the bag with something soft to help it keep its shape. You can use acid-free tissue paper, bubble wrap, old towels, or foam inserts. These fillers stop the bag from getting squished or wrinkled.
- Place your bag in a dust bag or a cloth pouch. This protects it from dust, sunlight, and moisture.
- Store your bag upright on a shelf. Don’t cram it into a tight space.
- Leave the zippers open a little so they don’t get stuck.
A little care in storage means your bag will be ready for your next adventure—no surprises, just smooth rides.
Conclusion
You just learned how to make a frame bag from start to finish! Here’s a quick recap:
- Gather your materials and tools.
- Measure your bike and make a template.
- Cut your fabric and sew the panels.
- Add a zipper, straps, and finish with custom touches.
Don’t worry if your first bag isn’t perfect—you’ll get better with every try. If you’re looking for a pro-level frame bag or want a design that’s truly your own, we’re here to help. As a professional frame bag manufacturer, we offer custom manufacturing services, from materials and sizing to structure and details. Whether you need a one-of-a-kind design or bulk custom orders, we can turn your ideas into a high-quality frame bag made to fit your ride.
FAQ
How long does it take to make a frame bag?
You can finish your first frame bag in about 3 to 5 hours. If you sew often, you might finish faster. Take your time and enjoy the process!
Can I make a frame bag without a sewing machine?
Yes, you can sew by hand. Use a strong needle and thick thread. It takes longer, but you still get a sturdy bag.
What if my bag doesn’t fit my bike perfectly?
Don’t worry! You can trim the edges or add extra fabric. Test the fit with cardboard first. Adjust as needed before sewing.
Which fabric is best for beginners?
Cordura works well for most people. It’s easy to cut and sew. X-Pac is also a good choice if you want something lighter.
How do I keep my bag from sagging?
Add a stiffener between the layers. You can use plastic or thin foam. This helps your bag keep its shape on bumpy rides.
Can I wash my frame bag in a washing machine?
It’s better to wash by hand. Use mild soap and water. Air dry your bag to keep it in good shape.
What tools do I need if I want to add extra pockets?
You need a ruler, fabric marker, scissors, and a zipper. Pockets are easy to add before you sew the main panels together.