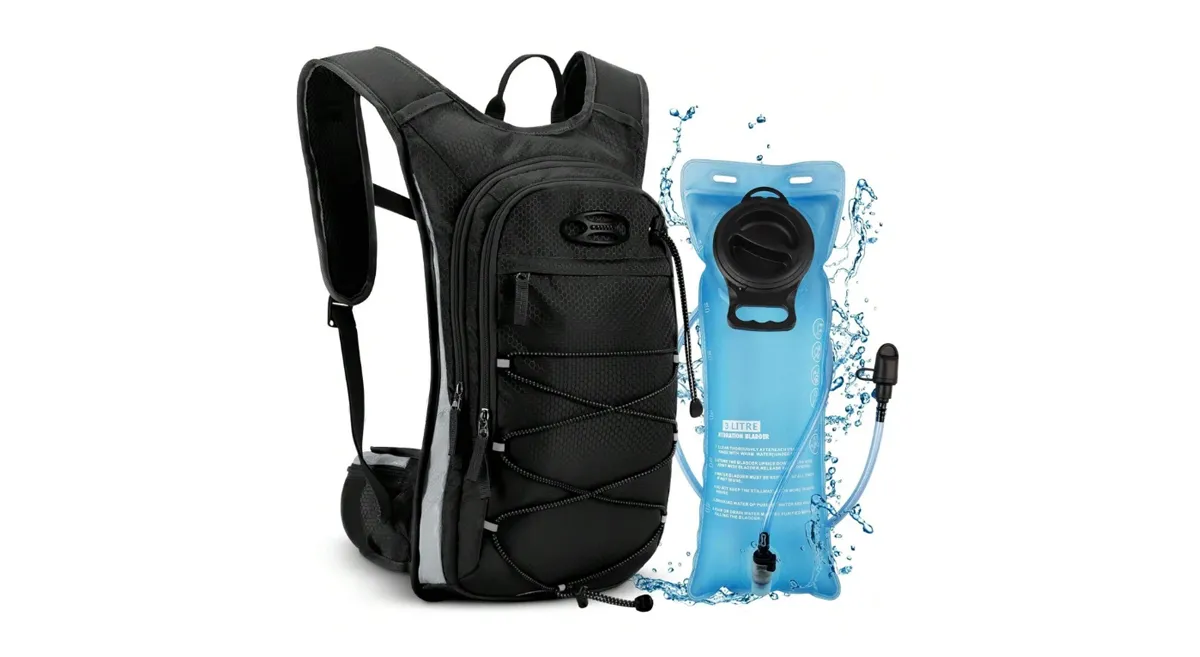
Cleaning a hydration backpack means you empty the water, take apart each piece, wash everything, rinse well, let it dry, then put it back together. When you keep your gear clean, you protect your health and help your backpack last longer. You only need simple cleaning tools, and you can learn how to clean hydration backpack in just a few easy steps. Anyone can do it—no special skills needed!
Tip: Regular cleaning stops germs and keeps your water fresh every time you use your backpack.
Key Takeaways
- Clean your hydration backpack often to stop germs and mold. Try to clean it after each use, especially if you use flavored drinks.
- Get your cleaning tools ready first, like brushes, mild soap, and drying racks. This helps make cleaning easier.
- Take your backpack apart before you start cleaning. This helps you clean every spot where dirt can hide.
- Rinse every part well with clean water after washing. This helps get rid of any soap left behind.
- Use baking soda or lemon juice for bad smells or stains. These natural cleaners work well and are safe to use.
- Always let your hydration bladder and parts dry all the way before putting them back together. This stops mold from growing.
- Keep your clean hydration backpack in a cool, dry place. You can use silica gel packs to soak up extra moisture.
- After putting it back together, check for leaks. Squeeze the bladder gently to make sure it is safe for your next trip.
Supplies for Cleaning
Before you start cleaning your hydration backpack, gather all the cleaning supplies you need. Having everything ready makes the job easier and faster. Here’s a breakdown of what you should use and why each item matters.
Cleaning Tools
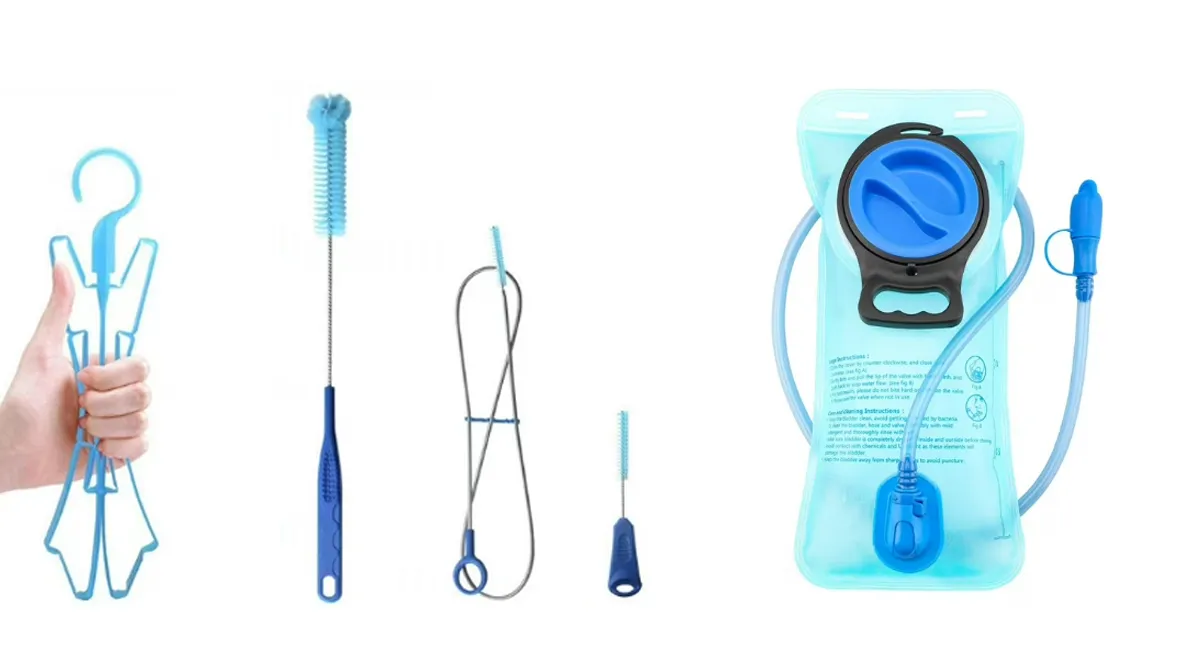
Brushes
You need brushes to scrub inside the hydration bladder and tube. A long, thin brush helps you reach deep into the tube, while a wider brush works well for the bladder. Some cleaning kits, like the Chill-Its 5159 Hydration Pack Bladder Cleaning Kit, come with special brushes designed for these jobs. Brushes remove dirt, mold, and any sticky residue left behind after your adventures.
Cleaning Tablets or Mild Soap
You can use cleaning tablets or mild soap to wash the inside of your hydration bladder. Cleaning tablets work fast and make the process simple. Just fill the bladder with warm water, drop in a tablet, and let it soak for about 5 to 30 minutes. When the bubbling stops, pour out the solution and rinse with clean water. Mild soap is another good choice. Add a few drops to warm water, scrub with your brush, and rinse well. Both options help remove bacteria and keep your water tasting fresh.
Tip: Denture-cleaning tablets also work as a quick cleaning alternative. They dissolve fast and help fight germs.
Drying Tools
Drying Rack or Hanger
After washing, you need to dry every part of your hydration backpack. A drying rack or hanger lets air flow inside the bladder and tube. This stops mold from growing and keeps your gear fresh. Some cleaning kits include racks made just for hydration bladders.
Towels
Use towels to wipe off extra water from the outside of the bladder and pack. Towels help speed up drying and keep water from pooling inside the backpack.
Optional Items
You might want a few extra items to make cleaning easier:
- Pipe cleaners for tight spots in the tube.
- Cotton swabs for cleaning the bite valve.
- Antibacterial wipes for quick touch-ups.
- Specialized cleaning kits with racks and brushes.
| Cleaning Supplies | Purpose |
|---|---|
| Brushes | Scrub inside bladder and tube |
| Cleaning tablets | Remove bacteria and odors |
| Mild soap | Clean and freshen bladder and tube |
| Drying rack/hanger | Air dry bladder and tube |
| Towels | Wipe off excess water |
| Optional items | Clean hard-to-reach spots |
Some new hydration backpacks use antibacterial films and multi-layer designs. These features help prevent bio-film build-up, so you spend less time scrubbing and more time enjoying clean water.
Note: Always check your backpack’s instructions before using any cleaning supplies. Some materials need gentle care.
Now that you know what you need, you’re ready to start cleaning your hydration backpack the right way!
How to Clean Hydration Backpack: Step-by-Step Guide
Ready to dive into the cleaning process? This step-by-step guide will walk you through how to clean hydration backpack parts the right way. You’ll find that each step is simple, and you can finish the job quickly if you follow the order below.
Empty and Disassemble
Before you start scrubbing, you need to take everything apart. This helps you reach every spot where dirt or bacteria might hide.
Remove Bladder
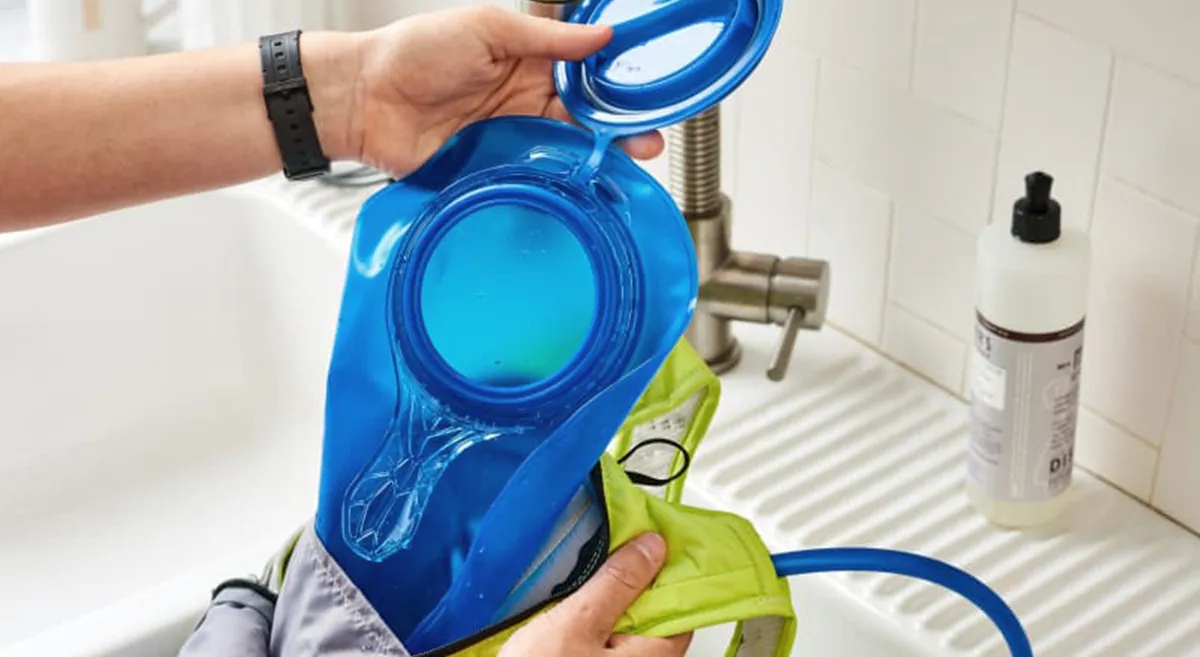
First, open your backpack and pull out the hydration bladder. Make sure you pour out any leftover water. Hold the bladder over a sink and let it drain completely. If your bladder has a wide opening, this makes the job easier.
Detach Tube and Valve
Next, disconnect the drinking tube from the bladder. Some tubes twist off, while others pull straight out. Remove the bite valve from the end of the tube. If the valve feels stuck, wiggle it gently until it comes loose. Taking these parts apart lets you clean inside the tube and around the valve, where grime can build up.
Separate Backpack Pack
Now, take the empty bladder and tube out of the backpack pack. Set the pack aside. You can clean the pack later, but for now, focus on the bladder and tube. This step keeps your backpack safe from water spills and makes it easier to handle each part.
Tip: Always handle the parts gently. Pulling too hard can damage the seals or connectors.
Rinse Components
After you take everything apart, rinse each piece with clean water. Hold the bladder under running water and swish it around. Run water through the tube by holding it up and letting gravity do the work. Squeeze the bite valve to let water flow through. This first rinse washes away loose dirt and any leftover drink mix.
If you used flavored or sweetened drinks, rinse extra well. Sticky residue can attract bacteria and cause odors. Some brands say you only need to rinse with water if you use plain water, but always check your backpack’s instructions.
Wash with Soap or Tablets
Now it’s time to wash. Fill the bladder halfway with mild soap and warm water. Shake it up to mix the soap. Use a soft brush to scrub the inside of the bladder. For the tube, connect it to the bladder and squeeze water through by rolling the bladder from the top down. This pushes soapy water through the tube and out the valve.
You can also use cleaning tablets. Drop a tablet into the bladder, fill with warm water, and let it fizz for about 30 minutes. The bubbles help lift away grime and kill germs. After soaking, scrub any stubborn spots with your brush.
Note: Never use boiling water or a hairdryer. High heat can damage the bladder and tube.
If you want to know how to clean hydration backpack parts after using sports drinks, pay extra attention to the tube and valve. Use a tube brush for deep cleaning. Rinse everything well after washing to remove all soap or tablet residue.
This step-by-step guide helps you avoid common mistakes, like missing hidden spots or using harsh cleaners. When you use mild soap and warm water, you protect your gear and keep your water tasting fresh. Now you’re ready for the next steps—rinsing thoroughly and tackling any tough odors or stains.
Rinse Thoroughly
After you finish washing your hydration bladder and tube, you need to rinse every part very well. Soap and cleaning tablets can leave behind a taste or residue if you do not rinse enough. Fill the bladder with clean water, shake it, and pour it out. Repeat this step two or three times. Run fresh water through the tube and squeeze the bite valve to flush out any leftover soap. You want to make sure no cleaning solution stays inside.
If you used bleach or baking soda, rinse even more. These cleaners work great, but you do not want any trace left in your water. Hold the bladder under running water and let it fill up. Swish the water around, then drain it. Do this until you do not smell any cleaner. For the tube, attach it to the bladder, fill the bladder, and squeeze water through the tube. This helps clear out every drop.
Tip: If you notice a soapy taste after rinsing, fill the bladder with clean water and let it sit for an hour. Then rinse again. This helps remove stubborn residue.
Address Odors or Stains
Sometimes, your hydration backpack develops odors or stains that regular cleaning cannot fix. You might notice a musty smell or see dark spots inside the bladder or tube. These problems often come from mold, fungi, or even germs like Norovirus. Do not worry—you can tackle these issues with a few simple solutions.
Here are the most common stains and odors you might find:
- Mold or mildew spots
- Fungi growth
- Cloudy patches
- Unpleasant smells from old drinks
- Pathogens like Norovirus
To remove tough stains and odors, try these cleaning methods:
- Baking Soda Solution: Heat about a liter of water to 140 degrees Fahrenheit. Add one tablespoon of baking soda. Pour the mixture into the bladder and scrub the inside with a bottle brush. Baking soda helps lift stains and neutralize odors.
- Bleach Treatment: Add one teaspoon of bleach to the baking soda solution. Shake the bladder well, making sure the solution touches every surface. Hang the bladder and let it sit for 30 minutes to an hour. Bleach kills germs and removes stubborn stains.
- Lemon Juice Rinse: If you want a natural option, use lemon juice. Fill the bladder with warm water and add a few tablespoons of lemon juice. Let it soak for 30 minutes. Lemon juice helps break down stains and leaves a fresh scent.
After using any of these methods, rinse the bladder and tube several times with clean water. You do not want any cleaning solution left behind. Check the inside for any remaining spots or smells. If you still see stains, repeat the process.
Note: Always let your hydration bladder dry completely after cleaning. Moisture helps mold and bacteria grow. Hang the bladder upside down and keep the tube open so air can flow inside.
If you clean your hydration backpack regularly and use these tips for tough stains, you keep your gear safe and your water fresh. You do not need fancy products—just a few household items and a little time.
Clean a Hydration Bladder
When you want to clean a hydration bladder, you need to focus on the inside. This is where germs, dirt, and even biofilm can build up. If you skip this step, your water might taste bad or even make you sick. Let’s break down the best way to get your bladder fresh and safe.
Scrub Interior
Start by filling your bladder with warm water. Add a few drops of mild dish soap and a spoonful of baking soda. Baking soda helps scrub away sticky spots and fights odors. Close the bladder and shake it well. This mix loosens up any grime stuck to the walls.
Now, grab a soft bottle brush. Use it to scrub the inside of the bladder. Pay extra attention to the corners and seams. These spots often hide dirt and biofilm. If you see cloudy patches or feel a slimy layer, keep scrubbing until it feels clean. For a deeper clean, you can:
- Heat about a liter of water to 140°F and pour it into the bladder with baking soda.
- Use your bottle brush to scrub every surface, especially where biofilm likes to stick.
- If you want to kill germs, add a small splash of bleach, shake the bladder, and let it hang for 30 minutes.
- For a natural option, soak the bladder in lemon juice and water after scrubbing.
Tip: If you want a no-scrub method, mix hydrogen peroxide and baking soda, shake the bladder, and let it sit for half an hour. This helps break down tough stains.
You should clean a hydration bladder this way after every few uses, especially if you use sports drinks or notice any strange smells.
Rinse and Inspect
Once you finish scrubbing, rinse the bladder with clean water. Fill it up, shake, and pour out the water. Repeat this step two or three times to make sure no soap or cleaner stays inside. Run water through the tube, too, so everything gets a good rinse.
After rinsing, hold the bladder up to the light. Look for any leftover stains, cloudy spots, or slimy patches. If you see anything, repeat the cleaning steps. You want the inside to look clear and smell fresh.
Note: Always let your bladder dry completely before you store it. Hang it upside down and keep the cap open so air can flow inside. This stops mold from growing.
When you clean a hydration bladder the right way, you keep your water tasting great and your gear ready for your next adventure.
Clean Hydration Pack Components
Taking care of every part of your hydration pack keeps your water fresh and your gear working well. You might think cleaning the tube and valve is tricky, but you can do it with a few simple steps. Let’s break down how you can clean hydration pack components so you never have to worry about mold or bad tastes.
Clean Tube and Valve
The tube and valve can collect dirt, germs, and even mold if you don’t clean them often. You want to make sure water flows clean every time you use your hydration pack.
Flush Tube
Start by flushing the tube. Fill your bladder with warm water and a little dishwashing liquid. Attach the tube and squeeze the bladder so soapy water runs through the tube. This helps loosen any dirt inside. Next, grab the thinnest brush from your cleaning kit. Push it through the tube to scrub away any sticky spots or hidden grime. You should rinse the tube with clean water until no soap remains. Repeat this step if you see any cloudy patches.
Tip: Always let the tube dry completely before you put your hydration pack away. Moisture can lead to mold.
Clean Valve/Bite Piece
The bite valve needs special attention. Remove it from the tube. If your valve has a red plastic piece, push it out gently. Soak both parts in hot water with dishwashing liquid. Squeeze the valve to release any trapped dirt. Use a small brush or cotton swab to clean inside the bite piece. Rinse everything with clean water. Make sure you dry the valve before reattaching it to your clean hydration pack.
Here’s a quick cleaning checklist for your tube and valve:
- Scrub all parts with dishwashing liquid and brushes.
- Remove and soak the bite valve in hot soapy water.
- Use a thin brush for the inside of the tube.
- Rinse every part with clean water.
- Dry all components before storing.
Clean Backpack Pack
The outside of your hydration pack gets dirty from dust, sweat, and mud. You want your pack to look good and last longer, so cleaning it is important.
Spot Clean
Check your pack for stains or dirty spots. Use a damp towel or antibacterial wipe to clean these areas. Rub gently so you don’t damage the fabric. If you see stubborn stains, add a drop of mild soap to your towel and scrub the spot. Wipe away any soap with a clean, wet towel.
Hand or Machine Wash
If your hydration pack is very dirty, you can wash the whole pack. Remove the bladder and tube first. Check the care label to see if you can use a washing machine. If you can, place the pack in a laundry bag and wash on a gentle cycle with cold water. For hand washing, fill a basin with cold water and mild soap. Soak the pack, then scrub with a soft brush. Rinse well and let it air dry.
Note: Never use bleach or strong chemicals on your pack. These can damage the fabric and shorten its life.
| Component | Cleaning Method | Drying Tip |
|---|---|---|
| Tube | Flush, brush, rinse | Hang to air dry |
| Valve/Bite Piece | Soak, scrub, rinse | Air dry before reattaching |
| Backpack Pack | Spot clean or wash | Dry in shade |
When you clean hydration pack parts regularly, you keep your gear safe and ready for every adventure. You don’t need fancy tools—just a little time and care. Make cleaning your hydration pack a habit, and you’ll always enjoy fresh water on the trail.
Drying and Reassembly
After you finish cleaning your hydration backpack, you need to dry every part before you put it back together. This step keeps your gear fresh and stops mold from growing.
Air Dry Bladder and Parts
You want your hydration bladder and all its parts to dry completely. If you seal them up while they are still wet, you risk mold and bad smells. Here’s how you can dry your gear the right way:
Dry Upside Down
Hang the bladder upside down in a spot with good airflow. You can use a drying rack, a special hanger, or even a clean clothes hanger. Make sure the cap or opening stays wide open. This lets air move inside and helps water evaporate faster. Hang the tube and bite valve so water can drip out. If you have a towel, you can gently pat the outside dry first.
- Wash your hydration reservoir after every use.
- Never seal it up while it is still wet. This helps you avoid mold growth.
- Hang the bladder upside down in a well-ventilated area for best results.
Tip: If you want to speed up drying, stuff a clean paper towel inside the bladder to soak up extra moisture. Remove it after an hour.
Avoid Sunlight
You might think sunlight will dry your gear faster, but it can actually cause problems. Direct sunlight can fade the colors of your bladder and weaken the fabric over time. Always pick a shady spot or an indoor area with good airflow.
- Avoid drying your hydration pack in direct sunlight.
- Sunlight can fade colors and make the fabric weaker.
Reassemble and Store
Once everything feels dry, you can put your hydration backpack back together. Take your time with this step so you do not miss anything.
Check for Leaks
Follow these steps to reassemble your hydration system:
- Gather your clean, dry hydration bladder, the tube, the bite valve, and your backpack.
- Rinse the bladder one last time if you want, then seal it tightly.
- Slide the bladder into the hydration sleeve inside your backpack.
- Attach the tube and position it so you can reach it easily while wearing the pack.
- Secure the bite valve at the end of the tube.
- Fill the bladder with a little water and check for leaks. Squeeze gently and watch for drips.
- Adjust the straps and make sure everything feels comfortable.
Note: Always test the bite valve before you head out. A quick squeeze will show if water flows well.
For storage, keep your hydration backpack in a cool, dry place. Some people store the bladder in the refrigerator to stop bacteria from growing. You can also put a silica gel pack inside to absorb any leftover moisture. Never store your bladder wet. Clean and dry it after each use to keep away odors and bacteria.
| Storage Tips | Why It Matters |
|---|---|
| Store in refrigerator | Stops bacteria and mold |
| Use silica gel packs | Absorbs leftover moisture |
| Never store wet | Prevents mold and bad smells |
| Clean after each use | Keeps water fresh and safe |
When you dry, reassemble, and store your hydration backpack the right way, you make sure it’s always ready for your next adventure. You also help your gear last longer and keep your water tasting great.
Cleaning Frequency & Tips
Keeping your hydration backpack clean is easier when you know how often to do it and what steps to follow. Here are some tips to help you keep your gear fresh, prevent mold growth, and avoid bad odors.
How Often to Clean
You might wonder how often you should clean your hydration backpack. The answer depends on what you put inside. If you use only water, you can clean it every 2 to 4 weeks. If you use sweetened or flavored drinks, you need to clean it after every trip. Most manufacturers suggest cleaning after each use to keep your backpack in top shape.
- Clean your hydration pack after every trip to maintain good condition.
- If you use electrolyte or flavored mixes, clean after every use.
- For plain water, clean every 2-4 weeks.
- Always clean after using sweetened or flavored drinks.
Tip: Cleaning right after each use helps stop bad odors and keeps your water tasting fresh.
Quick Cleaning After Use
Sometimes you need a fast clean, especially after a short hike. Here’s a simple routine you can follow:
- Disconnect the drinking tube from the bladder.
- Wash the reservoir with soapy lukewarm water. Scrub if needed.
- Rinse the bladder well and let it air-dry.
- Connect the tube and flush it with soapy water. Use a tube brush for a deeper clean.
- Rinse the drinking valve with soapy water. Deep clean only if you notice any build-up.
Tip: Quick cleaning stops bacteria and keeps odors away. Use mild cleaning solutions for the best results.
Prevent Mold and Odors
No one likes bad odors or mold in their hydration backpack. You can follow these tips to keep your gear fresh:
- Keep it clean. Wash your backpack often to remove sweat, dirt, and food bits.
- Dry thoroughly. Hang the bladder upside down in a well-ventilated area after each wash.
- Store properly. Pick a cool, dry place with good airflow to prevent moisture.
- Use desiccants. Place silica gel packets or cedar wood blocks inside to absorb moisture.
- Maintain the waterproof coating. Check and reapply treatments to keep water out.
Tip: Always let your hydration bladder and tube dry completely before storing. This simple habit helps prevent mold growth and stops bad odors from forming.
Here’s a table with best practices for long-term care:
| Best Practice | Why It Matters |
|---|---|
| Clean and dry before storing | Prevents mildew and bad odors |
| Store in a cool, dry place | Stops mold and keeps fabric strong |
| Use clean, potable water | Reduces risk of bacteria and odors |
| Avoid crushing under heavy items | Maintains shape and airflow |
| Loosely stuff with dry towels | Helps the pack keep its shape |
Tip: Always use cleaning solutions that are safe for your hydration system. Avoid harsh chemicals that can damage the bladder or leave behind strong odors.
When you follow these tips, you keep your hydration backpack in great shape. You get fresh-tasting water every time, and you avoid the hassle of cleaning tough stains or fighting bad odors later. Make cleaning a habit, and your gear will last for many adventures.
Conclusion
Taking care of your hydration backpack helps you stay healthy. Cleaning it often stops germs and mold from growing. This also keeps away bad smells and leaks. Here are some reasons to clean your pack:
- Stops germs and mold from growing
- Keeps your water tasting good
- Makes your backpack last longer and work well
- Lets you find damage early
If you want a hydration backpack designed just for your brand, we offer full custom, OEM, and ODM support. Whether you need unique styles, special materials, personalized logos, or branded packaging, our factory can produce hydration packs that match your requirements and market goals.
As a professional hydration backpack manufacturer, we help you create products with reliable quality and strong brand impact.
FAQ
How often should you clean your hydration backpack?
You should clean your hydration backpack after every use, especially if you use sports drinks. If you only use water, clean it every few weeks. Regular cleaning keeps your water fresh and your gear safe.
Can you put your hydration bladder in the dishwasher?
Most hydration bladders are not dishwasher safe. High heat can damage the plastic and seals. Always check the manufacturer’s instructions. Hand washing works best for most bladders.
What if your hydration bladder smells bad?
If you notice a bad smell, soak the bladder with baking soda or lemon juice and warm water. Let it sit for 30 minutes, then rinse well. This helps remove odors and leaves your gear fresh.
How do you dry the inside of the tube?
Hang the tube so air flows through it. You can use a tube brush to push out water drops. Some people tie a string to a small piece of paper towel and pull it through the tube to soak up moisture.
Can you use bleach to clean your hydration pack?
You can use a small amount of bleach mixed with water to kill germs and remove stains. Rinse very well after using bleach. Never use too much, and always let the bladder dry completely before storing.
What should you do if mold appears?
If you see mold, scrub the area with a brush and use a cleaning solution like baking soda or bleach. Rinse everything well. Dry all parts completely before you put your pack away.
Is it safe to freeze your hydration bladder?
Yes, you can freeze your hydration bladder to stop bacteria and mold from growing. Make sure it is empty and dry before freezing. Freezing does not replace cleaning, so always wash your gear first.
Can you use vinegar to clean your hydration system?
Yes, you can use white vinegar mixed with water to clean your hydration bladder and tube. Vinegar helps remove odors and kills some germs. Rinse well to get rid of the vinegar taste.