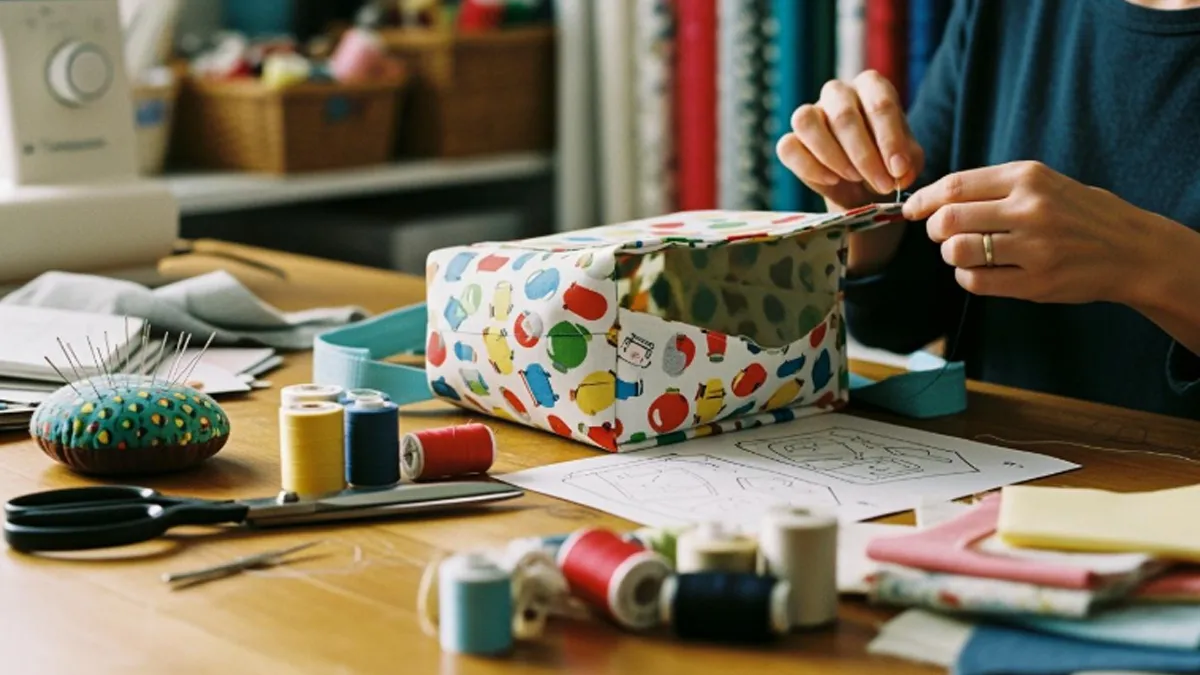
Yes, you can sew a diy lunch bag step by step. Making your own diy project gives you freedom to pick colors, patterns, and even the size you want. You help the planet by choosing reusable materials. You save money, too!
- Making a diy lunch bag usually costs much less than buying one.
- You can use fabric scraps or old clothes for your diy.
- You waste less by using only what you need.
If you are new to sewing or have some experience, this diy will bring you joy. There is something special about carrying a lunch bag you made yourself.
Key Takeaways
- Making a DIY lunch bag lets you pick colors and patterns you like. This makes your bag special and just for you.
- Using reusable materials for your lunch bag cuts down on waste. It is also better for the environment.
- Gather all the things you need before you start. You will need fabric, insulation, and tools.
- Measure and cut your fabric with care. This helps your lunch bag look neat and fit well.
- Follow each sewing step to make a strong lunch bag. Your bag will work well and last longer.
- Add insulation to keep your food at the right temperature. This makes your lunch taste better.
- You can add handles, closures, and decorations to your bag. This makes your bag unique and personal.
- Clean and take care of your lunch bag often. This helps it last longer and stay fresh.
Materials for a Canvas Lunch Bag
Getting your materials ready is the first step to making a canvas lunch bag you’ll love to use every day. You can pick from several fabric options, gather your tools, and add extras to make your bag unique and practical.
Fabric Options
Canvas, Cotton, Laminated
You have lots of choices for the main fabric. Canvas is a top pick for a canvas lunch bag because it’s tough and eco-friendly. You can toss it in the washing machine, and it stands up to daily use. Cotton is another good option. It feels soft and looks great, but it can wear out faster than canvas. Laminated fabrics add a waterproof layer, so spills won’t soak through.
Here’s a quick look at how these materials compare:
| Material | Durability | Notes |
|---|---|---|
| Canvas | Durable | Eco-friendly, machine washable, suitable for short trips |
| Cotton | Moderate | Biodegradable, soft, unique patterns |
| Laminated | High | Waterproof, easy to clean, stiffer feel |
Canvas lunch bags made from natural materials like cotton or canvas help the planet. Cotton breaks down faster than synthetic fabrics. Both canvas and cotton use less energy and create less waste during production. If you care about the environment, these choices make sense.
Insulated Batting
Want to keep your food cool or warm? Add insulated batting. Insul-Bright is a popular choice. It keeps your lunch fresh until you’re ready to eat. You can also use felt or wool for extra padding. Some people mix materials like recycled denim or oil cloth for style and function.
Tools Needed
Sewing Machine, Scissors
You need a few basic tools to sew a canvas lunch bag. Grab a sewing machine for strong stitches. Sharp scissors help you cut clean edges. You’ll also want a ruler or measuring tape and some chalk for marking your fabric.
Pins, Measuring Tape
Pins hold your pieces together while you sew. A measuring tape helps you get the size just right. These tools make your project easier and help you avoid mistakes.
Tip: Use sturdy brown canvas and matching thread for a classic look. Duck canvas works well for a canvas lunch bag because it’s thick and holds its shape.
Extra Supplies
Handles, Closures
Handles make your canvas lunch bag easy to carry. You can use fabric straps, webbing, or even recycled belts. Closures like Velcro, zippers, or snaps keep your lunch secure. If you want to prevent leaks, try adding a PUL waterproof lining.
Thread, Interfacing
Pick strong thread that matches your canvas. Interfacing adds structure, so your canvas lunch bag stands upright. You can also use ripstop nylon or waxed canvas for the bottom to make cleaning easier and boost durability.
- Mixing materials like felt, recycled fabrics, or denim scraps can make your canvas lunch bag stand out.
- Waterproof linings help with spills, but they might make the bag stiffer.
- Insul-Bright batting keeps your food cool or warm.
You now have a full list of what you need to start your canvas lunch bag. Canvas gives you durability and style, while cotton and laminated fabrics offer other benefits. With the right tools and extras, you can create a bag that fits your needs and shows off your personality.
Cutting and Preparing Fabric
Getting your fabric ready is a big step in making a lunch bag that looks neat and fits your needs. You want to measure, mark, and cut with care. Let’s break it down so you feel confident from the start.
Measure & Mark
Standard Dimensions (30 x 38 cm)
Most DIY lunch bags use a rectangle shape. You can start with a size like 30 cm x 38 cm. This fits a sandwich, snacks, and a drink. If you want to compare, check out how these sizes stack up against popular commercial lunch bags:
| Lunch Bag | Dimensions (L x W x H) |
|---|---|
| Titan by Arctic Zone | 9.5″ x 7″ x 6.5″ |
| Hydro Flask Insulated Tote | 13.5″ x 12.1″ x 5″ |
| Carhartt Deluxe Cooler | 10″ x 8″ x 8″ |
| Baloray Insulated Bag | 11.8″ x 9.8″ x 6.3″ |
| DIY Standard | 11.8″ x 15″ |
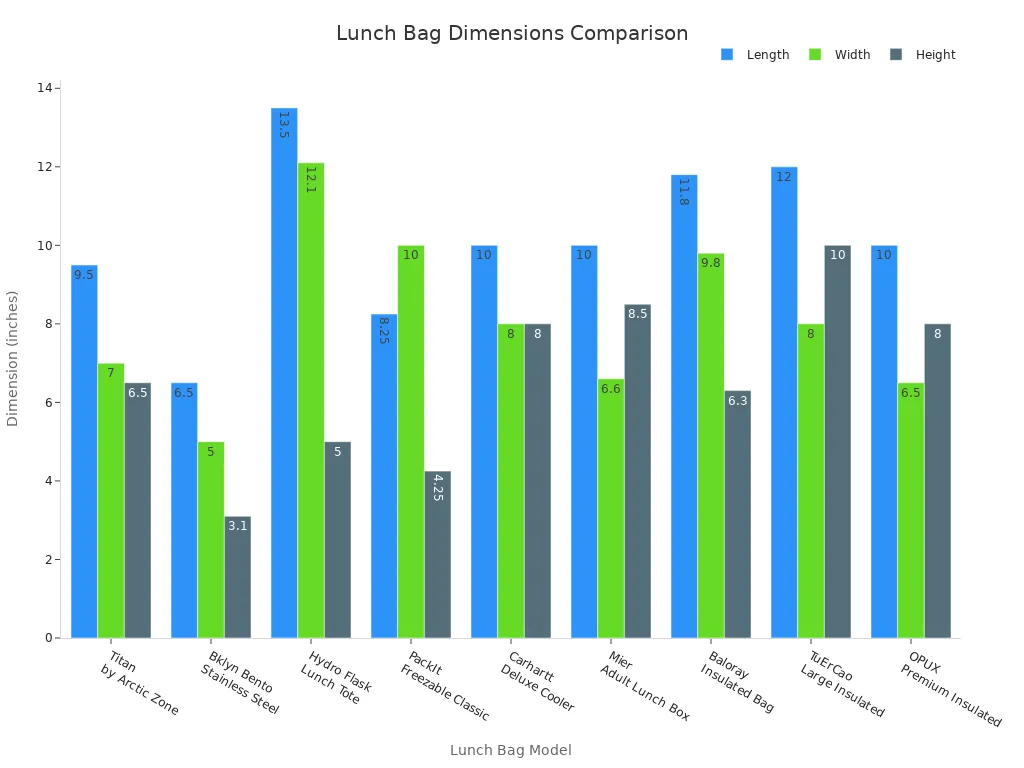
You see, your DIY lunch bag can be just as roomy as store-bought ones.
Custom Sizing
Want a smaller or bigger bag? Grab your lunch container and measure it. Add a few centimeters for seam allowance and wiggle room. You can sketch your own pattern on paper. This helps you see the shape before you cut.
Tip: Always add at least 1 cm around each edge for seams. If you skip this, your bag might end up too tight!
Cut Pieces
Outer Layer
Let’s get cutting! Here’s a simple way to do it:
- Draw your pattern on a large sheet of paper. Make sure you include seam allowances.
- Lay your fabric flat. Pin your paper pattern to the fabric.
- Use sharp scissors or a rotary cutter for clean edges.
- Cut a rectangle for the outer layer. For a standard bag, try 28 cm x 70 cm or 17 inches x 12 inches.
Lining
Repeat the same steps for the lining fabric. Pin your pattern to the lining, then cut. If you want insulation, cut extra pieces of batting the same size.
Note: Mark spots for handles and closures with chalk or pins. This makes sewing easier later.
Tips for Accuracy and Using Templates
- Take your time with measuring. Rushing leads to uneven edges.
- Use a cutting mat and ruler for straight lines.
- Double-check your pattern before you cut.
- If you use directional prints, make sure they face the right way.
Here’s a quick checklist to avoid common mistakes:
- Read through your pattern before you start.
- Pick fabric that’s easy to handle, like canvas or cotton.
- Don’t rush the cutting. Slow and steady wins!
Now you have your pieces ready. You’re set for the next step—sewing your lunch bag together!
DIY Lunch Bag Instructions: Sewing Steps
Ready to put your diy lunch bag together? You’re about to see how easy it is to follow step-by-step instructions and create a bag you’ll want to use every day. Grab your fabric pieces, lining, and insulation if you’re making a diy insulated lunch bag. Let’s get started!
Sew Outer Shell
Stitch Sides & Bottom
You start by assembling the outer shell. Here’s how you do it:
- Place the outer fabric right side up. If you’re adding insulation for a diy insulated lunch bag, layer the batting on top of the wrong side of the outer fabric.
- Align all edges and secure them with sewing clips or pins.
- Fold the fabric so the right sides face each other. Stitch the sides and bottom using a 1/4″ seam allowance. This keeps your bag sturdy.
- Pinch the corners at the bottom, open them up, and align the seams. Sew straight across to create boxed corners. This step gives your diy lunch bag a flat base so it stands upright.
Tip: Always double-check your alignment before sewing. This helps you avoid crooked seams.
Clean Finish Edges
You want your diy lunch bag to look neat inside and out. Try these techniques for clean edges:
- Use a French seam for the side panels. Place the right sides together and sew with a 1/4″ seam allowance. Trim the seam, then fold the fabric so the wrong sides face and sew again. This hides raw edges and adds strength.
- Clip the seam allowances at the corners. Press the edges from the outside to make them crisp.
- Finish with a topstitch around the pressed edges. Use a 1/4″ seam for a professional look.
- You can also pin bias tape around the raw edges. Start at the top and tuck the end under to hide the raw edge. Edgestitch the bias tape in place, making sure you catch both sides as you sew.
Sew Lining
Attach Lining to Outer
Now you move on to the lining. These instructions help you get a smooth finish:
- Turn the outer shell inside out. Keep the lining right side out.
- Place the lining inside the outer shell. The right sides should face each other, so you only see the seams.
- Line up the top edges, corners, and side seams. Pin or clip everything in place.
- Sew around the top edge using a 1/4″ seam allowance. This joins the lining and outer shell together.
- Snip the corners at the flap for easier turning later.
Note: Iron the top edges and flap from the canvas side. Use an ironing cloth or the paper that came with your vinyl to protect the fabric.
Leave Opening for Turning
Don’t sew the entire top edge closed. Leave a small opening (about 10 cm) at the side or bottom of the lining. You’ll use this gap to turn your diy insulated lunch bag right side out.
Turn & Finish
Secure Top Edge
Turning your bag right side out is a fun step. Follow these instructions for best results:
- Cut small slits at the corners before you turn the bag. This helps the corners lay flat.
- Reach inside through the opening in the lining and gently pull the bag right side out.
- Push out the corners with your fingers or a blunt tool. Take your time so you don’t damage the fabric.
| Method | Description |
|---|---|
| Encased Seam | Turn the bag inside out and sew a second, wider seam to hide raw edges. |
| Corner Clipping | Clip corners before turning for a flat, crisp finish. |
Tip: After turning, iron the bag from the canvas side. This helps the diy lunch bag hold its shape.
Final Stitching
You’re almost done! Here’s how you finish your diy insulated lunch bag:
- Push the lining inside the outer shell. Match up the bottom corners and side seams.
- Sew the opening in the lining closed with a topstitch close to the edge.
- Edge stitch around the top of the bag for a clean, finished look.
- Check all seams for strength. Add extra stitches if you want more durability.
You’ve followed step-by-step instructions and created a diy lunch bag that’s sturdy, neat, and ready for lunch. If you made a diy insulated lunch bag, your food will stay fresh longer. You can use these instructions for any diy lunch bag project, whether you want a simple cotton bag or a fully insulated one.
Remember, every diy lunch bag you make gets easier. You learn new sewing tricks each time. Enjoy your new bag and show off your diy skills!
How to Make an Insulated Lunch Bag
You want your lunch to stay fresh. You want it safe, no matter if it is hot or cold. Making an insulated lunch bag lets you pick the materials. You can use canvas you like. You can add waterproof layers. You choose the insulation that works best for you. Let’s look at the steps to make a diy insulated lunch bag.
Add Insulation
Insulation helps keep food at the right temperature. You have different choices. Each one has its own good points.
Insert Batting
Start with insulated batting. This material blocks heat from moving in or out. Insul-Bright is a special batting. It works for hot and cold foods. Put the batting between the outer canvas and the lining. Cut the batting so it matches your bag pieces.
- Insulated batting keeps food hot or cold.
- It protects your lunch from temperature changes.
- Your meal stays at the right temperature.
- This helps keep food safe.
- You can bring hot meals to school or work.
If you want more protection, use foam or reflective materials. Here is a table to help you pick insulation for your diy insulated lunch bag:
| Insulation Material | Benefits | Popular Uses |
|---|---|---|
| Foam (EPE, EVA) | Great insulation, light, strong | Lunch bags, school lunchboxes, cooler bags |
| Reflective Materials | Bounces heat, light, cheap | Insulated lunch bags, cooler bags |
| Neoprene | Water-resistant, bends easily, very good insulation | High-performance lunch bags, thermal cases |
| Polyester-based | Cheap, resists moisture, light | Budget lunch bags, snack pouches |
| Cotton | Good for the planet, lets air through, okay insulation | Eco-friendly lunch bags, reusable bags |
You can mix these materials to get what you want. Foam and reflective layers work well together. Cotton batting is good if you want an eco-friendly diy insulated lunch bag.
Layering Techniques
Layering makes your diy insulated lunch bag work better. Start with canvas on the outside. Add insulation next. Finish with a lining. You can use more layers for extra protection. Try this order:
- Outer canvas layer
- Insulation (batting, foam, or reflective material)
- Waterproof liner (optional)
- Inner lining
Pin all layers before sewing. This keeps them in place. It helps you avoid bunching. You can quilt the insulation to the canvas. This makes the bag sturdy. If you want a soft bag, use thin layers.
Tip: Check how thick your insulation is before sewing. Thick layers need a strong needle and tough thread.
Waterproof Options
Waterproofing stops spills and leaks from ruining your lunch. You have different ways to make your diy insulated lunch bag waterproof.
Use Laminated Fabric
Laminated fabric is good for waterproofing. You can buy canvas with TPU laminate. This makes a thin barrier that stops water. Air can still pass through. Food stays dry and fresh. Laminated canvas does not crack or tear easily. It lasts through many washes. You can use it every day.
- Waterproof and lets air through, so food stays fresh.
- Strong, so your diy insulated lunch bag lasts longer.
- Safe for food, with certified TPU laminates.
If you want to use your own canvas, add a waterproof layer. Use iron-on laminates or fusible liners. These stick to the fabric and make a strong seal.
Add Waterproof Liner
You can put a waterproof liner inside your diy insulated lunch bag. Use plastic or vinyl tablecloths. Cut them to size. Sew them as the inner layer. Silicone caulk seals seams so water cannot get in. Beeswax or candle wax rubbed into canvas makes a barrier. You need to reapply wax after washing.
Here are some popular waterproofing choices:
- Waterproof sprays: Fast and easy, good for canvas.
- Wax treatments: Beeswax or fabric wax seals canvas.
- Iron-on laminates or fusible liners: Adds a waterproof layer inside.
- Plastic or vinyl tablecloths: Sew as a liner for water resistance.
- Silicone caulk for seams: Seals places where water may enter.
Note: Test waterproofing on a scrap piece of canvas first. Do this before treating your whole diy insulated lunch bag.
How Insulation and Waterproofing Benefit Your Lunch
When you use insulation and waterproofing, your diy insulated lunch bag keeps food safe and fresh for hours. Insulated bags keep food cold for 2 to 4 hours without ice packs. With good insulation and ice packs, food stays cold for up to 8 hours. Non-insulated bags only last 1 to 2 hours. You can relax knowing your lunch stays at the right temperature.
| Lunch Bag Type | Without Ice Pack | With One Ice Pack | With Two Ice Packs |
|---|---|---|---|
| Non-insulated | 1-2 hours | 2-3 hours | 3-4 hours |
| Basic insulated | 2-4 hours | 4-6 hours | 5-7 hours |
| Premium insulated | 4-6 hours | 6-8 hours | 8-10 hours |
| High-end thermal | 6-8 hours | 8-10 hours | 10-12+ hours |
You can keep food warm for 2 to 4 hours. With heat packs, it lasts even longer. This makes your diy insulated lunch bag great for school, work, or travel.
Callout: Insulation and waterproofing make your diy insulated lunch bag dependable. You protect your food, save money, and enjoy homemade meals anywhere.
Now you know how to make an insulated lunch bag that fits your style and needs. Use canvas for strength. Add layers for insulation. Pick waterproof options for extra protection. Your diy insulated lunch bag will keep your lunch safe, fresh, and ready to eat.
Handles, Closures, and Customization
Adding handles, closures, and your own style makes your DIY lunch bag both useful and fun. You get to decide how you want to carry it, how to keep your lunch safe, and how to show off your personality.
Attach Handles
Fabric Straps, Webbing
You have a few choices for handles. Fabric straps feel soft and match your bag. You can cut strips from your main fabric or use a bold color for contrast. Webbing is another great pick. It is strong and comes in many colors. You can buy cotton, nylon, or polyester webbing at most craft stores.
- Fabric straps blend in with your bag.
- Webbing gives extra strength and a sporty look.
- Recycled belts or old bag straps work well, too.
To attach, pin the handles to the top edge of your bag before sewing the lining. Make sure both handles are the same length so your bag hangs straight.
Reinforce for Strength
You want your handles to last. Sew a square or an “X” where the handle meets the bag. This keeps the straps from pulling out, even when you carry heavy lunches. Double-stitching adds even more strength.
Tip: Use extra layers of fabric or interfacing at the handle spots for a sturdy finish.
Add Closures
Velcro, Zippers, Snaps
Closures keep your lunch safe inside the bag. You can pick from several types:
- Velcro: Easy to open and close. Great for kids.
- Zippers: Very secure and neat. Many popular lunch bags, like the Dillan and Russel, use large zipper openings for easy access and strong closure.
- Snaps: Quick to fasten. They add a classic touch.
- Flaps: Some bags, like the Stan, use two flaps that hold food and containers securely.
You can sew Velcro or snaps to the inside of the top edge. For zippers, pin them between the outer fabric and lining before sewing the top seam.
Secure Closures
Make sure your closure lines up with the center of your bag. Test it before sewing it down. A secure closure keeps your food from spilling out and makes your bag feel professional.
Note: A spacious interior, like in the Jan lunch bag, also helps keep your lunch secure and easy to pack.
Customize & Decorate
Pockets, Appliqué, Embroidery
Personal touches make your lunch bag special. Add a pocket on the outside for napkins or utensils. Try appliqué shapes, like stars or animals, using fabric scraps. Embroidery lets you stitch your name or a fun design. Kids love bags with their names on them. Embroidery helps children find their lunch bags at school and keeps them from getting lost.
- Pockets add storage for small items.
- Appliqué and embroidery make your bag unique.
- Personalization helps you spot your bag quickly.
Personalization Ideas
You can get creative with decorations! Many DIY fans use heat transfer vinyl to make shapes like triangles, hearts, or rectangles. Gold letter patches spell out names or favorite words. You can even draw with fabric markers or sew on colorful buttons.
| Customization | How to Do It | Why Try It? |
|---|---|---|
| Heat Transfer Vinyl | Iron on fun shapes | Easy and bold |
| Gold Letter Patches | Spell out names or phrases | Makes your bag stand out |
| Fabric Markers | Draw your own designs | Totally personal |
| Buttons & Charms | Sew on for extra flair | Adds texture and color |
Callout: Your lunch bag can be as simple or as fancy as you want. Try new ideas and make it truly yours!
Now your DIY lunch bag is ready to carry, close, and show off. Handles, closures, and decorations turn a simple bag into something you’ll love to use every day.
Care Tips for Your DIY Insulated Lunch Bag
Taking care of your diy insulated lunch bag helps it last longer and keeps your food safe. You do not need fancy tools or special products. Just a few simple steps will keep your bag looking and smelling fresh.
Cleaning
Machine Washable
Many diy insulated lunch bags can go in the washing machine. Always check your fabric first. If your bag is machine washable, follow these steps:
- Empty your bag and shake out crumbs or trash.
- Place the bag in a laundry bag or pillowcase to protect it.
- Use a gentle cycle with cold water and mild detergent.
- Skip the dryer. Air dry your bag completely before using it again.
Tip: Clean your lunch bag soon after use. This stops stains from setting and saves you from tough scrubbing later.
Hand Wash Tips
If your diy insulated lunch bag has special insulation or waterproof layers, hand washing works best. Here’s how you can do it:
- Fill a sink or basin with warm, soapy water.
- Wipe down the outside with a soft cloth or sponge.
- Clean the inside with a damp cloth. Avoid soaking the whole bag to protect the insulation.
- Rinse with clean water.
- Let your bag air dry fully before putting the liner back in.
You can also spot clean with antibacterial wipes or a mix of vinegar and water. This keeps your diy insulated lunch bag fresh every day.
Maintenance
Repair Weak Spots
Your diy insulated lunch bag might get small tears or loose handles over time. Fixing these right away keeps your bag strong.
- Patch small holes with fabric tape or textile glue.
- Sew loose handles or seams with heavy-duty thread.
- Clean and lubricate zippers to stop them from sticking.
Note: Avoid overstuffing your bag. This helps the insulated walls stay strong and keeps seams from ripping.
Longevity Tips
You want your diy insulated lunch bag to last as long as possible. Try these tips:
- Clean your bag often to stop odors and protect the insulation.
- Keep your bag away from heaters or direct sunlight. Heat can damage the insulation.
- Rotate between two or more bags if you use them daily. This reduces wear and tear.
- Use ice packs in sleeves to prevent leaks inside your bag.
- Always empty your bag at the end of the day. This stops moisture and smells from building up.
| Problem | Quick Fix |
|---|---|
| Stains | Spot clean with mild detergent |
| Odors | Air out and use baking soda inside |
| Torn seams | Stitch with strong thread |
| Sticky zippers | Rub with a little candle wax |
If you follow these care tips, your diy insulated lunch bag will stay clean, strong, and ready for every meal. You will save money and enjoy your homemade bag for a long time.
Conclusion
You feel happy when you use a diy lunch bag you made. You help the earth and keep your food safe. Here are some good things that last a long time:
- You stay away from bad chemicals in many store-bought bags.
- You use less plastic, so there is less trash in the ocean.
- You help make the world better for people in the future.
Try making your own diy lunch bag and use colors or pockets you like. If you want special bags for your business, we have OEM and ODM services. Look at the table below to see why many people pick us as their trusted factory in China:
| Advantage | Description |
|---|---|
| Rich experience in custom lunch bags | We have made lunch bags for over ten years, so we know a lot about designs, materials, and how to make them. |
| Whole production quality control | We check each lunch bag four times to make sure it is good at every step. |
Contact us if you want to buy many or need custom makeup bag solutions!
FAQ
How do I choose the best fabric for my lunch bag?
Canvas works great for durability. Cotton feels soft and comes in many patterns. Laminated fabric gives you waterproof protection. Pick what fits your style and needs.
Can I sew a lunch bag without a sewing machine?
Yes, you can sew by hand. Use strong thread and small stitches. Hand sewing takes longer, but you still get a sturdy bag.
What size should my DIY lunch bag be?
Most lunch bags measure about 30 x 38 cm. You can adjust the size to fit your containers. Always add extra space for seams.
How do I make my lunch bag waterproof?
Try laminated fabric or add a waterproof liner. You can also use waterproof sprays. Test on a scrap first to see how it works.
Is it safe to wash my DIY insulated lunch bag in the machine?
If your bag uses washable materials, you can use the machine. Place it in a laundry bag. Air dry to keep the insulation working well.
What’s the easiest closure to add?
Velcro is simple and quick. You just sew or stick it to the top edge. Kids find Velcro easy to open and close.
Can I personalize my lunch bag?
Absolutely! Add pockets, embroidery, or patches. Use fabric markers for names or fun designs. Your bag can show off your personality.