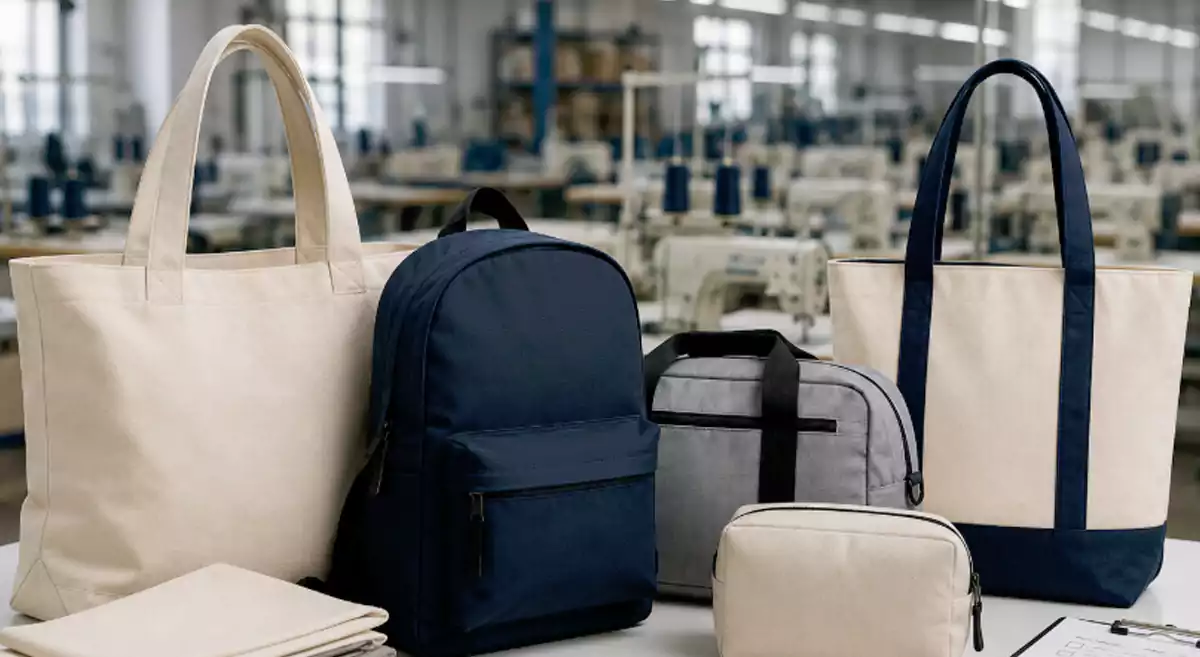
Ever wondered how to make felt bags as a beginner? You can do it, even if you have never made a bag before. This tutorial guides you step by step so you can create a unique bag with your own hands. You will find everything you need, from materials to fun ways to decorate. Give it a try—making your own felt bag feels rewarding and fun!
Key Takeaways
- Get all your materials and tools ready first. Pick good felt for better bags.
- Pick an easy shape for your bag, like a rectangle or square. This makes cutting simple.
- Think about your design before you start. Draw your ideas and choose pockets and decorations before you cut.
- Use strong handles so your bag is comfy. You can use felt strips, braid them, or use ribbon for handles.
- Follow each step in the tutorial. Go slow to keep edges neat and stitches tight.
- Try no-sew ways if you do not want to sew. Fabric glue can make strong bags without sewing.
- Add decorations like patches, embroidery, or cool closures to make your bag special.
- Be safe while you work. Keep your tools in order and take breaks to stay safe.
Materials and Tools
Before you start making your felt bag, you need to gather the right materials and tools. Picking the right supplies makes the process easier and helps your bag look great. Let’s break down what you need.
Felt Types
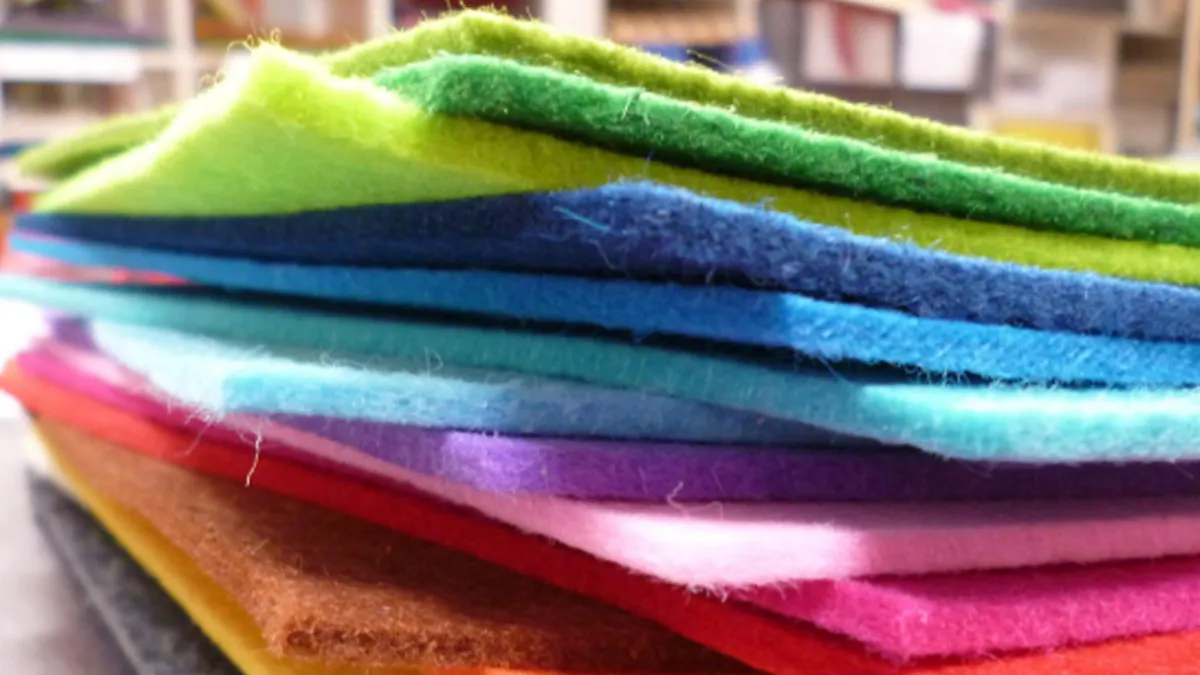
You have a few choices when it comes to felt. Each type has its own feel and look. Here are the most popular types for bag making:
- Merino wool felt: This felt feels soft and smooth. It comes in many colors and does not fray. Merino wool felt holds its shape well, even when you put things in your bag. It is also water-repellent and strong.
- 100% wool felt: This felt is dense and durable. It is biodegradable and absorbs moisture. Many people use it for bags, toys, and even clothing.
- Upcycled felted wool: You can make your own felt by washing and shrinking old wool sweaters. This process creates a thick, sturdy fabric called felted wool. Felted wool bags have a unique look and help you recycle old clothes.
Tip: Regular felt is made from fibers pressed together, while felted wool comes from wool that has been washed and shrunk. Felted wool is usually thicker and stronger.
Tools List
You do not need many tools to start making a felt bag. Here are the basics:
- Sharp scissors: Use these to cut felt cleanly. Smaller scissors help with details.
- Larger shears: These work well for cutting big pieces of felt.
- Rotary cutter: This tool makes it easy to cut straight lines, especially if you want to cut several layers at once.
- Scalloping shears: These scissors create fun, wavy edges on your felt pieces.
- Needle and thread: You need these if you want to sew your bag.
- Fabric glue or hot glue gun: These help you stick pieces together if you do not want to sew.
- Ruler or measuring tape: Use these to measure your felt pieces.
- Pins or clips: These hold your felt in place while you work.
Here are some optional tools that can make your project even better:
| Tool Type | Description |
|---|---|
| Die-cutting machine | Cuts felt into shapes quickly and easily. |
| Embroidery supplies | Adds designs and details to your felt bag. |
| Gluing options | Gives you more ways to attach and decorate felt pieces. |
Decorative Options
You can make your felt bag stand out with decorations. Here are some popular ways to add style:
- Color: Pick from many shades of felt to match your mood or the season.
- Embroidery and printing: Stitch patterns or print designs onto your bag for a personal touch.
- Contrasting fabrics: Mix felt with leather or cotton for extra texture and style.
- Buttons, beads, or patches: Glue or sew these onto your bag for fun details.
Note: You can use your imagination to create a bag that shows off your personality. Try different colors, shapes, and decorations until you find a style you love.
Now that you know about the materials and tools, you are ready to start making your own felt bag!
Prepare Felt
Getting your felt ready is the first real step in making your bag. You want to make sure each piece fits together and looks great. Let’s break it down so you can start with confidence.
Cut Shape
Start by choosing the shape and size for your bag. You can go with a classic rectangle, a square, or even a geometric pattern. If you’re new to felt bags, simple shapes work best. Here are some beginner-friendly dimensions you can try:
- For a geometric bag, cut pieces that measure about 11 inches by 12 inches. You can get up to 58 pieces from a large felt sheet that’s 12 inches by 60 inches.
- For an easy felt tote bag, cut one big piece that’s 12 inches by 30 inches. You’ll also need two smaller pieces, each 4 inches by 18 inches, for the sides.
Use a ruler or measuring tape to mark your felt before you cut. Sharp scissors or a rotary cutter will help you get clean edges. If you want a fun look, try scalloping shears for wavy edges. Lay your felt flat on a table and double-check your measurements before you start cutting. Mistakes happen, but you can always trim a little more if needed.
Tip: If you’re not sure about your cutting skills, practice on a scrap piece first. This helps you get comfortable and avoid wasting your good felt.
Plan Design
Now it’s time to think about how your bag will look. Do you want a simple style or something bold? Sketch your ideas on paper or use chalk to draw directly on the felt. Decide where you want pockets, decorations, or extra layers. You can add embroidery, patches, or even mix in other fabrics like cotton or leather.
Ask yourself these questions:
- Where will the handles go?
- Do you want a flap or an open top?
- Will you add a pocket inside or outside?
Planning helps you avoid surprises later. You can even lay out all your felt pieces and decorations before you start gluing or sewing. This way, you see how everything fits together.
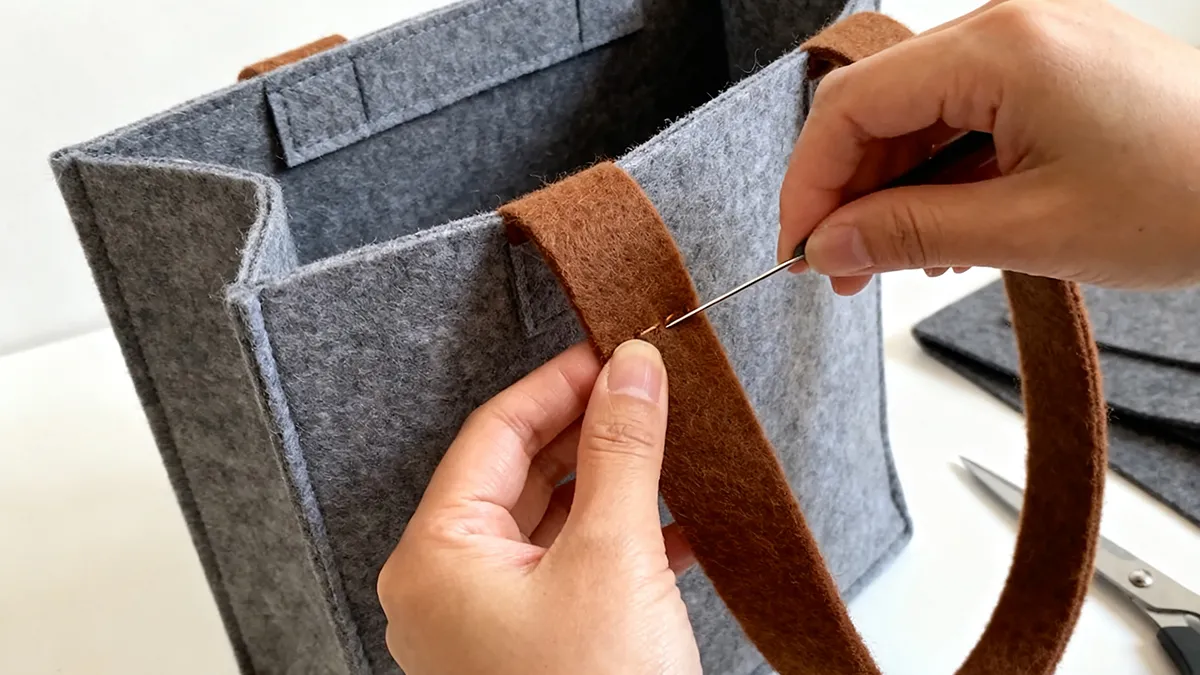
Make Handles
Handles make your bag easy to carry. You have lots of options, so pick what feels best for you. You can cut strips of felt for soft handles, braid several pieces together for a chunky look, or use ribbon or rope for extra strength.
Here’s a quick table to help you choose:
| Handle Type | How to Make It | Best For |
|---|---|---|
| Felt strips | Cut long, wide pieces of felt | Lightweight bags |
| Braided felt | Braid 3-4 thin felt strips | Stylish totes |
| Ribbon/rope | Attach with glue or sew ends | Heavy-duty bags |
Measure your handles so they fit your hand or shoulder. Most people like handles that are about 18 to 24 inches long. Attach them with glue, sewing, or clips. Make sure they feel sturdy before you finish your bag.
Note: If you want extra comfort, wrap your handles with another layer of felt or add padding inside.
Now your felt is cut, your design is planned, and your handles are ready. You’re all set for the next step—putting your bag together!
How to Make Felt Bags
Ready to dive into your first felt bag project? This tutorial walks you through every step, so you can follow along and create something special. Whether you want to sew, glue, or try wet felting, you’ll find clear instructions here. Let’s get started!
Step-by-Step Tutorial
You’re about to learn how to make felt bags using basic sewing techniques. Grab your materials and follow these steps:
Cut Outline
- Lay your felt flat on a clean surface.
- Measure and cut two rectangles for the front and back of your bag. A good size for beginners is 30cm x 25cm.
- Cut smaller squares or shapes from colored felt for decorations, like flowers or leaves.
- Cut a long strip of felt for the handle. Try 80cm x 3cm for a shoulder strap.
- Double-check your pieces before moving on.
Tip: Use sharp scissors or a rotary cutter for clean edges. Practice on scrap felt if you’re nervous about cutting.
Attach Belts/Straps
- Position the felt strip at the top edges of your bag pieces.
- Pin the ends of the strip between the front and back rectangles.
- Make sure the strap is even and secure before sewing or gluing.
Sew Pocket
- Cut a small rectangle from felt for your pocket.
- Decide where you want the pocket—inside or outside.
- Pin the pocket in place.
- Sew around the sides and bottom, leaving the top open.
Note: You can skip the pocket if you want a simple bag, but it’s handy for keys or cards.
Add Strap Covers
- If you want extra comfort, cut another strip of felt.
- Wrap it around the handle and sew or glue it in place.
- This makes your bag easier to carry and adds a pop of color.
Reinforce Bottom
- Cut a rectangle of felt for the bottom of your bag.
- Place it inside the bag before sewing the sides together.
- Sew or glue the bottom piece to the sides for extra strength.
Now, sew the front and back pieces together along the sides and bottom. Insert the ends of the strap between the rectangles and pin them. Stitch everything securely. You can cut fringes at the bottom for a fun look or add beads and ribbons for decoration.
Callout: Don’t rush! Take your time with each step. A neat finish makes your felt bag look professional.
No-Sew Felt Bag
If you want to skip sewing, you can still make a sturdy felt bag. This tutorial uses glue and simple folding.
- Cut five pieces of felt: two pieces 9″ x 11″ for the front and back, two pieces 4.5″ x 11″ for the sides, and one piece 4.5″ x 9″ for the bottom.
- Cut zigzag shapes across the top edges for style.
- Fold each piece to create crisp edges.
- Add a logo or design to the front using iron-on vinyl or paint.
- Cut a small half-circle at the top of the front piece for handles.
- Use fabric glue to attach the sides to the back, then glue on the front and bottom.
- Press the glued seams until they set.
You can add pop-rivets, D-rings, or a toggle closure for extra strength and style. If you want, punch holes and use spring clips for handles. This method is quick and perfect for beginners.
Tip: Always let the glue dry completely before using your bag. This keeps everything secure.
Wet Felting Method
Want to try something different? Wet felting creates a dense, sturdy material for your bag. Here’s how to make felt bags using this creative technique:
- Lay out wool fibers in layers, crisscrossing them for strength.
- Sprinkle warm water and a little soap over the fibers.
- Rub and roll the fibers together. The heat and soap open up the fibers, and your hands help them lock together.
- Shock the wool with cold water. This helps the fibers shrink and crimp, making the felt thicker.
- Keep rolling and agitating until the felt feels dense and smooth.
- Rinse out the soap and let the felt dry flat.
- Cut your felt into bag shapes and assemble using sewing or glue.
Wet felting is simple and lets you create unique, personalized bags. The finished felt is strong and smooth, perfect for a felt bag that stands out.
Callout: Wet felting takes some effort, but the results are worth it. You can make bags, rugs, or even hats with this method.
Common Mistakes to Avoid
- Don’t use cheap felt. It can fray and fade quickly.
- Always test your stitches on scrap felt before sewing your bag.
- Use the right needle for felt. The wrong one can break or skip stitches.
- Start with simple patterns. Complicated designs can be frustrating.
- Reinforce seams, especially at the handles and bottom.
- Take breaks. Tired hands make mistakes.
Note: Keep notes on what works for you. Every felt bag you make teaches you something new.
This tutorial covers how to make felt bags in several ways. You can sew, glue, or use wet felting. Try each method and see which one you like best. Making a felt bag is fun, creative, and easy to customize. Now you know how to make felt bags from start to finish!
Customize Felt Bag
Add Decorations
You can turn a simple felt bag into something special with a few decorations. Try adding colorful felt shapes, like stars or hearts, to the front. Use fabric glue or sew them on for a secure hold. You might want to stitch on some beads or buttons for extra sparkle. If you like drawing, grab some fabric markers and doodle your favorite designs right onto the felt.
Want to make your tote bag stand out? Try these ideas:
- Sew on patches or badges for a playful look.
- Attach a tassel or pom-pom to the handle.
- Use embroidery thread to create patterns or your initials.
Tip: Lay out your decorations before attaching them. This helps you see what looks best and keeps your design balanced.
Personalize with Logo
Adding a logo or name makes your bag truly yours. You have several ways to do this, and each one gives a different look and feel. Here’s a quick guide to help you choose the best method:
| Method | Description |
|---|---|
| Screen Printing | Push ink through a mesh screen to create a bold design. |
| Embroidery | Stitch your logo directly onto the felt for a classic, durable finish. |
| DTG Printing | Print detailed designs right onto the fabric with special printers. |
| Heat Transfer | Print your design on special paper, then use heat to stick it to the felt. |
If you want a long-lasting logo, embroidery works well. For colorful or detailed images, DTG printing or heat transfer might be your best bet. You can even mix methods for a unique look.
Note: Always test your logo method on a scrap piece of felt first. This helps you avoid mistakes on your finished bag.
Choose Closures
Closures keep your things safe inside your bag. You have a few options, and each one offers a different level of security. Check out this table to see which closure fits your needs:
| Closure Type | Security Level | Typical Use |
|---|---|---|
| Zipper | High | Everyday use |
| Magnetic Snap | Medium | Quick access bags |
| Hook and Eye | Low to Medium | Handmade bags |
A zipper gives you the most security, so it’s great for school or travel. Magnetic snaps work well if you want to open and close your bag quickly. Hook and eye closures add a handmade touch and suit smaller bags.
Callout: Pick a closure that matches how you plan to use your bag. If you carry valuables, a zipper is your best friend.
Customizing your felt bag lets you show off your style and creativity. Try different decorations, logos, and closures until you find the perfect combination!
Felted Wool Bag
Upcycled Sweater Method
You can turn an old wool sweater into a stylish felted wool bag with just a few steps. This method gives your project a unique look and helps the planet by reusing materials. Here’s why many crafters love using upcycled sweaters:
- Felted wool is sturdy and lasts a long time.
- You can shape it easily, and it keeps its form.
- The texture feels soft and looks appealing.
- Using second-hand sweaters is eco-friendly and reduces waste.
Ready to make your own? Follow these steps:
- Pick a 100% wool sweater. Check the label to make sure it’s not blended with other fibers.
- Wash the sweater in your machine on the hottest setting. Add a small squirt of dish soap.
- Dry the sweater on high heat. This shrinks the fibers and turns the knit into felt.
- Check the fabric. If you can’t see the knit stitches and it doesn’t fray when cut, it’s ready.
- Cut the felted sweater into the shapes you want for your bag.
Tip: If you want more control, you can felt the sweater by hand. Use hot water, a washboard, or bubble wrap, and rub the fabric until it thickens.
This process gives you a thick, durable material that’s perfect for a felted wool bag. You can use the sleeves for handles or add pockets from leftover pieces.
Care Tips
A felted wool bag can last for years if you treat it well. Here are some easy ways to keep your bag looking fresh:
- Use a lint roller or soft brush to remove dust and lint.
- Spot clean with a damp cloth and mild soap. Wet the spot, massage gently, and blot with a paper towel.
- Let mud dry before cleaning. Lightly vacuum the felt after it dries.
- For spills, blot right away. Avoid twisting or wringing the fabric.
- Give your bag a sunbath for 15 minutes before storing.
- Store your bag stuffed with tissue paper or a soft cloth to help it keep its shape.
- Place it in an airtight container with silica gel to keep moisture away.
Callout: Steaming can help remove wrinkles and bring back the bag’s shape. For intricate designs, consider dry cleaning.
With these tips, your felted wool bag will stay beautiful and strong, ready for everyday use or special outings.
Troubleshooting
Common Mistakes
You might run into a few bumps when making your felt bag, but don’t worry—everyone does! Here are some common mistakes beginners make and how you can avoid them:
- Skipping the Pattern Prep: Always read through your pattern before you start cutting. This helps you spot any tricky steps ahead of time.
- Choosing the Wrong Fabric: Felt works well, but if you ever switch to other fabrics, start with cotton or canvas. These are easier to sew than slippery or heavy materials.
- Using the Wrong Needle Size: Thick felt needs a sturdy needle. Try a 90/14 or 100/16 needle to prevent breakage.
- Skipping Interfacing and Stabilizer: If you want your bag to hold its shape, add interfacing or stabilizer.
- Ignoring Seam Allowances: Follow the pattern’s seam allowance for neat edges and a good fit.
- Not Changing Your Needle Regularly: Change your needle every 6-8 hours of sewing. A dull needle can cause problems.
- Rushing the Cutting Process: Take your time and use a rotary cutter for straight, clean lines.
- Skipping Basting or Clipping: Secure your felt pieces with pins or clips before sewing. This keeps everything lined up.
- Not Testing Stitch Length: Try out your stitch length on a scrap piece first. This helps you avoid surprises.
- Neglecting Finishing Details: Press your seams and finish raw edges. Your bag will look polished and last longer.
Tip: Slow down and double-check each step. You’ll save time and avoid frustration later!
Fixing Issues
Sometimes things don’t go as planned. Maybe you find a hole in your felt or your seams look messy. Here are some ways you can fix common problems:
- If you spot a hole, try weaving yarn across it like a spider web. Then re-felt the area to add strength and texture.
- Use a fine felting needle and poke gently at an angle to shrink small holes.
- Tease the edges of a hole with a small awl. This helps reposition the fibers and close gaps.
- If your felt looks stretched, set it aside for a few days. Wool often relaxes and fixes itself.
- For seams that don’t line up, unpick the stitches and try again. Secure the layers with clips before sewing.
Callout: Don’t toss your project if you make a mistake. Felt is forgiving, and you can often repair or reshape it!
Safety Tips
Crafting is fun, but you need to stay safe. Here are some simple tips to keep you and your workspace accident-free:
- Store your felting needles in a secure container. Keep them away from kids and pets.
- When needle felting, keep your free hand away from the needle. Use tools like a Felting Claw to hold pieces down.
- Always work on a felting mat or foam block. This protects your hands and keeps your project steady.
- Supervise children closely if they want to help with needle felting.
- For wet felting, work on a waterproof surface or outside. Wear shoes with good grip and keep towels nearby for spills.
- Set up your workspace at a comfortable height. This helps you avoid back strain.
- Wear finger guards or thimbles to protect your fingers from pricks.
- Keep your workspace tidy. A clutter-free area helps prevent accidents.
- Take regular breaks. This keeps your eyes and hands from getting tired.
Note: Safety first! A little care goes a long way and makes crafting more enjoyable.
Conclusion
You have learned that making a felt bag is simple and fun. Try using different shapes, colors, and decorations to make your own style. If you want a special design or need help with a big project, INITI Bag can help. we offer many choices for you:
| Customizable Area | Options |
|---|---|
| Size & Shape | Standard grocery bag, cube tote, wine bag, XL tote |
| Colors | Full color range plus Pantone matching |
| Handle Material | Felt, cotton webbing, nylon, or PU leather |
| Logo Application | Silk screen, heat transfer, embroidery, woven tag |
| Interior Options | With or without lining, divider, or pocket |
| Packaging | Flat-pack, custom belly band, branded box, or polybag |
Reach out to us to discuss designs, request samples, and get a fast quote.
FAQ
How do you clean a felt bag?
Use a damp cloth and mild soap. Gently blot stains. Let your bag air dry. Avoid soaking or wringing the felt. For tough spots, try a lint roller.
Can you wash felt bags in the washing machine?
No, you shouldn’t wash felt bags in the machine. Hand wash gently if needed. Machine washing can shrink or damage the felt.
What’s the best felt thickness for bags?
Choose felt that’s at least 3mm thick. Thicker felt gives your bag more structure and durability. Thin felt may sag or tear.
Can you make felt bags without sewing?
Yes! You can use fabric glue or hot glue. Fold and press the seams until they set. No-sew methods work well for beginners.
How do you attach handles to a felt bag?
Sew or glue the handles to the top edges. For extra strength, reinforce the area with another felt strip. Make sure the handles feel secure before using your bag.
Is felt waterproof?
Felt resists water but isn’t fully waterproof. Light rain won’t hurt your bag. Heavy soaking can damage the fibers. You can spray a fabric protector for extra safety.
Can you decorate felt bags with paint?
Yes, you can use fabric paint or markers. Let the paint dry completely before using your bag. Test your design on a scrap piece first.