You can fix your favorite drawstring bag in just a few minutes. You do not need fancy tools or sewing skills. If you ever wondered how to fix a drawstring bag, you will find it simple. Sometimes, you might want to make a drawstring bag last longer or look new again. With a few easy tricks, you can bring your bag back to life.
Key Takeaways
- You can fix a drawstring bag fast. You do not need special skills or tools. Simple repairs can help you keep your favorite bag.
- Fixing your bag saves money and helps the planet. It cuts down on waste and protects the environment.
- Get basic tools like tape, scissors, and a safety pin first. Having these ready makes fixing your bag easier.
- Look at your bag closely to find weak spots or damage. Finding problems early can stop bigger ones later.
- Tie strong knots and use cord stops to hold your drawstring. This stops it from slipping and makes your bag easier to use.
- Pick the right string for your bag’s use. Different strings have different strengths and looks.
- Take care of your bag by cleaning it and checking for damage. This helps your bag last longer and stay nice.
- If you find problems, quick fixes can help right away. Fix things like fraying or slipping strings as soon as you see them.
Quick Start
Overview
You probably use your drawstring backpack for everything—gym, school, or quick trips. When the string breaks or the bag stops closing, it can feel like a big problem. The good news? You can fix most issues with your drawstring backpack in just a few steps. You do not need special skills or expensive tools. You just need a little patience and the right method.
Most people face the same problems with their drawstring backpack. Here are the most common reasons you might need to repair yours:
- The drawstring breaks, so you cannot close your bag.
- The drawstring gets loose, and your stuff falls out.
- The drawstring disappears inside the casing, making the bag unusable.
You do not have to throw away your favorite drawstring backpack when these things happen. You can repair it and make it as good as new. Many people find that fixing a drawstring backpack is faster and easier than they expected.
Tip: Keep a spare string or cord at home. You never know when you might need to repair your drawstring backpack in a hurry!
When to Repair or Replace
You might wonder if you should repair your drawstring backpack or just buy a new one. Let’s look at the benefits of repair versus replacement.
- Repairing your drawstring backpack saves money. Buying a new bag costs more.
- When you repair your bag, you help the planet. Making new bags uses energy and creates pollution.
- Repairing uses less energy—up to 50 times less than recycling.
- Fixing your drawstring backpack helps protect nature. It stops the need for new materials and prevents habitat loss.
Most of the time, you can repair your drawstring backpack and keep using it for a long time. Only replace your bag if the fabric is torn beyond repair or if the casing is completely worn out. If you can fix the string or patch a small hole, choose repair. You will save money and help the environment at the same time.
Note: If your drawstring backpack has sentimental value, repair gives you a chance to keep those memories alive.
Tools and Materials
Before you start fixing your drawstring bag, you need to gather the right tools and materials. Having everything ready makes the repair process smoother and faster. You probably already have most of these items at home.
Essentials
You cannot fix a drawstring bag without some basic tools. Each one helps you handle the fabric, thread, or string with ease. Here’s what you need:
- Tape: Use tape to secure the end of the string. This keeps the fabric from fraying and makes threading easier.
- Paper clip or safety pin: Attach one to the end of your string. This helps you guide the string through the fabric casing without getting stuck.
- Pliers: Sometimes, the string or safety pin gets stuck inside the fabric. Pliers help you pull it out without tearing the fabric.
- Scissors: You need sharp scissors to cut the fabric or trim the replacement drawstring cord to the right length.
- Replacement string: If your old string is broken or missing, grab a new one. You can use a replacement drawstring cord, a shoelace, or even a strip of fabric.
- Cord stops or beads: These keep the string from slipping back into the fabric casing. They also make your bag look neat.
- Pen and ruler: Use a pen to mark where you need to cut or sew on the fabric. A ruler helps you measure strips of fabric for repairs.
- Sewing pins: Hold pieces of fabric in place while you sew.
- Thimble: Protect your fingers when pushing a needle through thick fabric.
- Thread and sewing needle: Stitch up holes or sew new casing for the string. Thread and a needle are must-haves for any fabric repair.
Tip: Always check the fabric for weak spots before you start. This helps you avoid more damage during the repair.
Optional Extras
Some tools are not required, but they make the job easier or help your bag last longer. If you want a stronger repair or a more professional look, try these extras:
- Heavy-duty needle and strong thread for thick fabric.
- Extra fabric patches or scrap material like canvas, leather, or nylon. These work well for patching holes or reinforcing weak spots.
- Measuring tape for more accurate fabric cuts.
- Fabric glue or iron-on patches for quick fixes when you do not want to sew.
- Bodkin (a special threading tool) if you have one. It slides through the fabric casing easily.
- Extra beads or decorative cord stops to add style and keep the string in place.
You can follow these steps to repair a torn casing:
- Draw two strips of 3.5″ x 0.5″ pieces of fabric.
- Cut the strips with scissors.
- Align the strips back to back and pin them.
- Sew along the long edge using a straight stitch.
- Use the whipstitch technique to sew the ends together.
- Insert the sewn ends into the ripped hole and sew it to the bag.
If you need to sew a new casing, start sewing a straight line from one side to the other. Add a lock stitch at the beginning and end. Cut the loose thread for a neat finish.
Note: Using the right tools helps you avoid damaging the fabric and makes your repair last longer.
How to Fix a Drawstring Bag
You want to know how to fix a drawstring bag and make it last. Start by checking every part of your bag. This way, you can spot problems early and avoid bigger issues later. Let’s walk through each step together.
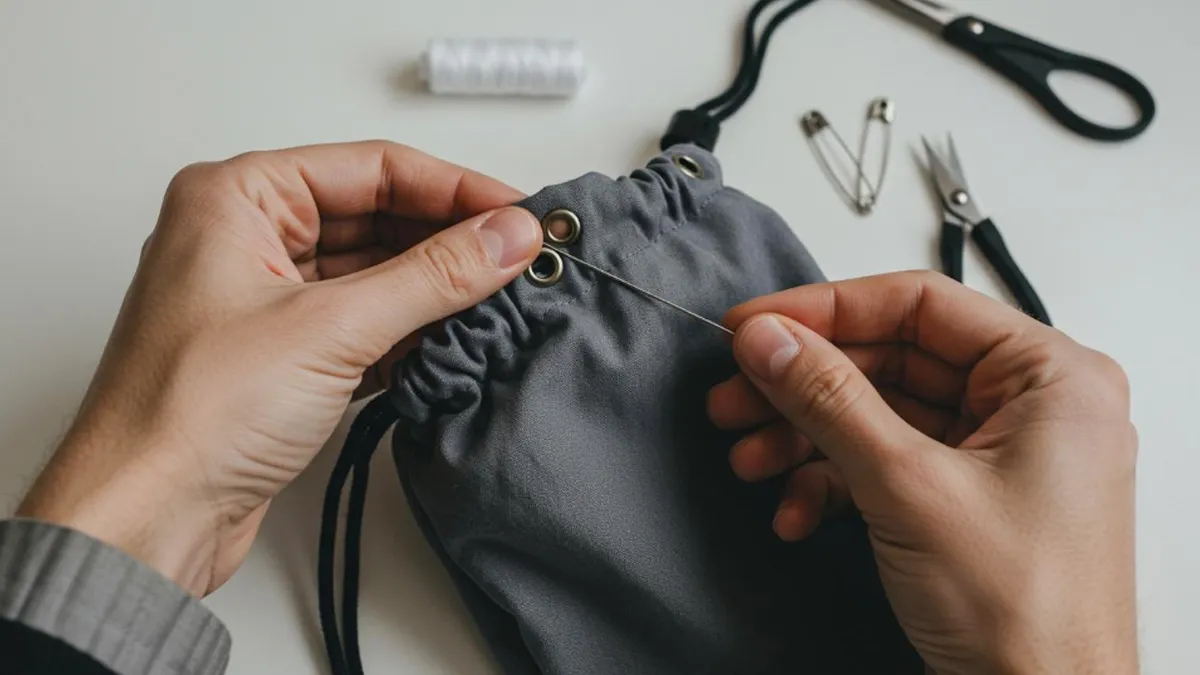
Inspect the Bag
Before you begin any repair, take a close look at your bag. This helps you decide what needs fixing and what tools you’ll need.
Check Casing
The casing is the tunnel where the string runs. Hold your bag up to the light and look for thin spots, holes, or frayed fabric. Gently press along the casing with your fingers. If you feel weak areas or see any patching fabric tears, mark them with a pen. Most casing damage comes from overfilling or carrying heavy items. Try not to stuff your bag too full in the future.
Tip: If you see dirt or grime, clean the fabric first. Dirt can weaken the casing and make repairs harder.
Assess String
Pull the string out a little. Check for knots, fraying, or spots where the string feels thin. If the string is missing, broken, or too short, you’ll need a replacement. Sometimes, the string slips inside the casing. Use pliers to gently pull it back out. If the string feels rough or looks worn, plan to cut a new one.
Repair Casing
If you find holes or weak spots in the casing, you need to repair them before threading a new string. This step keeps your bag strong and stops the string from getting stuck.
Patch Holes
For small holes or patching fabric tears, use a fabric patch or a scrap of sturdy material. Cut a patch that covers the hole with extra space around the edges. Place the patch on the inside of the casing for a smooth look. Pin it in place, then sew around the edges with a needle and thread. Use small, tight stitches to keep the patch secure.
| Cause of Damage | Prevention Method |
|---|---|
| Overfilling | Avoid overstuffing to maintain space efficiency. |
| Lack of compartments or pouches | Use compartments to keep items organized. |
| Ignoring item size and weight | Be mindful of weight distribution to prevent wear. |
| Forgetting waterproof protection | Organize wet items separately to avoid mess. |
Note: Always match the patch color and fabric type to your bag for a neat finish.
Sew New Casing
If the casing is too damaged for patching fabric tears, sew a new one. Cut a strip of fabric about 1 inch wide and long enough to go around the bag’s opening. Fold the strip in half lengthwise, then pin it along the top edge of the bag. Sew along both edges to create a new tunnel for the string. Use a lock stitch at the start and end for extra strength.
Professional repair services often replace the drawstring and casing to restore both function and appearance. They match materials and colors so your bag looks as good as new.
Cut New String
A strong, new string makes your bag easy to use and keeps it from breaking again. Choose the right type and prepare it carefully.
Measure Length
Lay your bag flat and measure the old string, if you have it. If not, measure the casing and add about 8 inches so you have enough to tie knots. Cut the string with sharp scissors for a clean edge.
Choose Thickness
Pick a string that matches your bag’s use. Here’s a quick guide:
| String Type | Description | Best For |
|---|---|---|
| Cotton Cord | Soft, natural, and comfortable | Everyday use |
| Nylon Cord | Strong, durable, and resists fraying | Heavy-duty bags |
| Paracord | Extremely strong, many colors | Outdoor and rugged use |
| Ribbon | Decorative, easy to tie | Lightweight bags |
| Satin Cord | Smooth, shiny, and elegant | Stylish, sophisticated bags |
If you use paracord, cut it to length, then melt the ends with a candle or lighter. Hold the end near the flame until it melts, then let it cool. This stops the cord from unraveling.
Tip: Always finish the ends of nylon or paracord by melting. For cotton or ribbon, wrap tape around the ends to prevent fraying.
Make Your Repair Durable
You want your fix to last. Use these methods to make your drawstring bag stronger:
| Method | Description | Key Benefits |
|---|---|---|
| Military-Grade Double Loop Lock | Wrap the cord twice before tying the knot, crossing the loops. | Holds longer than regular knots, adds durability. |
| Velcro-Assisted Fastening | Stitch Velcro to the cord end after tying the knot. | Easy to use, reusable, and secure. |
| Heat Shrink Tubing | Slide tubing over the knot and heat it to shrink. | Water-resistant and abrasion-proof. |
Try the water knot for slippery strings. This knot holds tight and does not slip, even with heavy use. Wrap tape around the ends before threading to make the job easier and keep the fabric safe.
Clean your bag often and store it in a dry place. Do not overfill your bag. These habits help prevent damage and keep your repairs strong.
Now you know how to fix a drawstring bag from start to finish. With these steps, you can repair the fabric, patch holes, sew new casing, and cut a strong new string. Your bag will look and work like new!
How to Thread a Drawstring Bag
Find the Opening
First, you need to find where the string goes into the bag. Look along the top edge of your drawstring bag. You will see a small hole or gap in the fabric casing. This is the opening where the string enters and exits. Sometimes, the opening hides under a fold or seam, so run your fingers along the edge until you feel it. If you cannot find the opening, check both ends of the casing. Some bags have two openings, one on each side. Once you spot the opening, you are ready to start threading.
Tip: If the opening looks tight or frayed, trim any loose threads with scissors. This makes it easier to slide the string through and helps prevent snags.
Use Safety Pin or Paper Clip
You might wonder how to thread a drawstring bag without getting frustrated. The easiest way uses a safety pin or a paper clip. These tools help you guide the string through the casing quickly and smoothly.
Here’s a simple step-by-step method:
- Pull the old string out completely, if it is still inside.
- Attach a safety pin to one end of your new string. If you use a paper clip, bend it into a hook shape and clip it onto the string.
- Insert the safety pin or paper clip into the opening of the casing.
- Use your fingers to push the pin or clip through the channel. Gently bunch up the fabric as you go, then pull the pin forward.
- Keep working the pin through the casing until it pops out the other end. The string will follow right behind.
Note: If you want to put string in drawstring bag even faster, use a large safety pin. It slides through the fabric more easily and gives you a better grip.
Guide the String
Now you need to guide the string all the way through the casing. This step can feel tricky, but you can do it with a little patience. Hold the end of the string with the safety pin or paper clip attached. Push the pin forward a little at a time. When the fabric bunches up, pull it back along the string to straighten it out. Keep repeating this motion—push, bunch, pull—until the pin comes out the other side.
To avoid snags or damage, try these tips:
- Use a safety pin that is smooth and not rusty. Sharp or rough pins can catch on the fabric.
- If the casing feels tight, twist the pin gently as you push it through.
- For extra protection, wrap a small piece of tape around the end of the string before attaching the pin. This keeps the string from fraying.
- If you want to prevent fraying inside the casing, finish the edges with a zig-zag stitch or serger before threading. You can also use a dab of fabric glue on the seams to keep them strong.
Pro Tip: If the string gets stuck, do not force it. Pull it back a little, smooth out the fabric, and try again. Slow and steady wins the race when learning how to thread a drawstring bag.
You have now learned how to thread a drawstring bag using simple tools. With these steps, you can fix your bag and get back to using it in no time!
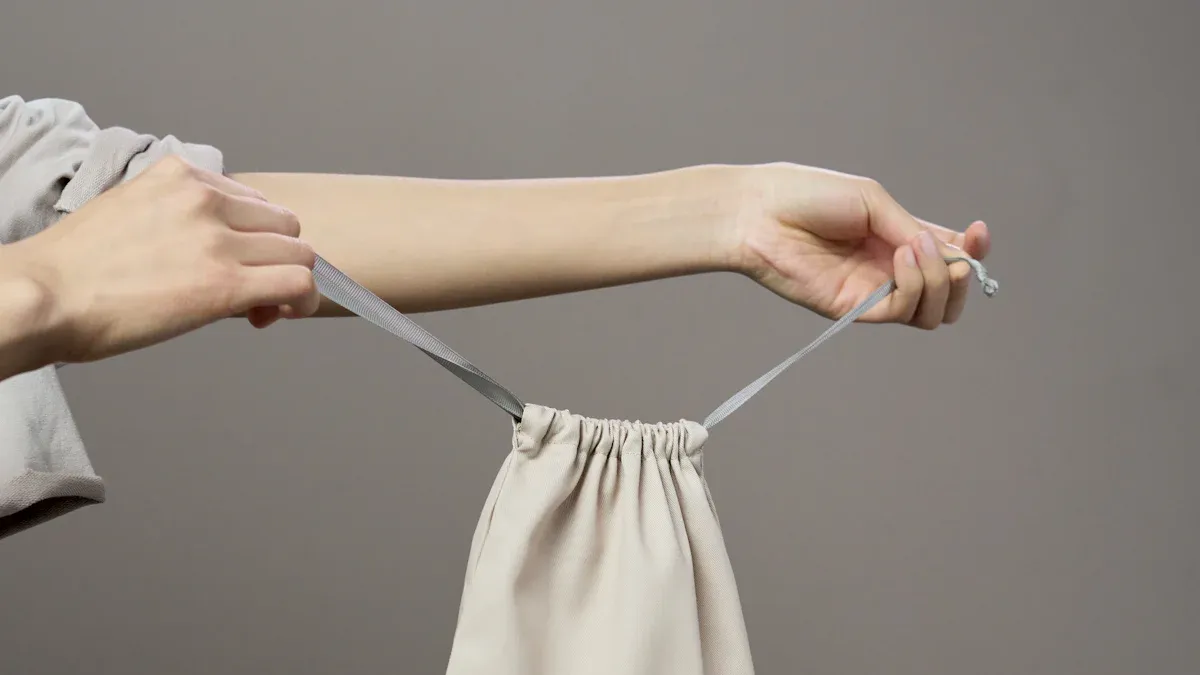
Even Out Strings
You’ve threaded your new string through the casing—great job! Now, you want both sides of the drawstring to be even. Uneven strings can make your bag look lopsided and feel awkward to use. Don’t worry, you can fix this in just a few minutes.
Start by holding the bag flat on a table. Grab both ends of the string and pull them out so they stick out from the casing. Sometimes, one side is much longer than the other. This happens a lot, especially if the string bunched up inside the fabric while you were threading.
Here’s a simple way to get both sides even:
- Hold the bag by the top corners.
- Pull both ends of the string at the same time.
- Slide the fabric casing back and forth along the string. This helps the string move inside and even out.
- Keep adjusting until both ends are the same length.
If you want a super quick method, try using a straw and a stapler. This trick works well if you have trouble keeping the string from slipping while you thread:
- Gather your supplies: a loose drawstring, a straw, and a stapler.
- Thread the drawstring through the straw.
- Staple the end of the straw to the drawstring. This keeps the string from sliding out.
- Push the straw through the casing and pull it out the other side. The string will follow, and both ends will come out even.
Tip: If you don’t have a straw, you can use a pen casing or a chopstick. Just make sure it’s smooth so it doesn’t snag the fabric.
Sometimes, after threading, you notice the ends are still a little uneven. That’s okay! Just pull the shorter end gently while holding the longer end steady. The string will slide inside the casing and even out. If the string feels stuck, bunch up the fabric and work it back and forth. This loosens the string and helps you adjust the length.
You can also use a ruler to measure both ends. If you want them exactly the same, line up the ends and trim any extra with scissors. Wrap a bit of tape around the cut ends to stop fraying.
Note: Even strings make your bag easier to open and close. They also help your knots stay tight and look neat.
If you ever find the strings uneven after using your bag, just repeat these steps. It only takes a minute, and your drawstring bag will look and work its best every time.
Secure and Finish
Knot Ends
You have your new string threaded through the bag. Now, you need to secure the ends so they do not slip back into the casing or fray. The right knot makes a big difference. Some knots hold better and last longer than others. Here is a quick guide to the most secure knots for drawstring bags:
| Knot Type | Description |
|---|---|
| Figure Eight | A strong and reliable stopper knot. Easy for beginners. Marks the end well. |
| Half Hitch | Attaches the string to a fixed point. Use with other knots for stability. |
| Back Splice | Tucks the ends of twisted nylon back into the rope. Stops fraying. |
| Short Splice | Joins two pieces of rope. Great for repairs or adding length. |
| Eye Splice | Makes a loop at the end of the string. Useful for securing drawstrings. |
For most bags, the figure eight knot works best. It is simple and strong. Just make a loop, pass the end around, and pull it through. If you use nylon or paracord, try a back splice to keep the ends neat. Always pull the knot tight and check that it does not slip.
Tip: If you want extra security, tie two knots on top of each other. This helps keep the string from slipping out.
Add Cord Stops or Beads
Cord stops and beads do more than just look nice. They help your bag work better and last longer. Here is why you should add them:
- Plastic cord locks keep your drawstring in place. You can open and close your bag without tying knots every time.
- Cord stops let you adjust the string easily. Just press and slide to tighten or loosen.
- These small tools protect your string from wear and tear. Your bag will last longer.
- Beads add style and keep the ends from slipping back into the casing.
To add a cord stop, pinch the lock open, slide both ends of the string through, and release. For beads, thread the string through the hole and tie a knot underneath to hold it in place.
Note: Choose cord stops or beads that match your bag’s color and size. This gives your bag a neat, finished look.
Adjust for Fit
A drawstring bag feels best when it fits you just right. You can adjust the straps and opening for comfort and style. Follow these steps to get the perfect fit:
- Loosen both strings all the way. This opens the bag and makes the straps longer.
- Put the bag on your back. Let the straps rest on your shoulders.
- Pull one string at a time. Tighten each side until the bag feels snug but not too tight.
- Shift the bag so it sits between your shoulder blades. This helps balance the weight.
- Tie off any extra string. You can use a simple knot or tuck the ends inside the bag.
Watch out for these common mistakes:
- Over-tightening the straps. This can hurt your shoulders and make the bag hard to use.
- Uneven drawstrings. If one side is tighter, the bag will feel lopsided.
- Loose strings. These can get caught on things or dangle in your way.
You can also adjust the fit for different uses:
- For work, keep the bag high on your back.
- For the gym, leave the straps a bit loose for quick changes.
- For travel, let the bag sit at mid-back for comfort.
Pro Tip: Check your fit every time you use the bag. A quick adjustment keeps you comfortable and your bag secure.
Repair Tips
Troubleshooting
Drawstring bags are handy, but sometimes you run into small problems. Let’s look at the most common issues and how you can fix them with simple repair techniques.
Slipping String
Does your drawstring keep slipping out or loosening? You are not alone. Many people think pulling the strings tight is enough, but that does not always work. Here are some easy ways to stop string slippage:
- Classic Double Knot: Tie a basic knot, then add a second knot on top. This holds the string in place and keeps your bag secure.
- Sliding Lock Technique: Use a cord lock or stopper. Slide it onto both ends of the string and press to lock. This keeps the string tight while you use your bag.
- Bow Knot for Easy Access: Tie a bow knot if you want to open and close your bag quickly.
- Figure-Eight Knot for Extra Security: This knot spreads out the pressure and acts as a strong stopper.
Using bulky or complicated knots without knowing the basics can cause frustration and damage to the bag’s fabric. The key is balancing ease of access, tightness, and durability.
You can also try the water knot if your string is slippery. This knot holds tight and does not come undone easily.
Tight Casing
Sometimes, the casing (the tunnel for your string) feels too tight. This makes threading hard and can even damage your string. Here’s what you can do:
- Use a safety pin or a paper clip to guide the string through. If it gets stuck, gently bunch up the fabric and pull the pin forward.
- If the casing is very narrow, try using a thin string or a bodkin (a special threading tool).
- Trim any loose threads inside the casing. This gives your string more room to move.
- If the casing is damaged, patch it or sew a new one using the repair techniques you learned earlier.
Fraying
A frayed drawstring can make your bag look messy and hard to use. You do not have to replace the whole bag. Here are some quick fixes:
| Common Issue | Recommended Solution |
|---|---|
| Frayed Drawstrings | Use a lighter to seal the frayed end, apply clear nail polish, or replace the drawstring if necessary. |
| Holes in the Fabric | Patch with matching fabric, use fabric glue, or sew a patch depending on the material. |
| Broken Seams | Hand sew or use a sewing machine to repair the seam, reinforcing as needed. |
If you have a frayed drawstring made of nylon or paracord, carefully melt the end with a lighter. For cotton, wrap a bit of tape around the end or dab on clear nail polish. If the damage is too much, just swap in a new string.
Maintenance
You want your repairs to last. Good habits help your bag stay strong and look great. Here are some simple tips:
- Regularly clean your drawstring bag to remove dirt and odors.
- Check for signs of wear and tear, especially on strings and seams.
- Reinforce weak seams to prevent further damage.
- Store your bag properly by hanging it or laying it flat to maintain its shape.
If you spot a frayed drawstring or a weak seam, fix it right away. Quick repairs stop small problems from turning into big ones. Try out different repair techniques as soon as you notice any issues. This way, your bag will last much longer and always be ready for your next adventure.
Choosing String
Types
Picking the right string for your drawstring backpack makes a big difference. You want something that feels good, lasts long, and matches your style. There are several materials you can choose from, and each one has its own strengths and weaknesses. Here’s a quick look at the most common options:
| Material | Advantages | Disadvantages |
|---|---|---|
| Cotton | Biodegradable, strong, long-lasting, eco-friendly. | Can be less water-resistant. |
| Nylon | Resilient, tear-resistant, lightweight, water-resistant. | Can be more expensive. |
| Polyester | Durable, lightweight, quick-drying, resists wear and tear. | Less eco-friendly than natural fibers. |
| Canvas | Heavy-duty, eco-friendly, strong, and durable. | Can be heavier than other materials. |
Cotton strings feel soft and natural. Nylon works well if you want something tough and water-resistant. Polyester dries fast and handles rough use. Canvas gives your drawstring backpack a sturdy, classic look, but it might feel heavier.
Tip: If you use your drawstring backpack outdoors or in wet weather, nylon or polyester will keep your bag looking new longer.
Match to Use
You want your drawstring backpack to fit your needs. The type of string you choose should match how you use your bag. Here are some things to think about:
- Understand your purpose. If you use your drawstring backpack for sports or the gym, pick a string that can handle sweat and movement.
- Material affects the user experience. Cotton feels soft and works for everyday use. Nylon and polyester are better for hiking, swimming, or rainy days. Canvas fits heavy-duty jobs, like carrying books or gear.
- If you want a stylish look, try satin or ribbon strings. These add a pop of color and make your drawstring backpack stand out.
- For kids, choose a string that is easy to grip and tie. Thicker cords are easier for small hands.
You can always swap out the string if your needs change. Try different materials until you find the one that feels right for your drawstring backpack.
Note: If you carry heavy items, double-check that your string is strong enough. Weak cords can snap and ruin your bag.
Where to Buy
Finding the perfect string for your drawstring backpack is easy. You can shop at local craft stores, big box retailers, or online shops. Many stores sell replacement cords in different colors and thicknesses. You can also buy bulk packs if you want to fix more than one bag.
Check out these places:
- Craft stores like Michaels or Joann Fabrics. You’ll find cotton, nylon, and polyester cords in many colors.
- Outdoor stores such as REI or Dick’s Sporting Goods. These shops carry strong, weather-resistant strings for drawstring backpacks.
- Online marketplaces like Amazon or Etsy. You can search for custom lengths, colors, and even decorative beads.
- Hardware stores. Sometimes, you’ll find sturdy cords or ropes that work well for heavy-duty drawstring backpacks.
If you want a truly unique drawstring backpack, consider working with a professional manufacturer. We offer custom design services, OEM, and ODM options. You can pick your favorite string, color, and style. Your drawstring backpack will fit your needs perfectly and stand out from the crowd.
Ready to upgrade your drawstring backpack? Reach out to us for custom solutions and expert advice. We’re here to help you create the perfect bag!
Conclusion
You can fix almost any bag with these easy steps. When you make a drawstring bag last longer, you help the planet in many ways:
- You keep waste out of landfills.
- You use fewer new products.
- You save energy and resources.
Trying a drawstring bag diy project feels rewarding. You get to make a drawstring bag look new again. If you have questions or want a custom bag, reach out! I offer expert help, customization, OEM, and ODM services.
FAQ
How do I stop my drawstring from fraying?
Wrap a small piece of tape around each end. For nylon or polyester cords, you can melt the tips with a lighter. This keeps the string neat and strong.
Can I use any type of string for my bag?
You can use many types, like cotton, nylon, or paracord. Just make sure the string fits the casing and feels comfortable in your hands.
What if my drawstring keeps slipping inside the bag?
Add a knot or a bead at each end. You can also use a cord stop. These tricks keep the string from sliding back into the casing.
How do I fix a hole in the fabric casing?
Cut a small patch from sturdy fabric. Place it over the hole and sew it down with tight stitches. You can use fabric glue if you do not want to sew.
Is it okay to wash my drawstring bag after repairs?
Yes, you can wash it. Use cold water and gentle soap. Let the bag air dry. Check your repairs after washing to make sure everything stays strong.
Can I make my own drawstring bag at home?
Yes! You just need fabric, a string, scissors, and a needle with thread. Cut the fabric, sew the sides, make a casing, and thread the string through.
Where can I find replacement cords or beads?
You can find them at craft stores, hardware stores, or online. Look for cords in the sewing section and beads near jewelry supplies.
What should I do if my bag’s string feels too short?
Replace it with a longer cord. Measure your bag’s opening and add extra length for tying knots. Cut the new string and thread it through the casing.